Picture this: the kitchen is a battlefield after a midnight campfire session, the air thick with the scent of toasted marshmallows and the echo of laughter. I was staring at the charred remains of a s'more that had turned into a sticky, burnt mess, and I thought, “I could do better.” So I grabbed a bowl, a whisk, and a handful of my favorite ingredients, and I set out to create a dessert that feels like a campfire hug but can be made anytime, anywhere. The result is a silky, gooey ice box cake that melts in your mouth like a sweet dream. If you think you’ve tried every s'more variation, I dare you to taste this and not go back for seconds.
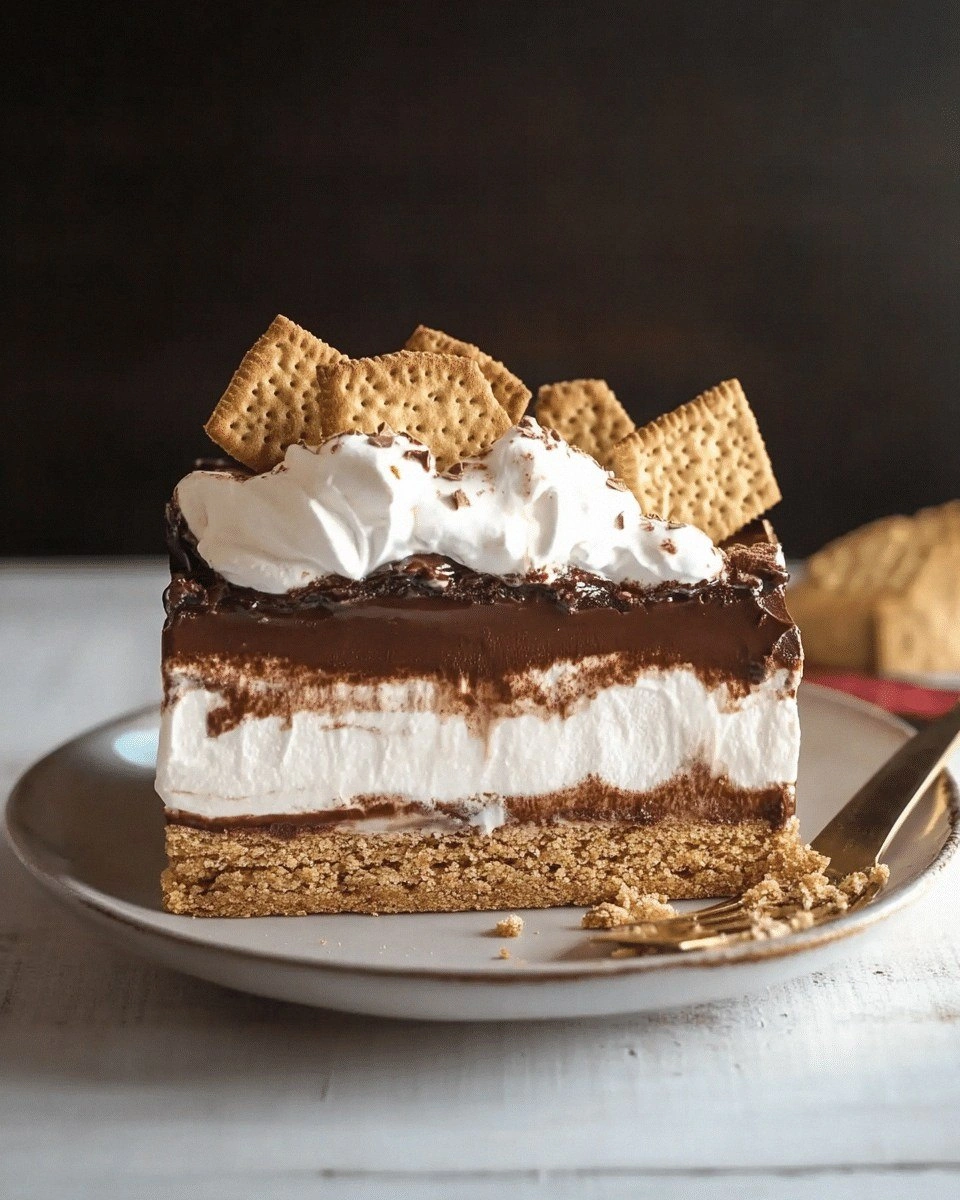
The first thing that strikes you is the contrast of textures: the crisp, buttery graham cracker base gives a satisfying crunch that snaps like a brittle twig, while the marshmallow fluff swirls across the surface like a cloud of sugar. The chocolate pudding mix infuses the batter with a deep, velvety richness that coats your tongue, leaving a lingering cocoa aftertaste. The heavy whipping cream lifts the whole thing into a cloud‑like, airy consistency that feels almost like a dessert soufflé, but without the fuss. The subtle hint of vanilla in the pudding mix brings a floral note that balances the sweetness, and the optional chocolate chips add a delightful pop of crunch that mirrors the crunch of a freshly toasted marshmallow. Every bite feels like a campfire memory, but it’s all served in a chilled, elegant dessert that’s ready in minutes.
What makes this version stand out is that it eliminates the need for a fire or a grill entirely. No more smoldering coals, no more risk of a kitchen fire. Instead, the magic happens in the fridge, where the ingredients mingle, marry, and set into a perfect, slice‑able cake. The method is simple enough that even a novice can pull it off, yet the result is sophisticated enough to impress your guests at a dinner party or a family gathering. I’ll be honest—when I first tried this, I ate half the batch before anyone else got a chance, and I still can’t stop thinking about that first bite. This is hands down the best version you’ll ever make at home.
There’s a twist that sets this recipe apart: the use of instant chocolate pudding mix instead of a homemade chocolate ganache. The pudding mix gives the cake a consistent, deep chocolate flavor that’s hard to beat, and it also speeds up the process dramatically. Imagine whipping up a dessert that’s as quick as a snack but as decadent as a fine dining entrée. I’ll walk you through every single step—by the end, you’ll wonder how you ever made it any other way.
What Makes This Version Stand Out
- Texture: The combination of graham cracker crumbs and marshmallow fluff creates a layered crunch and melt that’s impossible to resist. Each bite offers a satisfying snap followed by a silky, airy center.
- Flavor: Instant chocolate pudding mix delivers a deep cocoa profile that pairs perfectly with the sweet, buttery marshmallow fluff. The result is a balanced, chocolatey experience without any bitterness.
- Ease: No oven, no stove, no complicated steps. Everything you need is in a bowl, and the entire process takes less than 45 minutes from start to finish.
- Versatility: This cake can be served chilled for a refreshing treat or warmed slightly for a comforting, hot dessert. It’s perfect for any season or occasion.
- Make‑ahead: The cake can be assembled and refrigerated for up to 48 hours, making it an ideal prepped dessert for parties or last‑minute gatherings.
- Audience: Kids love the gooey marshmallow center, while adults appreciate the sophisticated chocolate base. It’s a crowd‑pleaser that satisfies all palates.
- Ingredient Quality: Using high‑quality heavy whipping cream and real marshmallow fluff elevates the flavor profile and texture beyond the average store‑bought version.
- Presentation: The final look is a glossy, golden‑brown surface that glistens like a campfire’s glow, making it a showstopper on any dessert plate.
Inside the Ingredient List
The Flavor Base
Instant chocolate pudding mix: This is the backbone of the cake’s chocolate flavor, providing a rich, velvety taste that’s deeper than any powdered cocoa. If you skip it, the dessert loses its chocolate identity and becomes a plain marshmallow treat. A good substitute is a high‑quality chocolate ganache, but it will increase prep time and complexity.
Heavy whipping cream: The cream adds body, richness, and a silky mouthfeel. It also helps the pudding mix emulsify properly, creating a smooth, cohesive batter. If you’re lactose intolerant, try a full‑fat coconut cream for a tropical twist.
The Texture Crew
Graham cracker crumbs: These crumbs form the cake’s base, giving a buttery crunch that contrasts with the soft interior. The crumbs also act as a binder, helping the cake hold together. If you’re looking for a gluten‑free option, use oat‑based cracker crumbs.
Mini marshmallows: The mini marshmallows are sprinkled on top to mimic the classic s'more experience. They melt into the cake, creating pockets of gooey sweetness. You can replace them with marshmallow fluff for a smoother finish, but the texture will be slightly different.
The Unexpected Star
Marshmallow fluff: This airy, sweet component gives the cake its signature marshmallow center. It also lightens the batter, preventing it from becoming too dense. If you can’t find marshmallow fluff, homemade marshmallow fluff made from sugar, corn syrup, and gelatin will work perfectly.
The Final Flourish
Chocolate chips (optional): Sprinkle these over the top before chilling to add a crunchy chocolate layer that melts into the cake, offering a delightful contrast. They also add visual appeal with their glossy sheen. If you’re vegan, use dairy‑free chocolate chips to keep the dessert plant‑based.
Everything’s prepped? Good. Let’s get into the real action.
The Method — Step by Step
- Step 1: Prepare the base. In a medium bowl, combine the graham cracker crumbs with a pinch of salt. Stir until evenly distributed. This step ensures that the crumbs don’t clump together during the assembly.
- Step 2: Whisk the pudding. In a separate bowl, whisk the instant chocolate pudding mix with the heavy whipping cream until the mixture thickens and forms a smooth paste. The mixture should resemble a thick mousse. If it’s too runny, let it sit for a minute to thicken.
- Step 3: Fold in the milk. Add the milk gradually to the pudding mixture while whisking constantly. This creates a silky, pourable batter that will coat the crumbs evenly. The batter should have a consistency similar to thick pancake batter.
- Step 4: Incorporate marshmallow fluff. Gently fold the marshmallow fluff into the batter using a spatula. The fluff should be fully integrated, creating a smooth, airy mixture. The batter will now have a light, fluffy texture that’s key to the cake’s mouthfeel.
- Step 5: Layer the base. Press a layer of graham cracker crumbs into the bottom of a 9‑inch springform pan or a shallow dish. Use the back of a spoon to create an even surface. This will serve as the cake’s foundation.
- Step 6: Add the batter. Pour the chocolate‑marshmallow batter over the crumb layer. Tap the pan gently to release any air bubbles and to level the surface. The batter should cover the crumbs completely.
- Step 7: Sprinkle the mini marshmallows. Evenly distribute mini marshmallows across the top of the batter. They will melt into the cake, creating pockets of gooey sweetness. If you prefer a more uniform texture, you can blend the marshmallows into the batter instead.
- Step 8: Optional chocolate chip layer. If you’re using chocolate chips, sprinkle them over the marshmallows. The chips will add a crunchy contrast and a glossy finish once chilled.
- Step 9: Chill the cake. Place the pan in the refrigerator for at least 3 hours, or until the cake has set firmly. The batter will firm up, allowing you to slice it cleanly.
- Step 10: Serve and enjoy. Remove the cake from the pan, slice with a sharp knife, and serve chilled. For a warm twist, microwave a slice for 10–12 seconds before serving.
That’s it — you did it. But hold on, I’ve got a few more tricks that will take this to another level.
Insider Tricks for Flawless Results
The Temperature Rule Nobody Follows
The key to a smooth, airy texture is to keep the batter cold. Chill the mixing bowl and utensils in the fridge for 10 minutes before whisking the pudding mix. This prevents the mixture from becoming too runny and ensures the marshmallow fluff stays light.
Why Your Nose Knows Best
Before you start, sniff the instant chocolate pudding mix. A slightly bitter aroma indicates a high‑quality product. A sweet, syrupy scent may suggest a lower‑grade mix that will taste flat.
The 5-Minute Rest That Changes Everything
After folding in the marshmallow fluff, let the batter rest for 5 minutes at room temperature. This allows the flavors to meld and the mixture to thicken slightly, improving the final texture.
Layering for Visual Appeal
Use a piping bag or a plastic bag with a corner snipped to create concentric circles of crumbs before pouring the batter. This adds a decorative touch that looks like a miniature s'more.
The Mini Marshmallow Trick
If you want a more intense marshmallow flavor, fold a few mini marshmallows into the batter instead of sprinkling them on top. They’ll melt into the cake, creating pockets of gooeyness.
The Final Chill
After chilling, let the cake sit at room temperature for 10 minutes before slicing. This prevents the cake from cracking when you cut through the cold batter.
Creative Twists and Variations
This recipe is a playground. Here are some of my favorite ways to switch things up:
Nutty Crunch
Add chopped toasted almonds or pecans to the graham cracker base. The nutty flavor pairs beautifully with the chocolate, creating a sophisticated twist that will delight your guests.
Spiced S’more
Stir a pinch of cinnamon or nutmeg into the pudding mix before whisking. The warm spices add depth and make the dessert perfect for cooler evenings.
Caramel Swirl
Fold a small amount of caramel sauce into the batter. The caramel will create a subtle swirl when the cake sets, adding visual appeal and a sweet, buttery note.
Minty Delight
Add a few drops of peppermint extract to the batter. The mint will complement the chocolate and give the dessert a refreshing finish.
Vegan Version
Replace heavy whipping cream with full‑fat coconut cream and use a vegan instant chocolate pudding mix. The result is a dairy‑free, plant‑based cake that still delivers on flavor and texture.
Berry Burst
Fold in a handful of fresh blueberries or raspberries after the batter is ready. The berries add a burst of tartness that balances the sweetness of the marshmallows.
Storing and Bringing It Back to Life
Fridge Storage
Store the cake in an airtight container in the refrigerator for up to 48 hours. The cake will stay firm and fresh, and the flavors will continue to develop. When ready to serve, let it sit at room temperature for 10 minutes to soften slightly.
Freezer Friendly
Wrap the cake tightly in plastic wrap and place it in a freezer bag. It can be frozen for up to 2 weeks. When you’re ready, thaw in the refrigerator overnight. For a quick fix, microwave a slice for 10–12 seconds.
Best Reheating Method
To warm a slice, place it on a microwave‑safe plate and heat for 10–12 seconds. Add a tiny splash of water to the plate to create steam; this prevents the cake from drying out and keeps the texture moist. A quick oven bake at 300°F for 5 minutes also works if you prefer a warm, melty experience.