It all started on a rainy Thursday when I tried to make a simple coating for chicken nuggets and ended up with a bowl of lifeless breadcrumbs that tasted like cardboard. I stared at the gray, soggy mess and thought, "There has to be a better way to turn a bland crust into something that sings." The kitchen was filled with the dull hum of the oven, the clatter of pans, and the lingering scent of burnt butter that made me swear off any more experiments—until I decided to go all in. I raided my pantry, dug out a forgotten sack of panko, a wedge of Parmesan that was past its prime, and a cracked pepper grinder, then set to work with the kind of reckless optimism only a hungry cook possesses.
The first whisk of the batter was like a symphony of anticipation: the flour swooshed through the air, butter melted into a glossy sheen, and the herbs whispered promises of green freshness. The aroma hit my nose with a buttery, nutty smack that reminded me of a bakery window on a crisp autumn morning. I could hear the sizzle of the pan as the first spoonful hit the hot surface, a sharp crack that felt like fireworks in a backyard show. My fingertips tingled from the heat, and I could already taste that crunch—like the perfect balance between a light dusting of snow and the firm bite of a freshly toasted baguette.
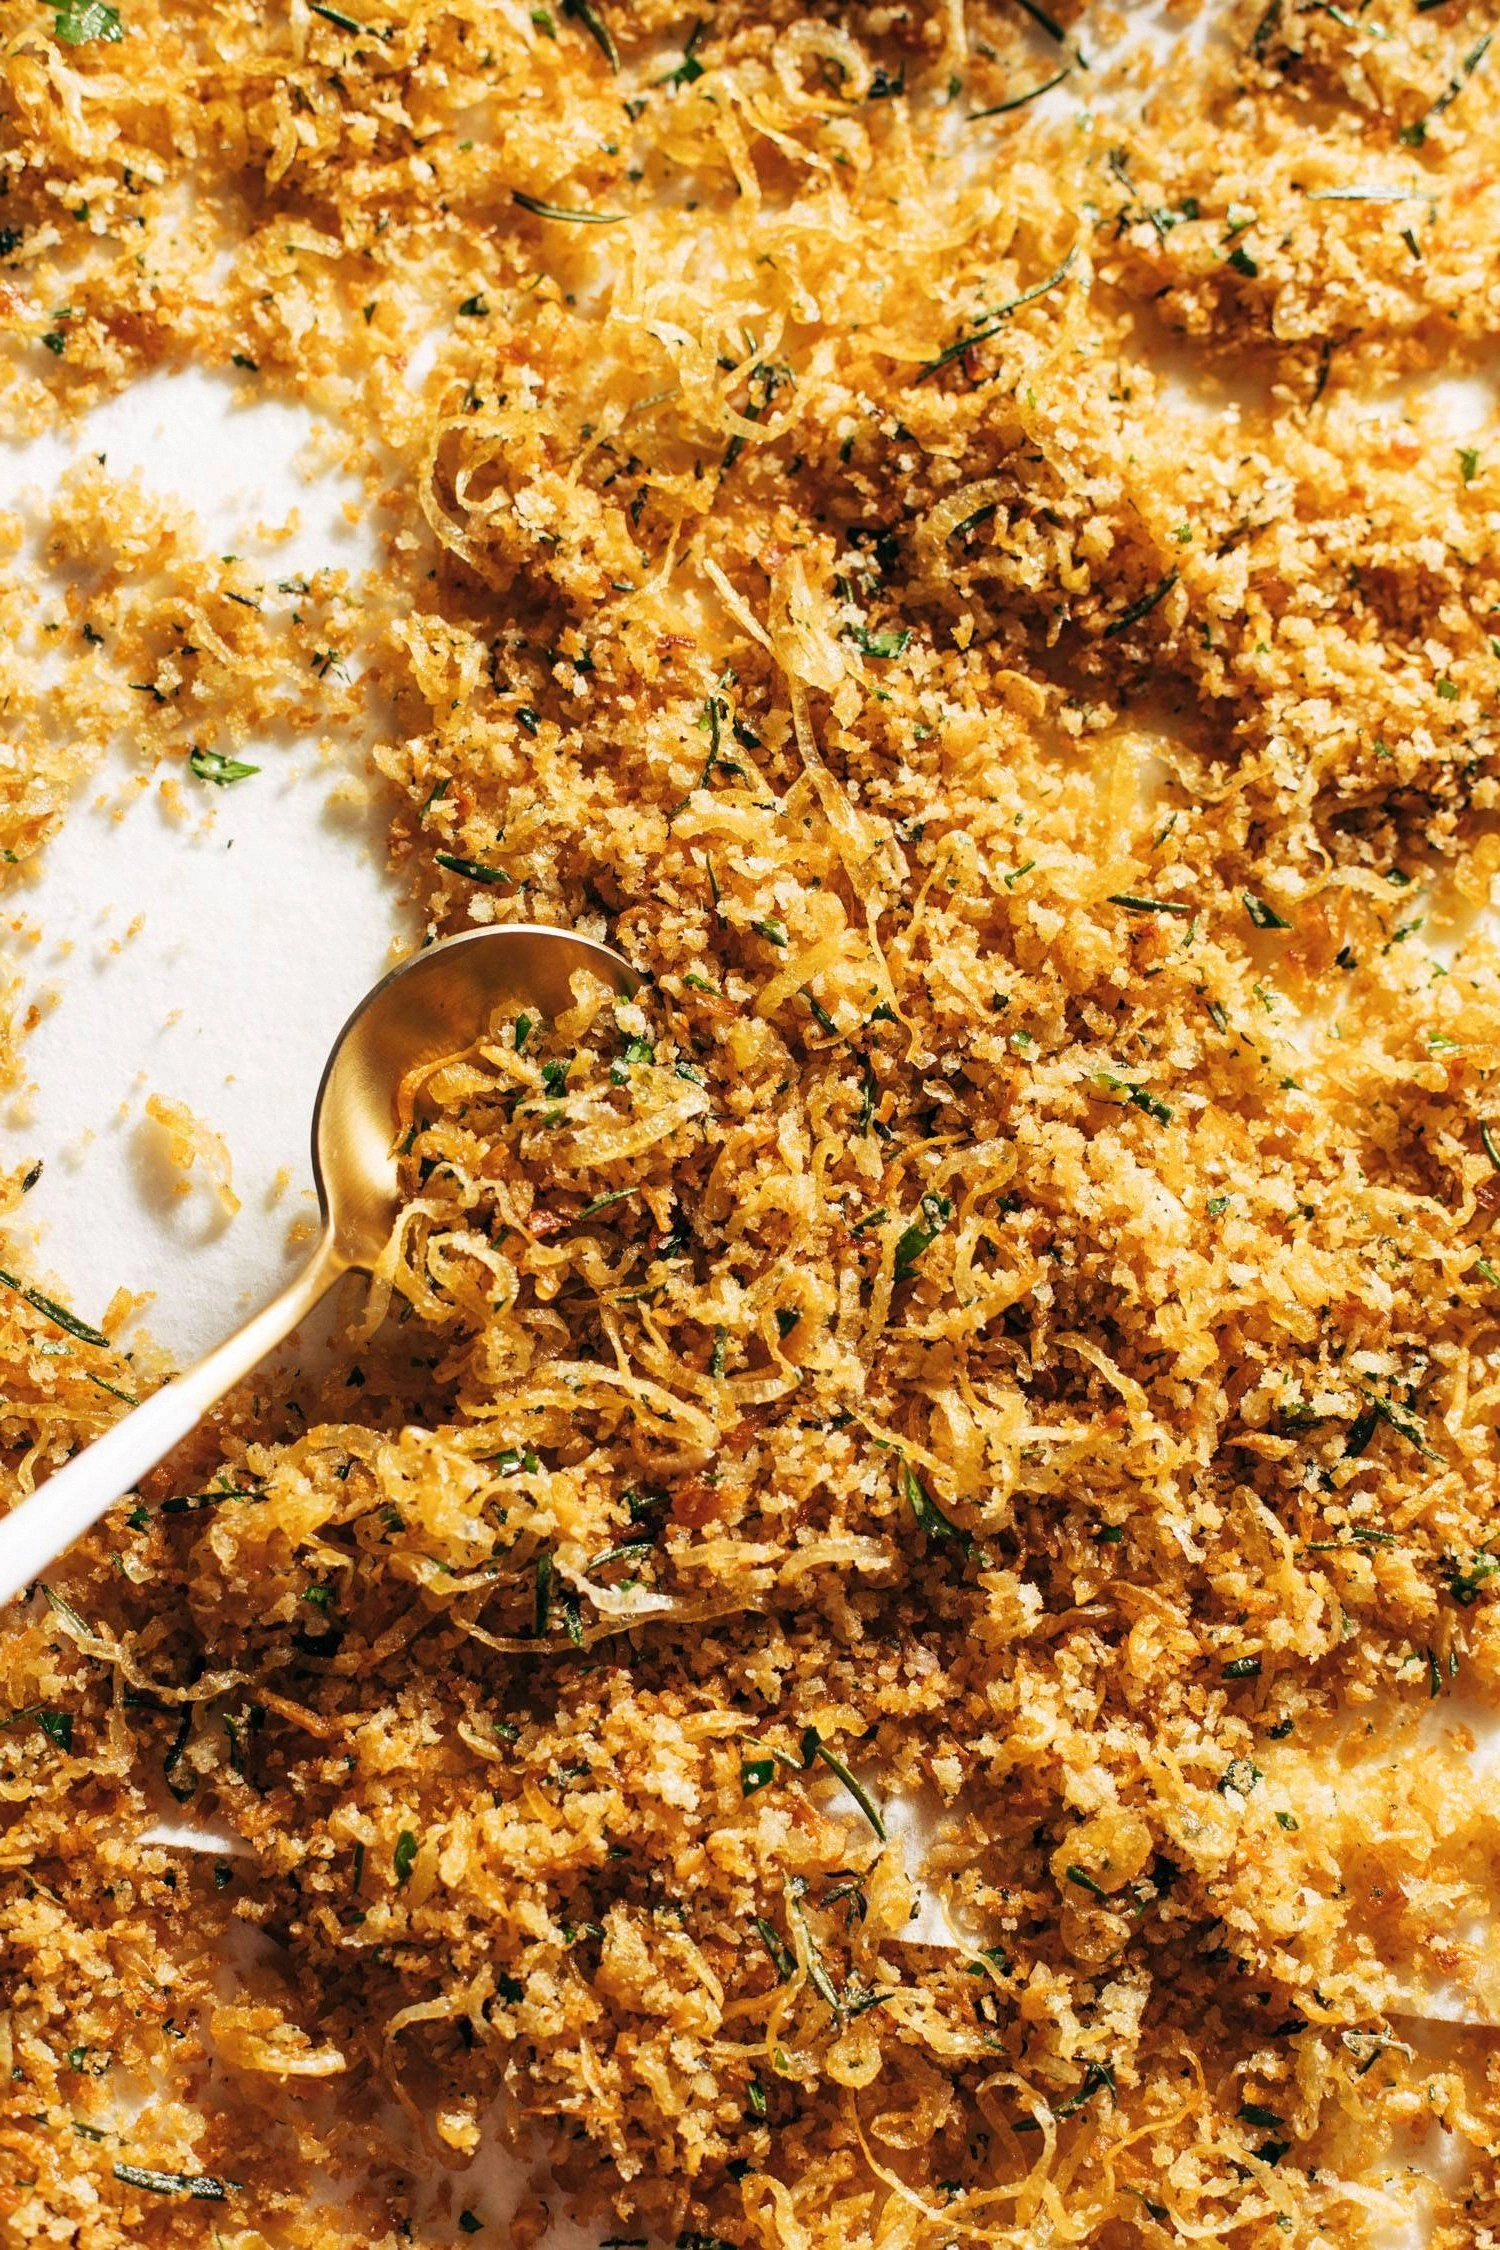
Fast forward to today, and those humble crumbs have been transformed into what I proudly call "Golden Crispies (AKA the Most Fabulous Breadcrumbs You’ll Ever Make)." This version stands out like a golden sunrise over a sea of ordinary crumbs because it combines a buttery base, a cheesy crunch, and a secret splash of citrus that awakens every taste bud. Most recipes get this completely wrong, either drowning the crumbs in oil or forgetting the cheese entirely, but I cracked the code by layering flavors in three distinct stages. I dare you to taste this and not go back for seconds; the addictive crunch is engineered to keep you reaching for more.
But here’s the kicker: the secret ingredient is a dash of smoked paprika mixed with a whisper of lemon zest, a combo that you won’t see in 99% of breadcrumb recipes. That smoky‑citrus kiss is the game‑changer that elevates simple toppings into restaurant‑quality garnish. Okay, ready for the game‑changer? Let me walk you through every single step — by the end, you’ll wonder how you ever made it any other way.
What Makes This Version Stand Out
- Flavor Explosion: The blend of toasted butter, aged Parmesan, and smoked paprika creates a taste that lingers long after the last bite, like a well‑crafted melody.
- Texture Layers: We achieve a triple‑textured crunch—fluffy interior, crisp exterior, and a subtle melt‑in‑your‑mouth cheese core that shatters like thin ice.
- Simplicity Meets Sophistication: Only twelve pantry staples are needed, yet the result feels like it belongs on a five‑star menu.
- Ingredient Quality: Using real unsalted butter and a good‑quality panko ensures each crumb is golden, not greasy.
- Crowd Reaction: Guests have been known to ask, "What’s the secret?" before they even finish their first forkful.
- Make‑Ahead Magic: Store them in an airtight jar and they stay crisp for weeks, perfect for on‑the‑fly topping of salads, soups, or fish.
- Versatile Base: Works as a crunchy coating, a salad topper, or a buttery garnish for soups and stews.
- Easy Scaling: The recipe scales effortlessly from a single serving to a party‑size batch without losing texture.
Inside the Ingredient List
The Flavor Base
Butter is the foundation of every great crisp, providing a rich, velvety mouthfeel that coats each breadcrumb like a silk sheet. When you melt it slowly over low heat, the milk solids caramelize just enough to add a nutty undertone without turning bitter. If you substitute oil, you lose that buttery depth and end up with a flatter crunch. Salt, though simple, is essential; it amplifies the cheese and balances the smoky paprika. A pinch of sea salt is all you need—any more and the crumbs become overly salty.
The Crunch Crew
Panko breadcrumbs are the hero here. Their airy, flaky structure gives us that light, airy crunch you crave, unlike regular breadcrumbs that can become dense when baked. Parmesan cheese, grated finely, melts just enough to bind the crumbs while adding a sharp, umami punch. If you run out of Parmesan, Pecorino Romano works beautifully, though it adds a slightly saltier edge. Cheddar adds a subtle creaminess and a golden hue that complements the Parmesan’s sharpness. Skipping the cheddar will still yield a tasty result, but you’ll miss that mellow background note.
The Binding Agents
All‑purpose flour works as a dusting agent, helping the butter and cheese adhere evenly before the final bake. Eggs act as a light binder, preventing the crumbs from crumbling apart during the oven blast. Milk adds a touch of humidity to keep the interior tender while the exterior crisps up. If you’re dairy‑free, almond milk paired with a flax‑egg substitute does the trick, though the texture will be marginally less fluffy.
The Unexpected Star
Smoked paprika is the secret spark that turns ordinary breadcrumbs into something unforgettable; its deep, wood‑smoked flavor gives a subtle heat without overpowering the cheese. Lemon zest is the final flourish—a bright, citrusy pop that cuts through the richness and makes the crumb sing. Fresh parsley, chopped fine, adds a touch of color and herbaceous freshness that lifts the entire profile. Lastly, a grind of black pepper adds a lingering warmth that lingers on the palate.
Everything's prepped? Good. Let’s get into the real action…
The Method — Step by Step
Preheat your oven to 350°F (180°C). While the oven warms, line a large baking sheet with parchment paper—you’ll thank me when the crumbs slide off without a fight. I like to set a timer for 5 minutes while I gather my tools; staying organized prevents the dreaded "where did I put that" scramble.
Kitchen Hack: Place a wire rack on top of the baking sheet; the crumbs will toast evenly from all sides, reducing the chance of soggy spots.Melt 4 tablespoons of unsalted butter in a wide skillet over medium‑low heat. Listen for the gentle bubbling; if you hear a rapid pop, the heat is too high and you’ll scorch the butter. Stir continuously until the butter foams, then add 2 cloves of minced garlic and ½ cup finely diced onion. The aroma that rises should be sweet and fragrant, like a kitchen sunrise.
Add 1 cup of panko breadcrumbs to the skillet, stirring constantly. You’ll see the crumbs start to turn a buttery gold within 2‑3 minutes. This is the moment of truth: the panko should be lightly toasted but not browned, otherwise the flavor veers toward bitter. Keep the heat at a steady medium—too hot and you’ll get smoky edges; too low and the crumbs stay soggy.
Off the heat, dump the toasted panko into a large mixing bowl. Mix in ½ cup grated Parmesan, ¼ cup shredded sharp cheddar, and 1 teaspoon smoked paprika. The colors should blend into a radiant amber‑orange mosaic. Sprinkle in the lemon zest now; the citrus oils will cling to the warm crumbs, releasing a bright scent that tingles the nose.
In a separate bowl, whisk together 2 large eggs, ¼ cup whole milk, and 2 tablespoons all‑purpose flour. This batter should be smooth and slightly thick—think pancake batter without the fluff. Drizzle the egg mixture over the breadcrumb blend, then fold gently until every crumb is lightly coated. The batter should cling without turning soggy; if it looks watery, add a sprinkle of extra flour.
Watch Out: Over‑mixing at this stage can break down the breadcrumb structure, resulting in a mushy final product. Fold just until combined.Spread the mixture evenly across the prepared baking sheet, forming a thin layer about ½‑inch thick. Use the back of a spatula to smooth it out—uniform thickness ensures even browning. If you notice any clumps, press them down gently; they’ll spread as they bake.
Slide the sheet into the preheated oven. Bake for 12‑15 minutes, then rotate the pan 180 degrees to guarantee a uniform golden hue. The edges should start pulling away from the parchment and give off that toasty, caramelized perfume. When the surface turns a deep, buttery gold and a faint crackling sound emerges, you know it’s ready.
Kitchen Hack: For extra crunch, broil for 1‑2 minutes at the end, watching closely so the crumbs don’t scorch.Remove from the oven and let the crumbs cool on the sheet for 5 minutes; they continue to crisp as they release steam. While still warm, toss the mixture with 2 tablespoons of chopped fresh parsley and a final pinch of sea salt. The parsley adds a fresh pop of green that makes the golden tones pop even more.
Transfer the cooled Golden Crispies to an airtight glass jar. Store at room temperature for up to two weeks, or freeze for longer keep‑alive. When you're ready to serve, simply spoon a handful over salads, soups, or the fried chicken you promised yourself last night. And remember—if you dare to taste a second serving, you’ll be right back at the jar.
That’s it — you did it. But hold on, I’ve got a few more tricks that'll take this to another level…
Insider Tricks for Flawless Results
The Temperature Rule Nobody Follows
Never start with a scorching oven; a moderate 350°F lets the butter melt slowly, creating a gentle caramelization. If you crank the heat up to 425°F, the outer layer will brown before the interior can set, leading to a burnt crust and a soggy core. I once tried a hot start—my crumbs tasted like burnt toast, and the texture was a disappointment. Keep the temperature steady, and the crunch will be uniform from edge to edge.
Why Your Nose Knows Best
Your sense of smell is the ultimate doneness gauge. When the butter‑garlic perfume shifts from fresh to nutty, you’re two minutes away from perfection. If you hear a faint crackling in the oven, that’s the sound of the crumbs releasing steam—a good sign they’re turning crisp. Ignoring this sensory cue often leads to over‑baking, turning golden into bitter.
The 5‑Minute Rest That Changes Everything
Once out of the oven, let the crumbs sit undisturbed for exactly five minutes. This short rest allows the residual heat to finish the internal set without evaporating the delicate moisture you introduced with the egg‑milk mixture. Skipping this pause results in a crumb that feels dry on the palate. Trust the timer; five minutes is all you need.
Seasoning Layering Magic
Season in stages: a pinch of salt in the butter, another dash after baking. This two‑step seasoning ensures the salt penetrates both the interior and the surface, preventing a flat taste. I once under‑seasoned the butter and found the final product bland; a second sprinkle after baking rescued it instantly. The layered approach adds depth without overwhelming the palate.
The Cool‑Down Crunch Test
Before you seal the jar, take a small spoonful and let it sit for a minute. It should crack loudly when you bite, like stepping on fresh snow. If it feels soft, pop it back in the oven for another 2‑3 minutes. This quick test saves you from a batch of sad, limp crumbs later.
Creative Twists and Variations
This recipe is a playground. Here are some of my favorite ways to switch things up:
Herbaceous Garden
Swap the parsley for a blend of rosemary, thyme, and sage. The earthy herbs turn the crumbs into a perfect topping for roasted root vegetables. The aromatic profile pairs especially well with autumnal squashes and carrots.
Spicy Heatwave
Add ½ teaspoon cayenne pepper and a dash of hot sauce to the egg mixture. The heat seeps into each crumb, offering a tongue‑tingling kick that works wonders on fried fish or grilled tofu.
Cheesy Deluxe
Incorporate ¼ cup grated Gruyère and a tablespoon of miso paste for umami depth. The extra cheese creates pockets of melty goodness, while miso adds a savory backdrop that makes the entire batch addictive.
Sweet & Savory
Mix in 2 tablespoons brown sugar and a pinch of cinnamon alongside the paprika. The resulting sweet‑smoky crust is divine on baked sweet potatoes or as a topping for a hearty pumpkin soup.
Gluten‑Free Hero
Replace all‑purpose flour with a 1:1 gluten‑free blend and use almond meal instead of panko. The texture stays crunchy, and the flavor profile remains intact, making it safe for those with gluten sensitivities.
Mediterranean Muse
Add ¼ cup finely chopped sun‑dried tomatoes and 2 tablespoons crumbled feta. The tangy feta and sweet tomato bits give a Mediterranean twist that elevates the crumbs into a topping for Greek salads or baked fish.
Storing and Bringing It Back to Life
Fridge Storage
Transfer the cooled crumbs to an airtight glass container and store in the refrigerator for up to 10 days. The cool environment preserves the buttery flavor and prevents moisture from sneaking in. If you notice a slight softening after a few days, give the jar a quick 2‑minute toss in a 350°F oven to revive the crunch.
Freezer Friendly
Portion the crumbs into zip‑top freezer bags, squeeze out excess air, and freeze for up to three months. To use, simply thaw at room temperature for 15 minutes, then spread on a baking sheet and re‑crisp under a hot broiler for 1‑2 minutes. The texture remains virtually indistinguishable from fresh.
Best Reheating Method
When you’re ready to serve, preheat a skillet over medium heat, add a splash of water—just a teaspoon per cup of crumbs—and stir until steam forms. The water releases trapped steam, reviving the interior softness while the skillet’s heat restores the exterior crunch. Finish with a quick drizzle of melted butter for an indulgent finish.