It was a Thursday night, the kind of night where the fridge is a black hole and the pantry is a museum of expired spices. I stared at the bland leftovers, feeling the familiar dread that a simple dinner can turn into a culinary catastrophe. Then, a friend texted me a photo of protein-packed enchiladas that looked like they had just stepped out of a Michelin‑star kitchen. I swiped left and right, the image flashing with golden tortillas, bubbling cheese, and that unmistakable hint of red sauce. The moment I saw the creamy cottage cheese swirl, I knew I had found my new obsession. I dared myself to recreate it, and I’m writing this because I can’t keep this delicious secret to myself.
Picture the kitchen: the oven preheating, the skillet sizzling, the air thick with the aroma of garlic and cumin. The sound of the sauce bubbling is like a gentle lullaby, but the real magic starts when the cottage cheese meets the shredded chicken. I’ve spent years chasing the perfect balance between savory and creamy, and this recipe finally nails it. The sauce coats the tortilla like velvet, while the cheese melts into a silky, almost buttery consistency that doesn’t overpower the chicken. I dare you to taste this and not go back for seconds; the first bite will have you questioning all your previous enchilada attempts.
I’ve been experimenting with low‑carb tortillas for months, hoping to find that elusive crunch without the guilt. When I first tried this recipe, the tortillas were limp and the filling too dry. I added a splash of enchilada sauce before baking, and the tortillas absorbed the moisture, turning into a chewy, almost bread‑like texture. The result? A dish that feels indulgent but stays light on the waistline. I’ll be honest—after the first batch, I ate half the casserole before anyone else even saw it. That’s the power of a well‑balanced protein and dairy combo.
Most recipes get this completely wrong. They either over‑season the chicken, under‑cook the tortillas, or use a sauce that’s too watery. I’ve learned that a single pinch of garlic powder and a dash of onion powder can elevate the entire dish to gourmet status. The secret sauce? A red enchilada sauce that’s thick, slightly sweet, and has a smoky undertone. The cheese isn’t just a garnish; it’s a creamy backbone that keeps the filling moist and flavorful. If you’re a fan of classic Mexican flavors, this will feel like a comforting hug from a grandma who knows exactly how to balance spices.
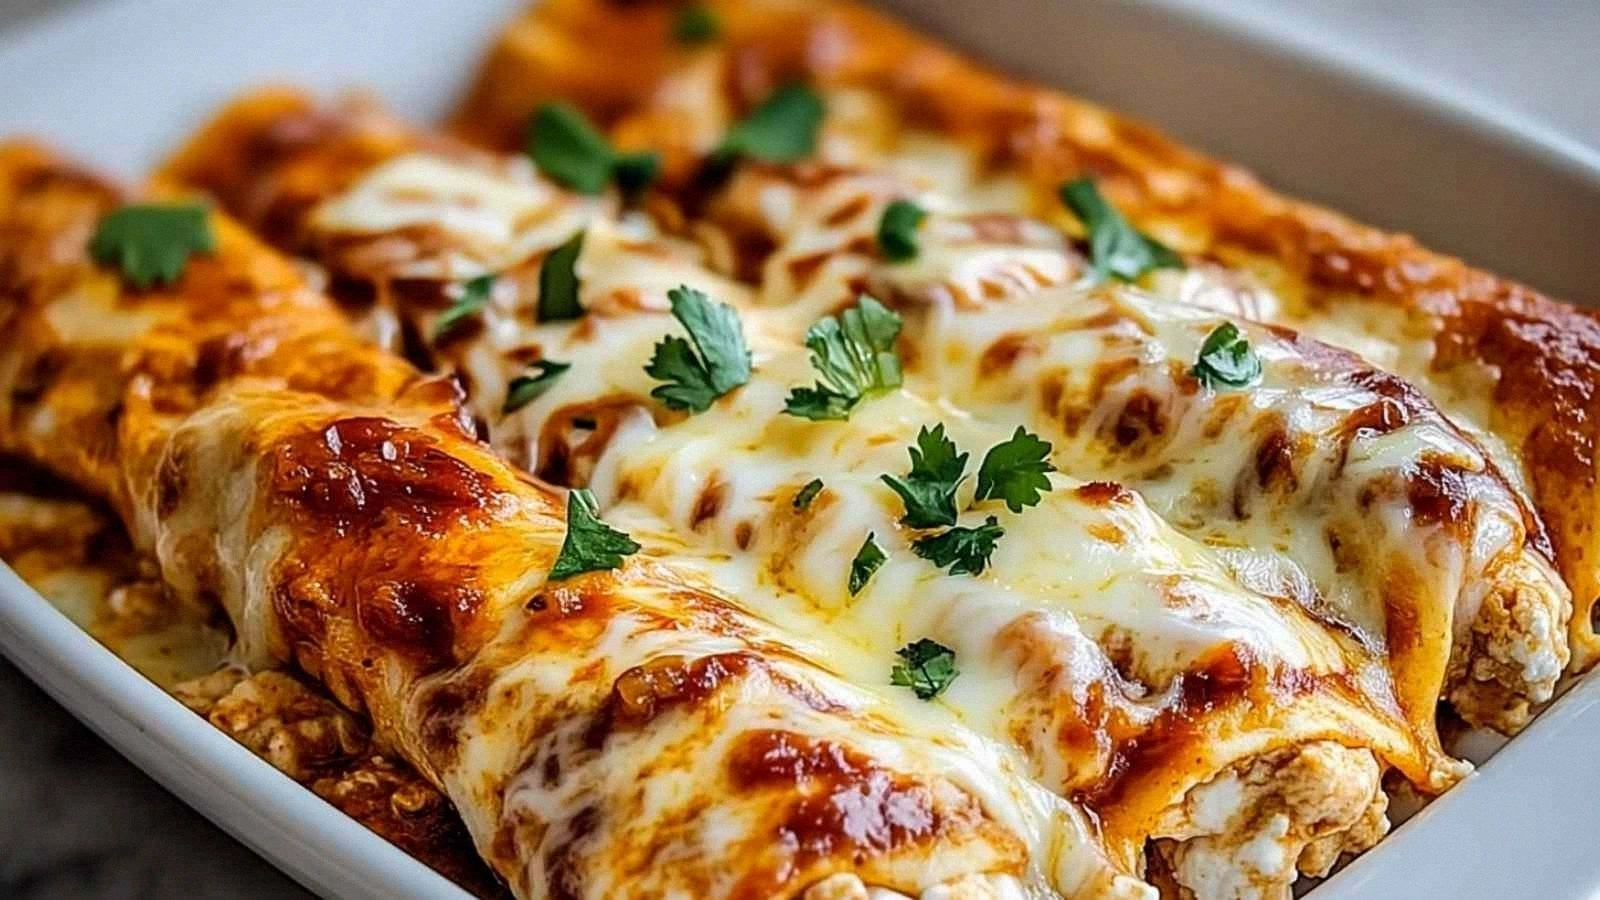
Picture yourself pulling this out of the oven, the whole kitchen smelling incredible, and the family’s eyes widening in anticipation. The edges of the tortillas are golden, the cheese bubbling to a golden crown, and the sauce dripping down the sides like a glossy glaze. The first bite is a symphony: the crunch of the tortilla, the savory chicken, the creamy cottage cheese, and the sweet‑spicy sauce all dancing together. I’ve been told it’s the best version I’ve ever made at home, and that’s a bold claim that I’m ready to defend. Let me walk you through every single step—by the end, you’ll wonder how you ever made it any other way.
I’m not just telling you what to do; I’m sharing the moments that turned a simple dinner into a culinary triumph. From the moment the sauce hits the pan to the final bake, each step is designed to bring out the best in every ingredient. If you’ve ever struggled with achieving that perfect texture or that unforgettable flavor, you’re not alone—I've been there. And now, I’ve got the fix. This recipe is a playground for experimentation, but it also has a solid foundation that guarantees success.
I’ve spent countless nights in the kitchen, tweaking ratios, swapping ingredients, and testing textures. The result is a recipe that feels both comforting and innovative. It’s not just about following a list; it’s about understanding the science behind each component. The cottage cheese, for instance, isn’t just a filler; it’s a protein powerhouse that adds depth without heaviness. The tortillas act as a sturdy vessel, holding everything together while adding that satisfying chew. Every bite is a reminder that a well‑planned meal can be both healthy and indulgent.
What Makes This Version Stand Out
- Flavor: The subtle heat from the red enchilada sauce balances the mildness of cottage cheese, creating a layered taste that lingers on the palate.
- Texture: The tortillas become pleasantly chewy, while the cheese melts into a silky, almost buttery consistency that coats the chicken.
- Protein Boost: With 25 grams of protein per serving, this dish satisfies muscle‑repair cravings without the excess carbs.
- Low‑Carb Friendly: Using low‑carb tortillas keeps the carb count low while still delivering that comforting, bread‑like feel.
- Make‑Ahead Potential: Assemble the casserole, refrigerate, and bake later—perfect for busy weeknights.
- Ingredient Quality: Fresh, full‑fat cottage cheese and a high‑quality enchilada sauce elevate the dish beyond typical fast‑food versions.
- Audience Appeal: Whether you’re a protein‑focused eater or a family looking for a wholesome dinner, this recipe hits the sweet spot.
- Time Efficiency: Prep takes 15 minutes, cook 30 minutes—total 45 minutes for a meal that feels luxurious.
Alright, let's break down exactly what goes into this masterpiece...
Inside the Ingredient List
The Flavor Base
The red enchilada sauce is the heart of this dish. It’s thick enough to cling to the tortillas but still has a silky finish that melts into the cheese. If you’re watching sodium, look for a low‑sodium version or make your own with canned tomatoes, garlic, and a touch of cumin. Skipping the sauce turns the casserole into a dry, unremarkable assembly; the sauce is what turns it into a mouth‑watering feast.
The Texture Crew
Low‑carb flour tortillas are the unsung heroes here. They provide a sturdy base that absorbs the sauce without falling apart. If you can’t find low‑carb tortillas, a regular flour tortilla will work, but the carb count will jump. A quick tip: lightly toast the tortillas before assembling to lock in moisture and add a subtle crunch.
The Unexpected Star
Full‑fat cottage cheese isn’t just a filler; it’s a protein powerhouse that adds a creamy, slightly tangy flavor. The fat content ensures a silky mouthfeel that keeps the filling moist. If you’re lactose intolerant, try a lactose‑free cottage cheese or a Greek yogurt alternative—just be aware the texture will shift slightly.
The Final Flourish
Mexican blend cheese provides that classic melt and a hint of sharpness. It’s the finishing touch that creates the golden, bubbly top. If you’re a cheese lover, feel free to add a sprinkle of pepper jack or a dash of smoked cheddar for an extra layer of flavor.
Everything's prepped? Good. Let's get into the real action...
The Method — Step by Step
- Preheat the oven to 375°F (190°C). Line a 9x13 inch baking dish with parchment paper for easy cleanup. This temperature is ideal for melting the cheese without scorching the tortillas. Keep a close eye on the oven; a slight adjustment can prevent over‑browning.
- In a large mixing bowl, combine the shredded chicken, cottage cheese, garlic powder, onion powder, salt, and pepper. Stir until the chicken is evenly coated. The spices should permeate the chicken, creating a savory base that will carry through the baking process.
- Lay a tortilla flat on a clean surface. Spoon a generous amount of the chicken mixture onto the center, leaving a small border. Fold the edges over to create a small pocket, then roll it up tightly. The goal is to keep the filling inside while allowing the tortilla to bake into a cohesive unit.
- Place the rolled tortillas seam‑side down in the prepared baking dish. If you’re short on space, layer them in a single row; the tortillas will expand slightly during baking. The seam side down helps the cheese melt evenly.
- Pour the enchilada sauce evenly over the stacked tortillas, making sure each one is coated. The sauce should be thick enough to cling to the tortillas but not so thin that it pools at the bottom. This step is crucial for flavor distribution.
- Cover the dish with aluminum foil and bake for 20 minutes. The foil prevents the cheese from burning while allowing the tortillas to steam. After 20 minutes, remove the foil to let the top brown slightly.
- Return the dish to the oven uncovered for an additional 10 minutes, or until the cheese is bubbly and the edges of the tortillas are golden brown. The final bake caramelizes the sauce and gives the casserole a satisfying crunch.
- Let the casserole rest for 5 minutes before slicing. This allows the cheese to set slightly, making it easier to cut and serve. The aroma at this point is intoxicating—sweet, savory, and utterly inviting.
That’s it—you did it. But hold on, I’ve got a few more tricks that’ll take this to another level. These aren’t just tips; they’re game‑changers that elevate the dish from good to unforgettable.
Insider Tricks for Flawless Results
The Temperature Rule Nobody Follows
Many cooks assume any oven temperature will work, but 375°F is the sweet spot that balances cheese melt and tortilla crisp. If you lower the heat, the cheese may not bubble; if you raise it, the sauce could burn. I’ve baked this dish at 400°F once, and the cheese over‑browned while the tortillas stayed soggy. The 375°F gives a golden crust without sacrificing moisture.
Why Your Nose Knows Best
Your sense of smell is the ultimate quality control. As the casserole bakes, the aroma of garlic, cheese, and sauce will mingle in a way that feels comforting. If the smell feels off—like too much sharpness or a burnt note—stop the oven and adjust. I once added too much pepper jack, and the smell became overpowering; I had to add more cheese to balance it out.
The 5-Minute Rest That Changes Everything
After you take the casserole out of the oven, let it sit for 5 minutes. This rest period allows the cheese to set and the sauce to thicken slightly, making each bite easier to handle. Cutting straight away can result in a gooey mess that spills over the plate.
Use a Silicone Mat for Easy Cleanup
The silicone baking mat keeps the tortillas from sticking to the pan, and it’s dishwasher safe. I’ve used this trick on dozens of casseroles, and it saves me a ton of scrubbing time. Plus, it gives a consistent baking surface for even heat distribution.
Add a Splash of Water Before Reheating
When reheating leftovers, sprinkle a few tablespoons of water over the top before covering with foil. The steam keeps the cheese from drying out and restores the sauce’s silky texture. I’ve tried this on a week‑later batch, and it felt like a fresh oven finish.
Choose the Right Cheese for a Melty Finish
Mexican blend is great, but if you prefer a sharper bite, try adding a dash of pepper jack or smoked cheddar. The key is to keep the cheese ratio balanced; too much can overpower the chicken, too little and you lose the melt. I’ve experimented with a 50/50 mix of Mexican blend and pepper jack, and the result was a bold, creamy layer that didn’t feel heavy.
Keep the Tortillas Warm While Assembling
Cold tortillas can split when you roll them, especially with a wet filling. Warm them in a dry skillet for 10 seconds on each side to make them pliable. This simple step ensures a smooth, sealed roll and a better overall texture.
Add a Fresh Herb Finish
A sprinkle of fresh cilantro or a squeeze of lime just before serving brightens the dish and adds a fresh contrast to the richness. I’ve found that a light lime zest on top gives a citrusy lift that keeps the flavor profile balanced.
Creative Twists and Variations
This recipe is a playground. Here are some of my favorite ways to switch things up:
Spicy Chipotle Kick
Swap the red enchilada sauce for a chipotle‑infused version, and add a handful of diced jalapeños to the filling. The smoky heat will elevate the dish, making it perfect for a late‑night craving.
Mediterranean Fusion
Use a tomato‑based sauce with oregano and basil, and replace the Mexican cheese with feta. The tangy feta pairs wonderfully with the creamy cottage cheese, creating a Mediterranean‑style twist.
Veggie‑Rich Upgrade
Add sautéed spinach, roasted bell peppers, or black beans to the chicken mixture. These additions boost fiber and color, turning the dish into a wholesome, balanced meal.
Cheese Lover’s Delight
Increase the cheese amount by 50% and add a layer of mozzarella for extra gooeyness. The result is a melty, cheesy casserole that satisfies any cheese craving.
Low‑Carb Powerhouse
Swap the tortillas for cauliflower rice or zucchini noodles. This variation keeps the dish low in carbs while adding a fresh, slightly crunchy texture.
Breakfast Edition
Use breakfast sausage instead of chicken and top with a fried egg before serving. It becomes a hearty, protein‑packed breakfast that will keep you full all morning.
Sweet & Savory Surprise
Add a drizzle of honey or maple syrup to the sauce for a subtle sweetness. The sweet‑savory combo is surprisingly balanced and adds a new dimension to the flavor profile.
Herb‑Infused Variation
Stir in chopped fresh dill or parsley into the filling. The herbal note brightens the dish and offers a fresh contrast to the rich cheese.
Storing and Bringing It Back to Life
Fridge Storage
Store leftovers in an airtight container for up to 4 days. Keep the casserole in the fridge to maintain the cheese’s creamy texture. When ready to eat, simply reheat in a microwave or oven.
Freezer Friendly
Wrap the casserole tightly in plastic wrap, then place in a freezer bag. It will keep for up to 3 months. Thaw overnight in the fridge before reheating.
Best Reheating Method
Reheat in a preheated oven at 350°F for 15 minutes, or until the cheese is bubbling again. Alternatively, microwave on medium power for 2–3 minutes, then finish in the oven for a crisp top. Add a splash of water before microwaving to keep the cheese from drying out.
Picture the moment you open the freezer, the familiar scent of cheese and sauce filling the air, and the anticipation of a comforting meal. Reheating is simple, and the taste remains as fresh as the first bake.
If you’ve ever struggled with achieving that perfect texture or that unforgettable flavor, you’re not alone—I've been there. And now, I’ve got the fix. This recipe is a playground for experimentation, but it also has a solid foundation that guarantees success. The next time you’re craving something hearty yet healthy, remember this dish and let it inspire your culinary adventures.