It started with a kitchen disaster that would have ruined my entire dessert lineup for the week. I was juggling a pot of caramel sauce, a bowl of ice cream, and a tray of Oreo cookies when the sugar exploded into a sticky cloud that covered the countertop like a glittering snowstorm. The smell of burnt sugar filled the air, and my taste buds were already on edge, waiting for that sweet, creamy payoff that never came. I stared at the ruined caramel, feeling the frustration build, and then a thought hit me: why not turn the disaster into an opportunity?
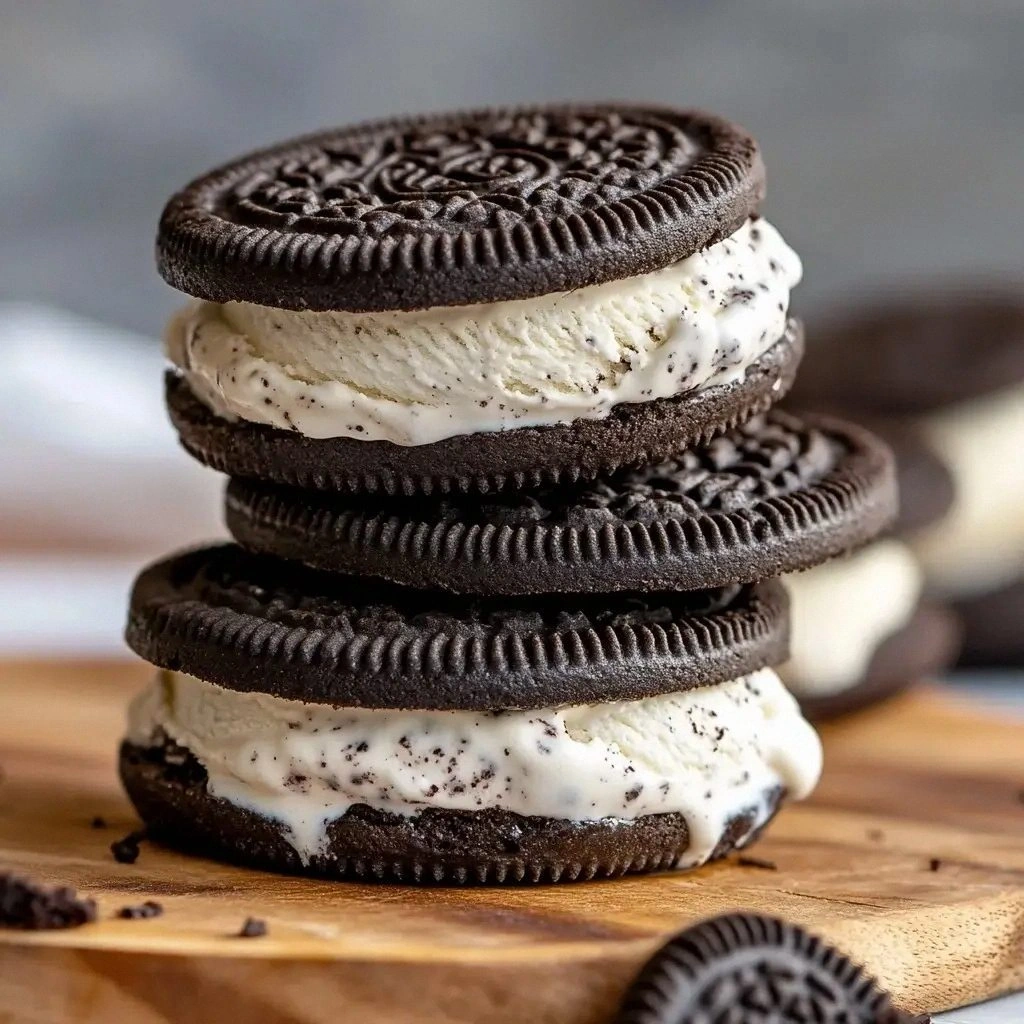
Picture this: the air is thick with the buttery aroma of freshly baked Oreo cookies, the faint hiss of melted chocolate, and the faint scent of vanilla ice cream that has just been softened to a silky consistency. The sound of the spoon tapping the bowl is punctuated by the gentle clink of a glass of milk, while the texture of the cookies is a perfect contrast—crisp on the edges, chewy in the middle. The first bite feels like a delicate dance between crunchy and creamy, while the chocolate coating adds a glossy, almost velvet finish that coats the tongue. The visual is a parade of golden-brown cookies, glossy chocolate swirls, and a mound of soft ice cream waiting to be enveloped.
What sets this version apart from the endless variations you’ll find online is the meticulous layering of flavor and texture. I’ve discovered that brushing each cookie with a buttery vanilla glaze before baking gives it a caramelized edge that stands up to the sweetness of the ice cream. The chocolate coating isn’t just a decorative touch; it adds a slight bitterness that balances the creamy richness, creating a flavor profile that is both indulgent and surprisingly refined. I dare you to taste this and not go back for seconds because each bite delivers a punch of chocolate, a whisper of vanilla, and the satisfying crunch of a perfectly baked cookie.
And the best part? This recipe doesn’t just taste amazing—it looks like a piece of art. The glossy chocolate glaze shines like a jewel, while the soft ice cream peeks out like a secret hidden in plain sight. I’ll be honest—once I finished the first batch, I had to hide it in the freezer before anyone else could see. If you’ve ever struggled with making ice cream sandwiches that are both crunchy and creamy, you’re not alone—and I’ve got the fix. Let me walk you through every single step—by the end, you’ll wonder how you ever made it any other way.
What Makes This Version Stand Out
- Crunch Factor: The brief 8‑minute bake gives the cookies a caramelized edge that resists melting, creating a satisfying bite that holds up against the soft ice cream.
- Flavor Depth: A butter‑vanilla glaze infuses each cookie with a subtle buttery sweetness that amplifies the vanilla ice cream’s flavor.
- Chocolate Balance: The melted chocolate isn’t just a coating; it adds a mild bitterness that cuts through the richness, leaving a clean finish.
- Texture Contrast: The combination of a crisp cookie, silky ice cream, and glossy chocolate provides a multi‑sensory experience that feels indulgent yet balanced.
- Make‑Ahead Friendly: Assemble the sandwiches a few hours ahead, then chill; the flavors meld, and the cookies stay crisp.
- Visual Appeal: The glossy chocolate finish makes each sandwich look like a miniature dessert masterpiece, perfect for sharing on social media.
- Ingredient Quality: Using high‑quality Oreos and real vanilla ice cream ensures that every bite is authentic and flavorful.
- Time‑Efficient: From prep to final dip, the whole process takes just 10 minutes—no oven needed if you skip the brief bake.
Inside the Ingredient List
The Flavor Base
At the heart of this sandwich is vanilla ice cream, the creamy canvas that carries the entire flavor profile. Softening the ice cream for just five minutes before use prevents it from sticking to the cookie, allowing for a smooth, even spread that melts in the mouth. If you’re in a rush, a quick dip in the microwave—just 20 seconds—will bring it to the right consistency.
Complementing the ice cream is a butter‑vanilla glaze made from melted butter, powdered sugar, and a splash of vanilla extract. The glaze adds a caramelized layer to the cookie’s surface, creating a subtle crunch that contrasts with the cookie’s inherent softness. This glaze also helps the chocolate coating adhere better, preventing it from sliding off during the dipping process.
The Texture Crew
The Oreo cookies themselves are the backbone of the sandwich, providing both structure and flavor. Use whole Oreos for a classic crunch; the chocolate wafer gives a deep, bittersweet bite that pairs perfectly with the sweet ice cream. If you prefer a lighter texture, consider using chocolate sandwich cookies from another brand, but the flavor profile will shift slightly.
Adding a chocolate coating transforms the sandwich from a simple treat into a decadent dessert. Melted chocolate chips in a double boiler or microwave create a glossy finish that not only looks impressive but also adds a subtle bitterness that balances the sweetness. For a twist, sprinkle a pinch of sea salt over the chocolate before it sets; the salt enhances the chocolate’s flavor and adds a pleasing contrast.
The Unexpected Star
One of the secret weapons in this recipe is the powdered sugar used in the glaze. Powdered sugar dissolves quickly, creating a silky glaze that doesn’t leave a gritty residue. If you’re looking to cut down on sugar, replace it with a natural sweetener like honey or maple syrup—but be prepared for a slightly different texture.
Another unexpected star is the pinch of salt added to the chocolate coating. Salt is a classic flavor enhancer that brings out the chocolate’s richness. Even a tiny amount can make a big difference, turning a sweet treat into a more complex, satisfying experience.
The Final Flourish
The final flourish is the chocolate coating that not only adds flavor but also gives the sandwich a professional finish. By dipping the assembled sandwich in melted chocolate, you create a barrier that keeps the ice cream from leaking and the cookie from becoming soggy. The chocolate also adds a slight crunch when it hardens, providing a satisfying bite that completes the experience.
When everything is prepped and ready, the assembly process is a breeze. Just remember to keep the ice cream chilled, the chocolate set, and the cookies baked to a golden brown. With these ingredients in place, you’ll have a dessert that feels both indulgent and meticulously crafted.
Everything’s prepped? Good. Let’s get into the real action…
The Method — Step by Step
- Chill the vanilla ice cream in the freezer for about five minutes to soften it slightly. This short chill prevents the ice cream from sticking to the cookie, allowing for an even spread. If you’re in a hurry, a quick 20‑second microwave burst will do the trick.
- While the ice cream chills, combine the powdered sugar, melted butter, and vanilla extract in a small bowl. Whisk until the glaze is smooth and glossy, then set aside. This glaze will caramelize the cookie edges and provide a sweet, buttery base.
- Preheat your oven to 350°F (175°C). Line a baking sheet with parchment paper and place the Oreo cookies on it. Brush each cookie with the butter‑vanilla glaze, ensuring an even coat. The glaze will give the cookies a caramelized finish.
- Bake the glazed cookies for 6–8 minutes, or until the edges turn a golden brown and the cookies feel firm to the touch. Keep a close eye on them; you don’t want them to burn. Once baked, let them cool on the sheet for a few minutes before handling.
- While the cookies are cooling, melt the chocolate chips in a double boiler or microwave. Stir every 30 seconds until the chocolate is smooth and glossy. A smooth coating will adhere better and provide a silky finish.
- Take a cooled Oreo cookie and spread a generous layer of softened ice cream onto the bottom half. Gently press the ice cream into the cookie to ensure an even spread. The ice cream should be firm enough to hold its shape but soft enough to melt into the cookie’s crevices.
- Place another Oreo cookie on top, aligning it with the bottom one. Press gently to seal the sandwich. The pressure should be firm but not crushing; you want a snug fit that keeps the ice cream from spilling.
- Dip the assembled sandwich into the melted chocolate, ensuring it’s fully coated. Let the excess chocolate drip back into the bowl. The chocolate will set quickly, creating a protective shell that keeps the ice cream from melting.
- Place the chocolate‑coated sandwich on a parchment‑lined tray. Allow the chocolate to set at room temperature for about 5 minutes, then transfer the tray to the refrigerator. Chill for an additional 30 minutes to firm up the ice cream and set the chocolate.
- Serve immediately, or store in an airtight container in the freezer for up to two weeks. Before serving, let the sandwiches sit at room temperature for a few minutes to soften slightly; this enhances the flavor and texture.
That’s it — you did it. But hold on, I’ve got a few more tricks that’ll take this to another level…
Insider Tricks for Flawless Results
The Temperature Rule Nobody Follows
Many people bake the cookies at a high temperature, only to end up with a hard, burnt exterior that cracks the ice cream inside. The trick is to bake at a lower temperature—350°F (175°C)—and watch the edges turn golden. This slower bake caramelizes the sugar without overcooking, giving you a crisp yet tender cookie that holds up against the ice cream.
Why Your Nose Knows Best
Before you even touch the ingredients, give the chocolate a quick sniff. If it smells slightly burnt, let it cool; a fresh, sweet chocolate aroma signals that it’s ready. I once used chocolate that was too hot, and the result was a soggy sandwich that didn’t hold its shape. Trust your nose—your taste buds will thank you.
The 5‑Minute Rest That Changes Everything
After dipping the sandwich in chocolate, let it rest on parchment for five minutes before refrigerating. This short rest allows the chocolate to set just enough to form a protective shell, but not so hard that it becomes brittle. The result is a smooth, glossy finish that snaps cleanly when you bite.
Keep the Ice Cream Frozen Until the Last Minute
Don’t let the ice cream sit out too long; it will soften and become sticky. Keep it in the freezer until you’re ready to spread it on the cookie. A firm scoop ensures that the ice cream stays in place and doesn’t leak through the chocolate.
Seal the Sandwich Properly
When pressing the top cookie onto the bottom, apply even pressure. A firm, even seal prevents the ice cream from leaking, but avoid crushing the cookie, which will ruin the texture. I once pressed too hard and ended up with a broken cookie that tasted like crushed crumbs.
Use a Sharp Knife for Clean Cuts
If you want to serve the sandwiches in bite‑size pieces, use a sharp knife to slice them cleanly. A dull knife will crush the sandwich, turning it into a mushy mess. A clean cut keeps the layers distinct and the presentation polished.
Creative Twists and Variations
This recipe is a playground. Here are some of my favorite ways to switch things up:
Minty Madness
Swap the vanilla ice cream for mint chocolate chip and add a few drops of mint extract to the glaze. The cool mint undertone pairs beautifully with the chocolate coating, creating a refreshing twist that’s perfect for summer.
Nutty Crunch
Add chopped toasted almonds or hazelnuts to the ice cream before spreading. The nutty crunch adds texture and a nutty aroma that elevates the classic flavor profile.
Spiced Surprise
Stir a pinch of cayenne pepper or chili powder into the chocolate coating. The subtle heat balances the sweetness and gives the sandwich an unexpected kick.
Berry Burst
Replace the chocolate chips with fresh strawberries or blueberries, finely chopped, and melt them into a glaze. The berry flavor adds a bright, fruity note that contrasts with the creamy ice cream.
Caramel Swirl
Drizzle caramel sauce over the assembled sandwich before the chocolate sets. The caramel adds a luscious, buttery sweetness that complements the chocolate’s bitterness.
Almond Joy Edition
Replace the chocolate coating with a mixture of shredded coconut and melted dark chocolate. This version mimics the popular candy bar, offering a tropical twist that’s both indulgent and nostalgic.
Storing and Bringing It Back to Life
Fridge Storage
Store the sandwiches in an airtight container in the refrigerator for up to three days. Keep the container sealed to prevent the ice cream from absorbing fridge odors and to maintain the chocolate’s glossy finish.
Freezer Friendly
For longer storage, wrap each sandwich individually in plastic wrap and place them in a freezer‑proof bag. They’ll keep for up to two weeks. Thaw at room temperature for 10 minutes before serving to restore the creamy texture.
Best Reheating Method
If you prefer a slightly warm sandwich, place the frozen or refrigerated sandwich on a parchment‑lined tray and warm it in a 250°F oven for 3–4 minutes. This gentle heat softens the ice cream without melting it, giving you a warm, gooey center while preserving the chocolate shell.