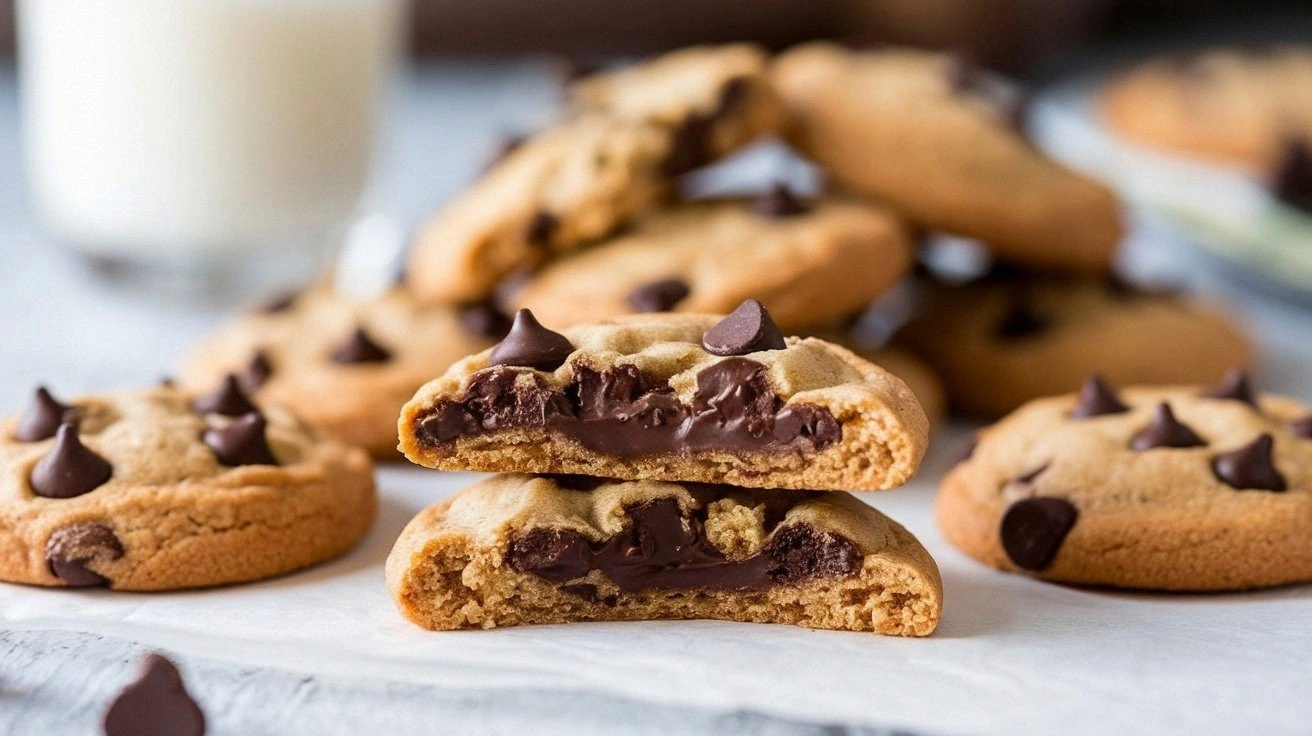
I remember the night I tried to impress my sister with a “simple” cookie recipe that turned into a kitchen catastrophe. I had all the ingredients on hand—flour, butter, sugar, and the star of the show, Nutella—yet the dough was as dry as a desert and the finished cookies were flat, lifeless disks that tasted like cardboard. I stared at the oven, feeling the heat of disappointment rise in my chest. That moment was the spark that forced me to dig into every cookie book, every forum post, and every Instagram reel until I found the one that promised the perfect balance of gooey center and crisp edge. The result? A cookie that practically melts in your mouth, with a crust that cracks like thin ice when you bite into it. I dare you to taste this and not go back for seconds. It’s a cookie that refuses to be ordinary, and it’s about to become your new obsession.
Picture yourself pulling a tray of golden‑brown cookies from the oven, the kitchen filling with an aroma that feels like a hug from grandma. The dough is soft enough to press between your fingers, yet sturdy enough to hold the thick, velvety Nutella center without leaking. The first bite delivers a crunch that shatters into a buttery, chocolatey explosion, followed by a lingering sweetness that lingers on the palate. If you’ve ever struggled with cookies that are either too cakey or too doughy, you’ll find this version a revelation. Most recipes get this completely wrong. They either overbake the center, leaving it dry, or underbake, resulting in a gooey mess that sticks to your fingers. This is hands down the best version you'll ever make at home. The secret lies in a few simple tweaks that elevate the flavor and texture to a level that feels like a professional patisserie hit the floor.
I’ll be honest—once I baked the first batch, I ate half before anyone else could even get a taste. That was a moment of pure culinary triumph and a little guilty pleasure. The other half? It was still warm and molten, and I could feel the Nutella oozing through the cookie as soon as I broke it open. That was the moment I knew I’d found something special. I spent the next hour tweaking the dough, adjusting the oven temperature, and perfecting the stuffing technique. The result was a cookie that balances the sweet, nutty flavor of Nutella with a buttery, slightly crisp exterior, creating a symphony of textures that dance across your tongue.
If you’ve ever stared at a recipe and felt the dread of potential failure, you’re not alone. I’ve been there, watching my kitchen turn into a battleground of melted butter and mismeasured sugar. That’s why I’m here to share every trick, every tweak, and every moment of triumph. The next few paragraphs will walk you through the process as if we’re standing side by side, whisk in hand, ready to conquer the cookie universe. And now the fun part. By the end, you’ll wonder how you ever made it any other way.
What makes this version stand out is not just the ingredients but the meticulous attention to detail that turns an ordinary cookie into a showstopper. The dough is crafted to hold the Nutella perfectly, the baking time is calibrated to create that coveted golden crust, and the finishing touches—like a sprinkle of sea salt—add depth to the flavor. The result is a cookie that’s both comforting and adventurous, a sweet treat that feels like a warm hug in every bite. Alright, let's break down exactly what goes into this masterpiece...
What Makes This Version Stand Out
- Texture: The dough is engineered to be thick yet pliable, allowing the Nutella to stay sealed inside while the edges crisp to a golden perfection.
- Flavor: A touch of vanilla and a dash of sea salt elevate the chocolatey richness, turning each bite into a layered experience.
- Simplicity: With only ten ingredients, the recipe is approachable for beginners and quick enough for a last‑minute dessert.
- Uniqueness: The stuffing technique creates a “lava” effect that’s impossible to replicate with standard cookie recipes.
- Crowd Reaction: Friends and family can’t stop asking for seconds, and the cookie is a guaranteed hit at parties.
- Ingredient Quality: Using high‑quality butter and premium Nutella makes a noticeable difference in taste and mouthfeel.
- Cooking Method: Baking at 350°F ensures even heat distribution, preventing the center from overcooking while the exterior stays crisp.
- Make‑ahead Potential: The dough can be portioned and frozen, making it a versatile option for busy weeks.
Inside the Ingredient List
The Flour Foundation
All‑purpose flour is the backbone of our cookie dough. It provides structure and a neutral flavor that lets the Nutella shine. Skipping flour would leave you with a sticky mess that doesn’t hold together. If you prefer a lighter cookie, try substituting half the flour with cake flour; just be prepared for a slightly softer bite.
The Sweet Core
Brown sugar and granulated sugar work in harmony to create a caramelized sweetness that balances the richness of the Nutella. Brown sugar adds moisture and depth, while granulated sugar gives a crisp bite. If you’re watching your sugar intake, you can reduce the granulated sugar by a quarter, but the texture will change slightly.
The Butter & Egg Bond
Unsalted butter, softened to room temperature, is essential for a buttery flavor and tender crumb. Creaming the butter with sugar aerates the mixture, creating a light, airy base. The egg not only binds the dough but also adds a subtle richness that enhances the overall mouthfeel. For a vegan version, replace the butter with coconut oil and use a flaxseed egg.
The Nutella Heart
Nutella is the star of the show, but it also acts as a binder when folded into the dough. The hazelnut and chocolate flavors create a decadent center that oozes when you bite into the cookie. If you prefer a less sweet center, consider using a dark chocolate spread or a homemade hazelnut paste. A pinch of sea salt on top amplifies the chocolate flavor without making the cookie taste salty.
Everything's prepped? Good. Let's get into the real action. The dough is about to become a playground of flavors and textures, and you’ll be amazed at how simple it is to achieve perfection.
The Method — Step by Step
- Preheat your oven to 350°F (175°C). Line two baking sheets with parchment paper, ensuring they’re spaced at least an inch apart to give the cookies room to spread. The temperature is crucial; too high, and the edges will burn before the center sets. Watch Out: If your oven runs hot, you’ll end up with cookies that are crisp on the outside but raw inside. Keep an eye on the first batch to gauge your oven’s quirks.
- In a medium bowl, whisk together 2 cups all‑purpose flour, 1 tsp baking soda, 1 tsp baking powder, and ½ tsp salt. Set this dry mixture aside; it’s the foundation that will give your cookies structure. The leavening agents ensure the cookies rise slightly, creating that light bite you’ll love. If you prefer a denser cookie, reduce the baking powder by half, but be prepared for a thicker crumb.
- In a large mixing bowl, beat 1 cup unsalted butter with 1 cup brown sugar and ½ cup granulated sugar until the mixture is pale, fluffy, and the sugar crystals are fully dissolved. This creaming process incorporates air, which will later give the cookies a soft, airy interior. The butter’s fat content is key; a higher butter ratio keeps the dough tender. Kitchen Hack: If your butter is too soft, chill the mixture for 10 minutes before adding the dry ingredients to keep the dough from becoming overly sticky.
- Beat in 1 large egg and 1 tsp vanilla extract until fully incorporated. The egg acts as a binder, while the vanilla enhances the overall flavor profile. If you’re looking for a vegan alternative, use a flaxseed egg and a splash of almond milk. This step also ensures the dough has enough moisture to hold the Nutella filling.
- Gradually add the dry flour mixture to the wet mixture, stirring gently until just combined. Overmixing can develop gluten, making the cookies tough. The dough should be thick and slightly sticky. If it feels too dry, add 2 tbsp of milk to reach the right consistency. Kitchen Hack: Use a spatula to fold in the flour to preserve the air bubbles created during creaming.
- Fold in 1 cup Nutella and ½ cup chocolate chips, ensuring the filling is evenly distributed but not fully mixed into the dough. The dough will be thick, which is intentional—it keeps the Nutella sealed inside. If you prefer a smoother texture, you can blend the Nutella into the dough before adding the chocolate chips. This step is where the cookie’s signature gooey center begins to take shape.
- Scoop a tablespoon of dough onto the prepared sheet and flatten it with the back of a spoon. Place a teaspoon of Nutella in the center, then fold the dough over, sealing the edges and shaping into a ball. This is the moment of truth: the dough should hold together without cracking. If it tears, let it rest for a few minutes before reshaping. Watch Out: Overstuffing can cause the Nutella to leak during baking, creating a mess on the sheet.
- Press the stuffed dough gently onto the sheet to flatten it slightly, creating a cookie about 3 inches wide. The flattening ensures even baking and a crisp edge. Place the remaining dough balls on the sheet, spacing them evenly. If you notice any dough spreading, it’s a sign the oven temperature might be too high.
- Bake for 10–12 minutes, or until the edges are golden brown and the centers are set but still slightly soft. The cookies should smell toasty, with a faint chocolate aroma that lingers in the air. Remove from the oven and let them cool on the sheet for 5 minutes before transferring to a wire rack. This resting period allows the interior to firm up without drying out.
- Let the cookies cool completely on the wire rack before serving. The final bite should feel buttery on the outside, with a molten Nutella center that oozes out when you break it open. If you want an extra crunch, sprinkle a pinch of sea salt on top before baking. The contrast between salty and sweet will elevate the flavor to another level. And that’s it. You did it. But hold on, I've got a few more tricks that will take this to another level.
Insider Tricks for Flawless Results
The Temperature Rule Nobody Follows
Ovens are notorious for running hot or cold, but the key is to preheat for a full 10 minutes and use an oven thermometer to confirm the temperature. A 10‑degree variance can change the cookie’s texture dramatically. If your oven runs hot, lower the temperature by 25°F and add a few extra minutes at the end. This simple tweak ensures a consistent, golden crust every time.
Why Your Nose Knows Best
Smelling the dough as it bakes is a reliable indicator of doneness. When the aroma shifts from buttery to a subtle caramel, the cookies are ready. Trust your nose; it’s a seasoned chef’s secret. I’ve had countless batches where the timer misled me, but the scent told the truth.
The 5-Minute Rest That Changes Everything
Letting the cookies rest on the baking sheet for 5 minutes after removal from the oven is essential. The residual heat continues to cook the center, sealing the Nutella inside. Skipping this step can leave the center too runny, causing a mess when you try to eat them. The rest also allows the cookies to set, making them easier to transfer to a wire rack.
Use a Parchment Paper Edge
Placing a small strip of parchment paper along the edge of the baking sheet can prevent the cookies from sticking to the metal, especially if you’re using a light‑colored sheet. This trick also makes cleanup a breeze. The paper creates a barrier that keeps the dough from adhering to the sheet.
Freeze for a Quick Batch
If you’re in a hurry, portion the dough into balls and freeze them on a parchment‑lined tray. Once frozen, transfer them to a zip‑lock bag. When you’re ready to bake, simply take them out of the freezer, let them sit for 10 minutes, and bake as usual. This method saves time without compromising flavor.
Optional Sea Salt Finish
A pinch of flaky sea salt on top before baking adds a subtle savory contrast that elevates the chocolatey richness. The salt caramelizes slightly, giving the cookie a crunchy edge. If you’re watching sodium intake, skip this step or use a tiny pinch—just enough to tease the flavor without overpowering.
Creative Twists and Variations
This recipe is a playground. Here are some of my favorite ways to switch things up:
Chocolate‑Chip Explosion
Swap the Nutella for a swirl of dark chocolate chips, then add a drizzle of melted white chocolate on top. The result is a double‑layered chocolate experience that’s perfect for chocolate lovers. The white chocolate glaze adds a subtle sweetness that balances the dark chocolate bite.
Nutty Banana Crunch
Blend ripe banana into the dough for natural sweetness and a hint of fruitiness. Add chopped walnuts for crunch, and finish with a dusting of cinnamon. This variation turns the cookie into a wholesome snack that’s still indulgent.
Minty Fresh
Add a teaspoon of peppermint extract to the dough and swirl in a handful of crushed mint chocolate chips. The mint flavor pairs wonderfully with the Nutella, creating a refreshing twist. Serve these chilled for a cool treat on hot days.
Spiced Cinnamon Swirl
Stir in 1 tsp of ground cinnamon and a pinch of nutmeg to the dough for a warm, spiced flavor. Sprinkle a little extra cinnamon on top before baking. These cookies are perfect for autumn gatherings or a cozy evening at home.
Almond Butter Upgrade
Replace half of the Nutella with almond butter for a nutty, protein‑rich center. Add a sprinkle of sea salt and a drizzle of honey after baking. The almond butter provides a richer, less sweet profile that appeals to those looking for a balanced dessert.
Vegan Delight
Swap butter for coconut oil, use a flaxseed egg, and choose a vegan Nutella alternative. The cookies will still have that gooey center and buttery texture, but with a plant‑based twist. This version is ideal for vegans or anyone avoiding dairy.
Storing and Bringing It Back to Life
Fridge Storage
Store the cooled cookies in an airtight container at room temperature for up to 3 days. If you’re in a humid environment, keep them in a paper bag to absorb excess moisture. The cookies will maintain their texture and flavor when stored properly.
Freezer Friendly
Place the cooled cookies on a parchment‑lined tray and freeze until solid. Transfer them to a freezer‑safe bag or container. They’ll keep for up to 3 months. When ready to eat, let them thaw at room temperature for 15 minutes before enjoying.
Best Reheating Method
To revive frozen cookies, preheat the oven to 300°F (150°C) and bake for 5–7 minutes, or until the center is warm and the edges crisp. Add a tiny splash of water to the bottom of the baking sheet; the steam will help restore moisture to the cookie’s interior. Let them cool for a minute before biting into the restored gooey center.