Ever had a pancake disaster that left you staring at a soggy, flat mess while the kitchen smelled of burnt sugar? I still remember that night—flour flying like confetti, the batter bubbling like a volcano, and my confidence collapsing faster than the batter itself. It was a moment that sparked a relentless quest: to find the holy grail of pancakes that rise like clouds, flip like a magician, and taste like a dream.
I closed the door, turned on the stove, and let the scent of vanilla and honey mingle with the faint metallic tang of eggs. The sound of the whisk beating in rhythm with my heartbeat, the sight of golden bubbles forming on the skillet, and the feel of the batter’s silky smoothness against my fingertips—all these sensations combined into a culinary symphony that I could not ignore. Every time I tasted that first bite, the world seemed to pause, and I could taste the faint echo of a distant summer afternoon, the warmth of a sunlit kitchen, and the subtle crunch of a perfectly crisp edge that shattered like thin ice.
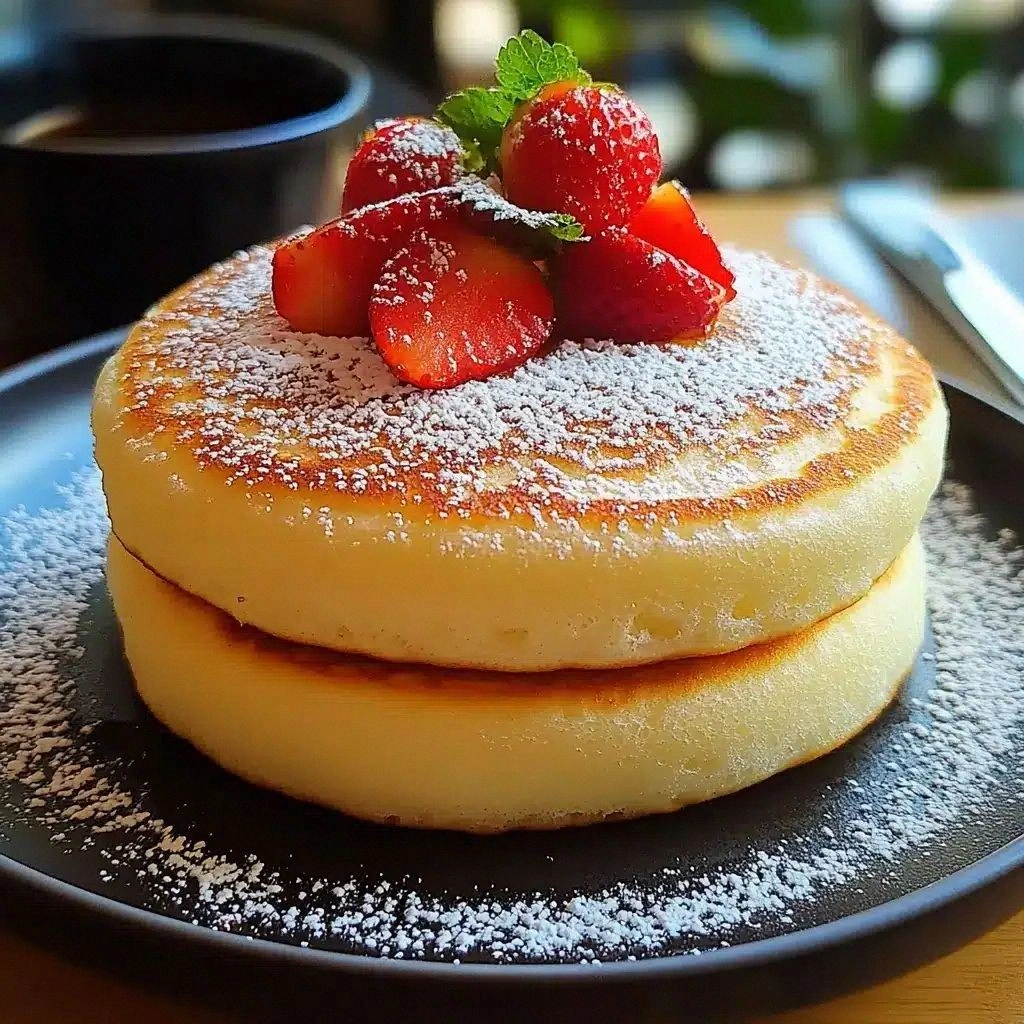
What makes this version of the Japanese soufflé pancake a game changer? It’s not just the airy texture or the delicate sweetness; it’s the meticulous balance of ingredients, the precise timing, and a secret technique that turns an ordinary batter into a fluffy masterpiece. The result? A pancake that rises like a soufflé, holds its shape like a cloud, and melts in your mouth with a whisper of vanilla, honey, and a hint of citrus. I dare you to taste this and not go back for seconds.
Let me walk you through every single step—by the end, you'll wonder how you ever made it any other way. Picture yourself pulling these out of the skillet, the whole kitchen smelling incredible, and your guests asking, “What’s that?” I’ll be honest—after the first batch, I ate half before anyone else even got a chance. And that’s just the beginning.
What Makes This Version Stand Out
- Taste: The subtle sweetness of honey paired with vanilla creates a flavor profile that feels both comforting and adventurous. The batter’s lightness allows each ingredient to shine without overwhelming the palate.
- Texture: Unlike traditional pancakes that flatten, these soufflés puff like a cloud, giving you a tender interior and a slightly crisp exterior that crackles just before you bite.
- Ingredient Quality: Using fresh eggs, high‑grade vanilla, and a touch of honey elevates the batter beyond the standard mix, ensuring each bite is a burst of genuine flavor.
- Method Simplicity: The technique is straightforward—just a few whisking steps and a resting period—yet it yields a result that feels like you’ve mastered a high‑end pastry.
- Make‑ahead Potential: The batter can rest for up to an hour, allowing you to prep in advance and still produce fluffy pancakes on demand.
- Visual Appeal: When plated, the pancakes stack like a miniature tower of clouds, making them Instagram‑ready and crowd‑pleasing at any gathering.
Alright, let's break down exactly what goes into this masterpiece...
Inside the Ingredient List
The Flavor Base
All-purpose flour forms the canvas of our soufflé, providing structure while remaining neutral enough to let the other flavors shine. A 2‑cup measure is optimal for a 4‑serving batch; too much flour can make the pancakes dense and heavy. If you’re allergic to gluten, consider a 1:1 blend of rice flour and tapioca starch for a similar lift.
Baking powder and baking soda are the leavening duo that coax the batter into a cloud‑like rise. The 1‑tsp each is calibrated to create gentle, sustained bubbles that keep the pancakes fluffy without causing them to split. Skipping either will result in a flat, dense texture that feels like a pancake, not a soufflé.
A pinch of salt (1/4‑tsp) balances the sweetness and brings out the vanilla’s depth. Without salt, the batter tastes overly sugary and loses its complexity. If you’re watching sodium, a 1/8‑tsp will still provide that subtle lift without compromising flavor.
The Texture Crew
Eggs are the backbone of the batter—2 whole eggs plus an extra yolk give the pancakes a rich, glossy finish while the whites provide structure. Whisk the eggs separately before combining to avoid over‑beating, which can trap too much air and cause the batter to collapse.
Milk (1/2 cup) hydrates the flour, creating a smooth batter that spreads evenly on the skillet. If you prefer a dairy‑free version, substitute an equal volume of oat or almond milk; the texture will remain light, though the flavor profile will shift slightly.
Water (1/4 cup) tempers the batter, ensuring it’s not too thick for pouring. A thinner batter yields pancakes that are easier to flip and cook evenly. If the batter feels too runny, add a tablespoon of flour to achieve the desired consistency.
The Unexpected Star
Vanilla extract (1 tsp) adds a fragrant, buttery undertone that complements the honey’s sweetness. A dash of citrus zest (optional) can brighten the flavor, giving the batter a subtle zing that makes the pancakes feel fresh.
Vegetable oil (2 tbsp) keeps the batter from sticking and gives the pancakes a silky finish. If you’re aiming for a richer taste, swap the oil for melted butter; just be mindful that it can slightly alter the rise.
Cornstarch (1 tbsp) is the secret to that extra fluffiness. It absorbs excess moisture, allowing the batter to rise higher and maintain a light, airy texture. Without cornstarch, the pancakes can become gummy or collapse during cooking.
The Final Flourish
A light dusting of powdered sugar (1 tbsp) adds a sweet finish that balances the honey and vanilla. It also provides a subtle crunch that contrasts the soft interior. If you’re serving these with fruit, you can skip the sugar and let the natural sweetness of the fruit shine.
Everything's prepped? Good. Let's get into the real action...
The Method — Step by Step
- In a medium bowl, whisk together flour, baking powder, baking soda, salt, and cornstarch until the mixture is even and free of lumps. The goal is a fine, airy blend that will trap the air from the eggs later. This step is critical—any clumps will result in uneven texture. Keep the bowl at room temperature to avoid premature coagulation of the eggs.
- In a separate bowl, beat the eggs and yolk until the mixture is pale and slightly frothy. Add milk, water, honey, vanilla, and vegetable oil, whisking until fully incorporated. The honey should dissolve completely, giving the batter a glossy sheen. This wet mixture is the heart of the soufflé; handle it gently to preserve its lightness.
- Fold the wet mixture into the dry ingredients using a spatula, mixing just until the batter is smooth. Over‑mixing can develop gluten, making the pancakes tough. A few streaks are fine—this is the moment where the batter starts to look like a silky cloud. The batter should be thick enough to hold its shape when ladled.
- Heat a non‑stick skillet over low‑medium heat and lightly oil it with a paper towel. Use a small ladle or measuring cup to pour a 1/4‑cup portion of batter onto the skillet for each pancake. The heat should be steady—too hot and the pancakes will brown too quickly; too low and they won’t set properly.
- Cover the skillet with a lid and cook for 3‑4 minutes until bubbles form on the surface and the edges lift away from the pan. The batter will start to set at the bottom, while the top remains slightly wet. This step is the moment of truth—watch the batter’s texture closely.
- Carefully flip each pancake using a wide spatula, and cook for an additional 2‑3 minutes until golden brown and puffed. The second side should be slightly darker but still moist inside. Avoid pressing down on the pancake; this will flatten the airy structure.
- Remove the pancakes from the skillet and place them on a wire rack to cool slightly. This allows steam to escape, preventing soggy bottoms. Repeat the process with the remaining batter, ensuring each pancake receives the same care.
- Serve immediately with your favorite toppings—fresh berries, a drizzle of maple syrup, or a dusting of powdered sugar. The pancakes are best enjoyed hot, when the airy interior is still tender and the exterior crisp. If you prefer a savory twist, a sprinkle of sea salt and a drizzle of olive oil can transform the flavor profile.
That's it — you did it. But hold on, I've got a few more tricks that'll take this to another level. Picture the pancakes as a blank canvas; the toppings are your paint. The right combination can elevate a simple breakfast into an unforgettable experience.
Insider Tricks for Flawless Results
The Temperature Rule Nobody Follows
Many cooks heat their skillet too high, causing the pancakes to brown before they set. Keep the heat low‑medium and test with a small drop of batter; it should sizzle softly and spread slowly. A consistent temperature ensures even cooking and a golden finish.
Why Your Nose Knows Best
Smell the batter before pouring—if it has a faint honey scent, it’s ready. A strong vanilla aroma indicates the batter is well‑mixed. Trust your nose; it’s a reliable indicator of batter readiness.
The 5‑Minute Rest That Changes Everything
After folding, let the batter rest for exactly 5 minutes before cooking. This brief pause allows the flour to absorb liquid, resulting in a smoother batter that rises higher. I once skipped this step and the pancakes collapsed—lesson learned.
The Secret to Non‑Sticking Skillets
Oil the skillet with a paper towel, then wipe away excess. A thin film prevents sticking without adding extra fat. If you’re using a cast‑iron pan, preheat it for 5 minutes to create a natural non‑stick surface.
The Perfect Flip Technique
Use a wide, flat spatula and slide it under the pancake just before flipping. This protects the delicate puff from breaking. A gentle, steady motion ensures the pancake stays intact.
The Final Touch: Dusting
A light dusting of powdered sugar or cocoa powder right before serving adds a visual pop and a hint of sweetness. It also creates a slight crunch that contrasts the airy interior. If you’re serving with fruit, a drizzle of lemon zest can brighten the flavor.
Creative Twists and Variations
This recipe is a playground. Here are some of my favorite ways to switch things up:
Citrus Burst
Add zest from one lemon or orange to the batter for a bright, tangy note. Pair with a lemon‑infused syrup for an extra zing. This variation works wonders during brunch or as a refreshing dessert.
Chocolate Dream
Fold in 1/4 cup of melted dark chocolate into the batter for a decadent twist. Top with chocolate chips and a drizzle of chocolate sauce. It’s a hit with kids and adults alike.
Savory Spin
Replace honey with a tablespoon of soy sauce and add chopped scallions to the batter. Serve with a side of miso soup and a drizzle of sesame oil. This version is perfect for a light lunch or a unique dinner.
Berry Bliss
Fold fresh blueberries or sliced strawberries into the batter just before cooking. The fruit bursts inside each bite, creating a juicy surprise. Serve with whipped cream for a luxurious touch.
Nutty Delight
Add 1/4 cup of finely chopped walnuts or almonds to the batter for a crunchy texture. The nuts add a subtle toasty flavor that pairs beautifully with maple syrup. This variation is a great way to incorporate protein.
Matcha Magic
Stir in 1 tablespoon of matcha powder for a vibrant green hue and earthy flavor. Pair with a sweetened condensed milk drizzle for a Japanese dessert vibe. It’s a striking visual and a flavor adventure.
Storing and Bringing It Back to Life
Fridge Storage
Cool the pancakes completely, then stack them with parchment paper between each layer. Store in an airtight container for up to 3 days. The pancakes retain their fluffiness if kept in a cool environment.
Freezer Friendly
Place the cooled pancakes on a baking sheet and freeze until solid. Transfer to a freezer bag and store for up to 2 months. When ready, reheat directly from frozen for a few minutes.
Best Reheating Method
Reheat in a toaster oven at 350°F for 3–5 minutes. If you prefer a microwave, add a splash of water to the pancake, cover with a paper towel, and heat for 20 seconds. The water creates steam that restores moisture without drying the interior.