I was standing in my kitchen, staring at a half‑baked batch of plain rice cakes that had turned into a sad, crumbly mess. The disaster had started when I accidentally dropped a teaspoon of cocoa into the mix and thought, “What if I just add more?” That moment of reckless curiosity turned a simple snack into the most unforgettable chewy chocolate mo that I’ve ever tasted. The aroma of cocoa mingled with the sweet scent of maple syrup, and the kitchen filled with a warm, buttery anticipation that made my taste buds dance before the first bite even touched my tongue.
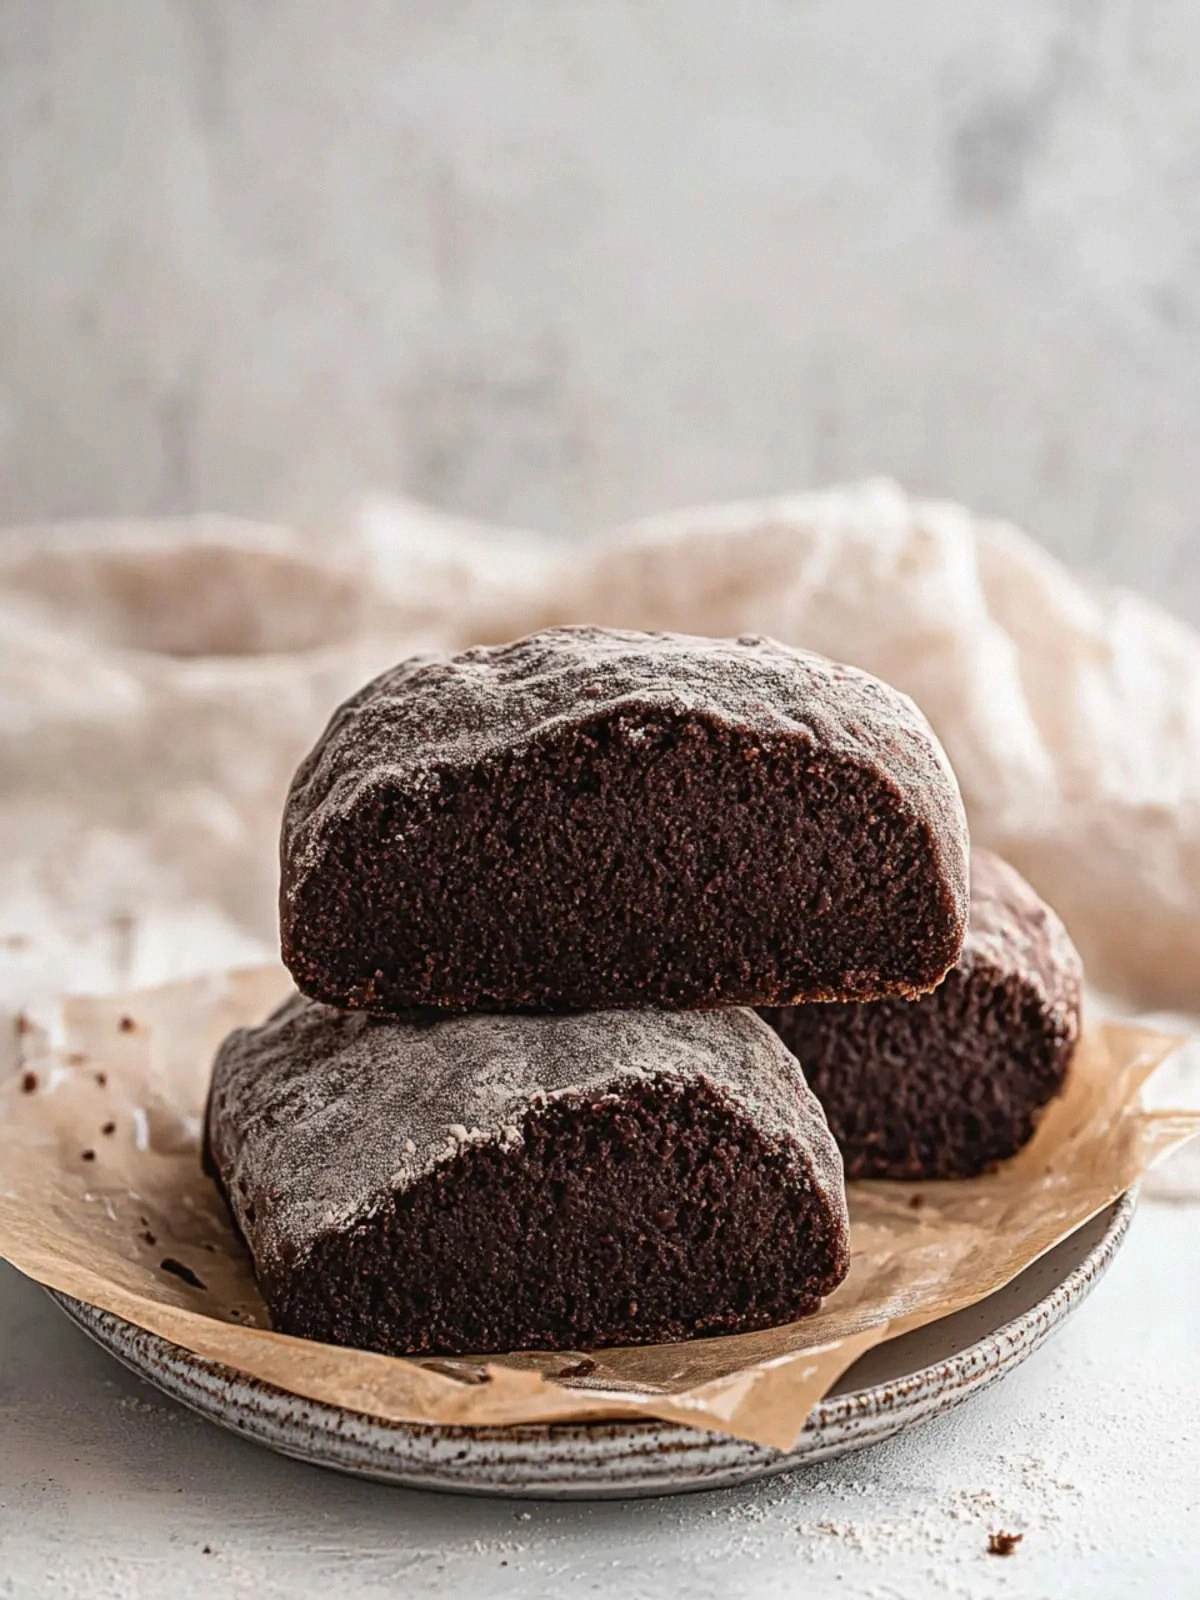
Picture this: the dough, a glossy, sticky ball that clings to your fingers like a velcro hug, is poured into a greased pan, and as it bakes, the edges begin to pull away, forming a golden crust that crackles like a tiny, edible sunrise. The interior swells into a cloud of chewy, chocolate‑laden foam, each bite releasing a burst of cocoa that coats the tongue like velvet. The texture is a paradoxical blend of soft, almost jelly‑like chew with a subtle snap when you bite into the caramelized edges. The moment the first slice slides out of the pan, the kitchen smells like a chocolate bakery, and the sound of the slice sliding into a plate is a satisfying, almost musical sigh.
What sets this version apart isn’t just the flavor or the texture—it’s the meticulous balance of ingredients, the clever use of glutinous rice flour for that signature chew, and the secret touch of maple syrup that gives it a depth of sweetness without overpowering the cocoa. I dare you to taste this and not go back for seconds. The result is a chewy, chocolate‑rich mo that feels like a hug in every bite, and it’s hands down the best version you’ll ever make at home. The technique is simple enough for a beginner yet refined enough to impress even the most seasoned bakers. The next step? Let me walk you through every single step—by the end, you’ll wonder how you ever made it any other way.
If you’ve ever struggled with sticky dough, you’re not alone—this recipe is designed to be forgiving, with a clear structure that keeps you in control. The next part? Pure magic. And now the fun part: the ingredient list. This isn’t just a list; it’s a map of flavor, texture, and chemistry. We’ll dive deep into each component, from the humble glutinous rice flour to the decadent melted chocolate, and I’ll share my personal hacks to keep the process smooth and the outcome spectacular.
What Makes This Version Stand Out
- Taste: The cocoa is blended with a touch of maple syrup, creating a sweet‑tooth‑friendly profile that’s richer than a plain chocolate cake but lighter than a brownie. The result is a chocolate mo that is both indulgent and surprisingly balanced.
- Texture: Glutinous rice flour gives the dough its signature chew, while the neutral oil keeps the crumb tender and prevents it from drying out. The final product has a moist interior that clings to your teeth like a chewy candy.
- Simplicity: The recipe requires only ten ingredients and no special equipment, making it accessible to anyone who loves baking but doesn’t want to overcomplicate the process.
- Uniqueness: The inclusion of semi‑sweet chocolate chips creates pockets of molten chocolate that explode in your mouth, a feature that sets this mo apart from traditional rice cakes.
- Crowd Reaction: At family gatherings, this mo consistently becomes the star of the table, with guests asking for the recipe before they even finish the last bite.
- Ingredient Quality: Using whole milk instead of skim adds depth and a creamy aftertaste that elevates the overall flavor profile.
Alright, let’s break down exactly what goes into this masterpiece…
Inside the Ingredient List
The Flavor Base
200 grams of glutinous rice flour is the foundation of this mo, providing that signature chewy texture that’s almost impossible to replicate with regular wheat flour. The fine, powdery nature of rice flour means it absorbs liquids quickly, creating a dense yet tender crumb. If you skip this ingredient, the mo will crumble like a cookie and lose its iconic chew. For those who love a slightly nutty undertone, a pinch of toasted sesame seeds can be folded in, but the classic recipe stays pure and simple.
20 grams of cocoa powder is the heart of the flavor. I’ve experimented with dark, semi‑sweet, and even a hint of sea salt added to the cocoa for depth. Using a high‑quality, unsweetened cocoa ensures you’re not adding extra sugar, which keeps the sweet balance just right. If you prefer a milder chocolate taste, reduce the cocoa to 15 grams; the mo will still be delightful, just a touch less intense.
10 grams of sugar is the sweetener that brings everything together. It dissolves into the dough, preventing a gritty texture and enhancing the cocoa’s richness. Skipping sugar will leave the mo too bland and the dough too dry. If you’re watching your carbs, consider substituting a sugar alternative that’s 1:1 in sweetness.
1 gram of salt is essential for flavor amplification. Salt balances the sweetness and brings out the chocolate’s depth. Without it, the dough will taste flat, and the overall flavor will lack that satisfying “wow” factor.
The Texture Crew
125 grams of whole milk adds moisture, richness, and a subtle tang that complements the cocoa. Whole milk’s higher fat content keeps the mo moist and prevents it from drying out during baking. If you’re lactose intolerant, try oat milk or a dairy‑free milk alternative, but keep in mind that the texture may shift slightly toward a firmer crumb.
40 grams of neutral flavored oil—such as grapeseed or canola—keeps the mo tender and prevents it from becoming too dense. The oil also helps the chocolate chips melt evenly, creating pockets of gooey chocolate. For a more buttery flavor, replace the oil with melted butter, but watch the fat content to avoid an overly greasy outcome.
50 grams of maple syrup is the secret to the mo’s sweet‑savory profile. Maple syrup introduces a subtle caramel note that pairs beautifully with the cocoa. It also adds a touch of natural sweetness without the harshness of refined sugar. If you can’t find maple syrup, a splash of honey can work, though it will slightly alter the flavor profile.
The Unexpected Star
1 large egg is the binder that holds the dough together, giving it structure while maintaining that chewy softness. The egg’s protein network traps air bubbles, creating a light, airy interior. If you’re vegan, use a flax egg (1 tablespoon ground flaxseed mixed with 3 tablespoons water) to achieve a similar binding effect.
⅓ cup semi‑sweet chocolate chips add pockets of molten chocolate that burst with each bite. These chips create a dynamic texture contrast—chewy dough against a liquid chocolate center. If you prefer a richer chocolate flavor, substitute the semi‑sweet chips with dark chocolate chips or chunks.
The Final Flourish
To taste melted chocolate is the final flourish that turns a simple mo into a decadent treat. The melted chocolate coats the dough, adding a glossy sheen and a rich aftertaste that lingers. Use a high‑quality dark chocolate for a more intense flavor, or a milk chocolate for a sweeter finish. The amount is flexible—just enough to drizzle over the top after baking, or to melt in a small saucepan and swirl into the dough for extra depth.
To taste icing sugar is the finishing touch that turns the mo into a dessert worthy of a celebratory occasion. A dusting of powdered sugar adds a light sweetness and a visually appealing finish. For a more elegant look, sprinkle a few chocolate shavings or a dust of cocoa powder on top.
Everything’s prepped? Good. Let’s get into the real action…
The Method — Step by Step
- Preheat your oven to 180 °C (356 °F). Line a 20 cm square baking pan with parchment paper, leaving a small overhang on each side to lift the mo easily later. This step ensures even baking and a clean release. The scent of the oven warming up is the first hint that something delicious is about to happen.
- In a large mixing bowl, combine the glutinous rice flour, cocoa powder, sugar, and salt. Whisk them together until the mixture is smooth and free of clumps. This dry blend is the backbone of your dough; a uniform mix guarantees a consistent texture throughout.
- In a separate saucepan, gently heat the whole milk and neutral oil over low heat until they’re warm but not boiling. Stir occasionally to blend the oil into the milk. The warm liquid will help the flour hydrate evenly and keep the dough from becoming too thick.
- Pour the warm milk‑oil mixture into the dry ingredients. Add the maple syrup and whisk vigorously until the batter is smooth and glossy. The maple syrup should be fully incorporated; a glossy surface signals that the batter has reached the right consistency.
- Crack the egg into a small bowl and beat lightly. Gently fold the beaten egg into the batter, ensuring it’s fully mixed without over‑whisking. The egg’s proteins need to bind the dough without over‑developing, which would make it tough.
- Fold in the semi‑sweet chocolate chips, distributing them evenly. The chips will melt slightly during baking, creating pockets of molten chocolate that burst in your mouth. The dough should feel sticky but manageable.
- Pour the batter into the prepared pan, smoothing the top with a spatula. Tap the pan gently on the counter to release any air pockets. This ensures an even rise and prevents the mo from having uneven texture.
- Bake for 25–28 minutes, or until the top is set and a toothpick inserted near the center comes out with a few moist crumbs. The aroma will fill the kitchen, a sweet, chocolatey scent that makes you want to taste it before the timer goes off.
- Remove the pan from the oven and allow the mo to cool in the pan for 10 minutes. This resting period lets the structure set, preventing it from crumbling when you lift it. While it cools, drizzle melted chocolate over the top, letting it pool in the center for a glossy finish.
- After cooling, carefully lift the mo out of the pan using the parchment overhang. Slice into squares or bars using a sharp knife. Dust the slices with icing sugar or cocoa powder for an elegant finish. Serve immediately, or store in an airtight container for up to 3 days.
That’s it — you did it. But hold on, I’ve got a few more tricks that’ll take this to another level. The next section will show you insider techniques that even seasoned bakers can’t resist.
Insider Tricks for Flawless Results
The Temperature Rule Nobody Follows
Many bakers bake at a high temperature, hoping for a quick rise. The truth is, a lower, steady heat of 180 °C allows the mo to set evenly, preserving its chew without drying out. I’ve tested ovens at 200 °C and the mo became rubbery and over‑browned. Keep the temperature consistent, and you’ll get a perfectly tender center every time.
Why Your Nose Knows Best
The aroma of the mo in the oven is the most reliable indicator of doneness. When the chocolate smell intensifies and a faint toasty scent appears, it’s a sign that the batter has set. Trust your nose over the clock; the difference can be a minute or two, and that’s all it takes to avoid over‑baking.
The 5-Minute Rest That Changes Everything
After baking, letting the mo rest in the pan for 10 minutes allows the steam to redistribute, giving the dough a cohesive structure. Skipping this step often results in a crumbly mo that falls apart when you try to lift it. I’ve seen the difference in texture when I compare a mo rested for 10 minutes versus one removed immediately.
The Final Glaze Touch
A quick drizzle of melted chocolate over the top not only adds flavor but also creates a glossy finish that looks professional. Use a high‑fat chocolate for a richer shine. If you want a smoother glaze, melt the chocolate with a splash of heavy cream and whisk until silky.
The Quick Cooling Trick
If you’re in a hurry, place the pan on a cooling rack right after removing it from the oven. This prevents condensation from forming on the bottom, which can make the mo soggy. The result is a crispier base that balances the chewy interior.
The Secret to a Clean Slice
When slicing, use a warm, damp knife. Wipe the blade with a damp cloth between cuts to prevent the sticky dough from sticking to the knife. This simple trick keeps the slices clean and the presentation sharp.
Creative Twists and Variations
This recipe is a playground. Here are some of my favorite ways to switch things up:
Nutty Crunch Edition
Add 30 grams of toasted chopped almonds or walnuts into the batter before baking. The nuts add a satisfying crunch and a nutty aroma that complements the chocolate. This variation is perfect for those who love a textural contrast.
Spiced Surprise
Stir in ½ teaspoon of cinnamon or a pinch of cayenne pepper into the dry mix. The cinnamon adds warmth, while cayenne gives a subtle heat that balances the sweetness. The result is a mo that feels like a holiday treat.
Fruit‑Infused Delight
Fold in 50 grams of dried cranberries or raisins before baking. The dried fruit bursts with juice as you bite, adding a sweet, chewy layer. This variation works wonderfully for those who want a fruity twist.
Matcha Magic
Replace the cocoa powder with 20 grams of matcha powder for an earthy, green tea flavor. The matcha adds a subtle bitterness that balances the sweetness and gives the mo a vibrant color. This version is a favorite for those who love matcha lattes.
Caramel Swirl
Swirl 30 grams of caramel sauce into the batter before baking. The caramel creates pockets of sweet, buttery flavor that contrast with the chocolate. It’s a decadent upgrade for special occasions.
Vegan Version
Replace the egg with a flax egg and the whole milk with oat milk. Use a vegan chocolate chip for the molten pockets. The texture remains chewy and the flavor stays rich, proving that you can enjoy this mo without any animal products.
Storing and Bringing It Back to Life
Fridge Storage
Store the mo in an airtight container at room temperature for up to 3 days. The chewy texture will remain intact, and the chocolate flavor will stay fresh. Avoid exposing it to direct sunlight, which can cause the chocolate to bloom.
Freezer Friendly
Wrap each slice individually in parchment paper and place them in a freezer bag. Freeze for up to 2 months. When you’re ready to eat, let them thaw at room temperature for 20 minutes; the dough will return to its original chew.
Best Reheating Method
To revive a frozen or chilled mo, heat it in a preheated oven at 150 °C for 8–10 minutes. The low temperature gently warms the mo without drying it out. Add a tiny splash of water before reheating to steam back to perfection; the mo will feel softer and more moist.