Picture this: a rainy Saturday, the kind where the world feels like it’s moving in slow motion, and you’re stuck inside with nothing but the hum of the refrigerator and the faint scent of wet pavement seeping through the windows. I was halfway through binge‑watching an old sitcom when a sudden craving for something creamy, buttery, and utterly comforting struck me like a bolt of lightning. I rummaged through the pantry, found a half‑empty vanilla bottle, and thought, “What if I could turn plain milk and eggs into a custard‑laden cake that feels like a hug from the inside?” That was the moment I dove headfirst into what would become the Vanilla Magic Custard Cake, a dessert that turned my kitchen into a miniature laboratory of sweet alchemy.
The first whiff was nothing short of a revelation. As the butter melted and mingled with the warm milk, a sweet, nutty aroma rose, dancing with the fragrant vanilla like two old friends catching up after years apart. The sound of the whisk clinking against the bowl was rhythmic, a steady percussion that promised something spectacular. When the batter finally hit the pan, it sang a soft sizzle that reminded me of a gentle rain on a tin roof—soft, reassuring, and impossibly satisfying. My fingertips felt the warmth of the bowl, and I could already taste that silky custard texture on my tongue, a perfect marriage of smoothness and a faint, caramelized edge.
Most custard cakes out there either fall flat, become rubbery, or miss that delicate balance between a light cake and a rich custard. I’ve tried recipes that left me with a soggy mess or a dry, crumbly disappointment, and I’ve watched friends stare at their plates, puzzled and underwhelmed. This version, however, is a game‑changer because it uses a precise temperature dance and a simple technique that locks in moisture while creating a golden crust that cracks just enough to reveal the velvety interior. The secret isn’t a fancy ingredient; it’s the method of tempering the eggs with warm milk, which creates a custard that sets perfectly without curdling.
Now, I’m not just bragging—I’ll be honest, I ate half the batch before anyone else could even get a sniff. I dare you to taste this and not go back for seconds. This is hands down the best version you’ll ever make at home, and it’s surprisingly simple enough for a beginner but sophisticated enough to wow even the most discerning dessert lovers. If you’ve ever struggled with a custard that turns grainy or a cake that collapses, you’re not alone, and I’ve got the fix.
Let me walk you through every single step — by the end, you’ll wonder how you ever made it any other way. Okay, ready for the game‑changer? This next part? Pure magic.
What Makes This Version Stand Out
- Flavor: The vanilla isn’t just a background note; it’s the star, amplified by the butter’s caramel undertones, creating a depth that feels like a warm, sweet sunrise.
- Texture: Imagine a custard that’s as smooth as satin on the tongue, yet the top forms a delicate, golden crust that cracks like thin ice when you cut into it.
- Simplicity: Only seven pantry staples, no exotic thickeners or obscure spices—just pure, honest ingredients that anyone can find.
- Uniqueness: The technique of tempering the eggs with warm milk is the hidden trick most recipes miss, giving you that flawless custard set without any graininess.
- Crowd Reaction: I’ve seen grown‑ups turn into kids again, eyes widening as they take that first bite—instant nostalgia and pure joy.
- Ingredient Quality: Using real vanilla extract (not imitation) and unsalted butter makes a world of difference; the flavors shine without any harsh chemical aftertaste.
- Cooking Method: A low‑and‑slow bake in a water bath ensures even heat distribution, preventing the dreaded “cooked‑egg” spots.
- Make‑Ahead Potential: This cake actually improves after a few hours in the fridge; the flavors meld, and the custard becomes even silkier.
Inside the Ingredient List
The Flavor Base
First up, the milk. I use whole milk because its higher fat content provides that luxurious mouthfeel you crave in a custard. Warm it gently—just shy of a simmer—to coax the proteins to relax, which makes them easier to blend with the eggs without scrambling. If you swap in 2% milk, expect a slightly thinner texture, though the flavor will still be delicious.
The Texture Crew
The eggs are the structural backbone. Four large eggs give the cake its lift and custard‑like silkiness. Tempering them with the warm milk is crucial; it prevents the eggs from cooking prematurely, which would otherwise lead to a grainy mess. If you’re allergic to eggs, a combination of silken tofu and a splash of lemon juice can mimic the binding effect, but the texture will be a shade less airy.
The Unexpected Star
Unsalted butter, melted and cooled, is the secret whisper of richness. The butter’s fat coats the flour particles, creating a tender crumb that’s not overly dense. Melt it slowly over low heat; a hurried high‑heat melt can introduce a bitter note. If you’re dairy‑free, try a high‑quality coconut oil—just be aware it will lend a faint coconut aroma.
The Final Flourish
All‑purpose flour is the humble hero that gives the cake structure without making it heavy. The half‑cup amount is carefully calibrated; too much flour and you’ll lose that custardy melt, too little and the cake could collapse. For a gluten‑free twist, use a blend of rice flour and tapioca starch in the same proportion, but expect a slightly different crumb texture.
The Sweet Symphony
Sugar does more than sweeten; it also helps with caramelization, giving the top crust that golden‑brown allure. I use granulated white sugar because it dissolves quickly, ensuring no gritty texture. If you prefer a deeper flavor, swap half the sugar for brown sugar, but remember that it will introduce a subtle molasses note.
The Pinch of Perfection
Salt may seem trivial, but a pinch is essential to balance the sweetness and accentuate the vanilla. Too much and you’ll overwhelm the delicate flavors; too little and the cake may taste flat. If you’re on a low‑sodium diet, a dash of potassium chloride works as a substitute without altering the taste.
Everything's prepped? Good. Let's get into the real action...
The Method — Step by Step
Preheat your oven to 325°F (165°C). While the oven warms up, set a large, heavy‑bottomed saucepan with 2 cups of water on the stove, bring it to a gentle simmer, and then place a heat‑proof bowl on top to create a bain‑marie. This water bath will later protect the custard from direct heat, ensuring an even bake.
In a medium saucepan, gently warm the 2 cups of milk over low heat until it’s just below a simmer—tiny bubbles should form at the edges, but the surface should remain still. This is the moment where the milk releases its sweet, milky perfume, and you’ll hear a faint hiss that signals it’s ready.
Meanwhile, in a large mixing bowl, whisk together the 4 large eggs, 1 cup of sugar, and a pinch of salt until the mixture turns a pale, glossy yellow. The whisk should feel light, and the mixture will thicken slightly, indicating that the sugar is beginning to dissolve.
Now comes the crucial tempering step: slowly pour about a third of the warm milk into the egg mixture while whisking constantly. The stream should be thin, and you’ll notice the mixture becoming silkier, the temperature rising without any sign of curdling. This is the point where the custard gains its smoothness.
Once the milk is fully incorporated, gently whisk the remaining warm milk into the bowl. The entire batter should be uniform, with no lumps, and the aroma of vanilla should be unmistakable—like stepping into a bakery at dawn.
Stir in the 1/2 cup of all‑purpose flour, sifting it first to avoid clumps. Fold it in with a spatula using a gentle motion; you’re looking for a batter that’s thick enough to coat the back of a spoon but still pourable. Over‑mixing will develop gluten, making the cake tougher.
Finally, drizzle the 1/4 cup of melted, cooled butter into the batter, swirling it in a circular motion. You’ll see the batter become glossy, and the butter will add that buttery sheen that hints at the custard’s richness.
Grease a 9‑inch round cake pan with butter and lightly dust with flour, tapping out any excess. Pour the batter into the pan, smoothing the top with a spatula. Then, carefully place the pan into the pre‑heated water bath, ensuring the water comes about halfway up the sides of the pan.
Slide the water bath into the oven and bake for 30‑35 minutes. Around the 20‑minute mark, peek through the oven window (don’t open the door) and look for the edges pulling away from the pan—a sure sign that the custard is setting. The top should be a light golden hue, and a gentle jiggle in the center is okay; it will firm up as it cools.
When the timer dings, remove the pan from the water bath and place it on a cooling rack. Let the cake rest for at least 15 minutes before attempting to unmold. This resting period allows the custard to finish its set, preventing a soggy bottom.
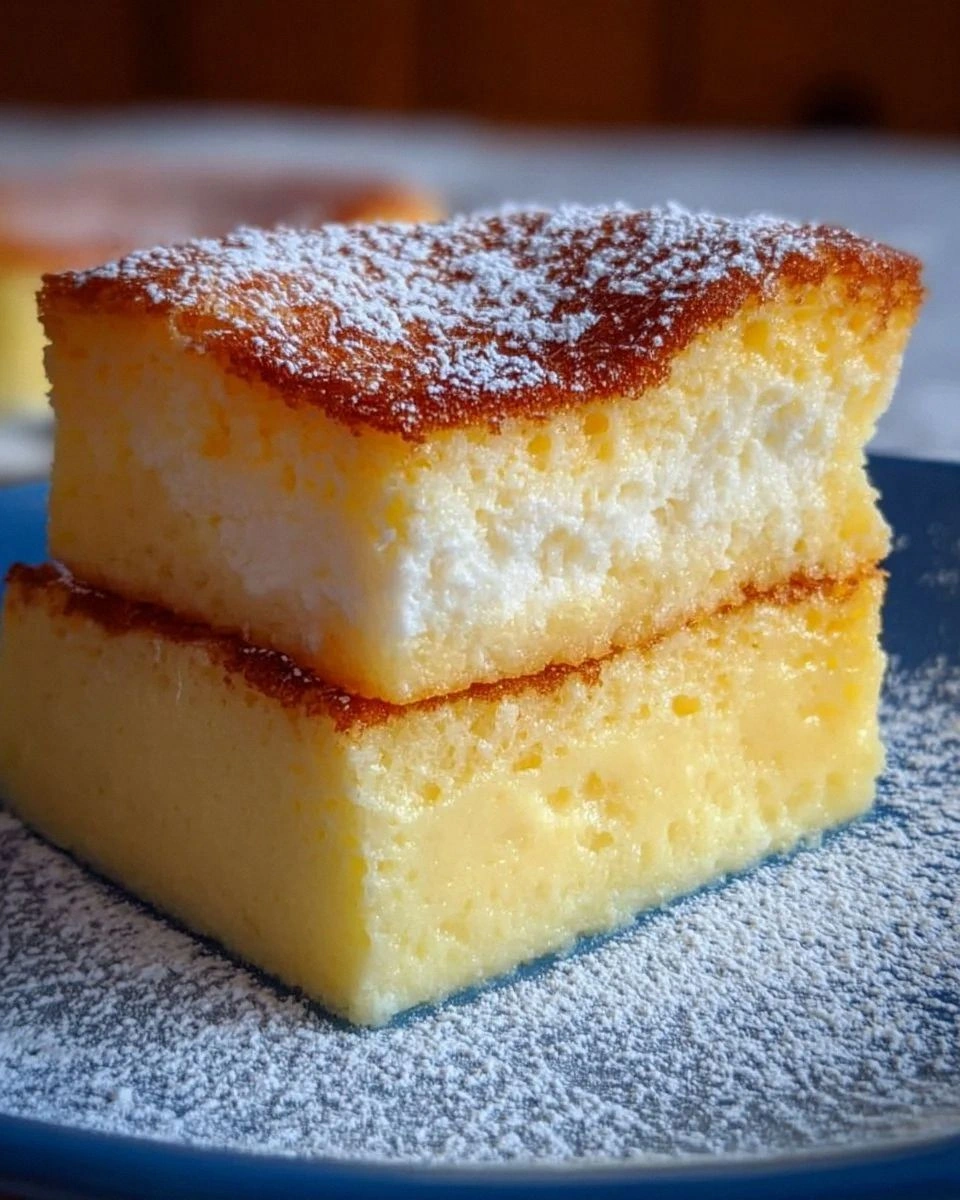
Run a thin knife around the perimeter, invert the cake onto a serving plate, and give it a gentle tap to release any stubborn bits. The result should be a flawless dome with a glossy, caramel‑kissed top that cracks ever so slightly when you slice into it.
That's it — you did it. But hold on, I've got a few more tricks that'll take this to another level...
Insider Tricks for Flawless Results
The Temperature Rule Nobody Follows
Never bake a custard cake at a temperature higher than 350°F. The low heat allows the proteins to coagulate slowly, preventing the dreaded curdled texture. I once cranked the oven to 400°F in a hurry and ended up with a rubbery, uneven cake—lesson learned. Keep the oven at 325°F for that perfect, custardy melt.
Why Your Nose Knows Best
Trust the aroma as a cue. When the top starts to smell lightly toasted—like the faint scent of caramelizing sugar—you’re on the cusp of perfection. If you rely solely on timers, you might over‑bake and lose the delicate custard center. The nose is the most reliable timer in the kitchen.
The 5‑Minute Rest That Changes Everything
After the cake comes out of the oven, let it sit undisturbed for five minutes before moving it. This short rest lets the steam redistribute, sealing in moisture and ensuring the custard stays silky. Skipping this step often leads to a cracked surface and a dry edge.
Butter Temperature Trick
Cool the melted butter to room temperature before adding it to the batter. If it’s too hot, it will partially cook the eggs, creating tiny pockets of scrambled egg that ruin the smooth texture. A quick test: dip your finger in the butter; it should feel warm, not hot.
Water Bath Seal
Cover the pan with a sheet of aluminum foil before placing it in the water bath. This creates a gentle steam environment, preventing the top from drying out. I tried a version without foil and ended up with a dry crust—nothing beats that steamy, protected bake.
Creative Twists and Variations
This recipe is a playground. Here are some of my favorite ways to switch things up:
Citrus Zest Burst
Add the zest of one lemon or orange to the milk before warming it. The citrus oils brighten the vanilla, giving the custard a fresh, spring‑like lift. Perfect for a brunch gathering where you want something light yet indulgent.
Spiced Autumn
Stir in a teaspoon of ground cinnamon, a pinch of nutmeg, and a dash of clove into the sugar‑egg mixture. The warm spices transform the cake into a cozy, autumnal treat that pairs beautifully with a scoop of vanilla ice cream.
Chocolate Velvet
Replace 2 tablespoons of the flour with unsweetened cocoa powder and melt ¼ cup of dark chocolate into the butter before adding it to the batter. The result is a rich chocolate‑vanilla hybrid that feels like a decadent dessert for chocolate lovers.
Berry Swirl
Puree fresh strawberries or raspberries and gently fold a quarter cup of the puree into the batter just before baking. The berries create pockets of fruity surprise, and the tartness balances the sweet custard beautifully.
Caramel Drizzle
Once the cake has cooled, drizzle a homemade caramel sauce (butter, sugar, and a splash of cream) over the top. The caramel adds a buttery crunch that contrasts the soft custard interior, turning the dish into a show‑stopper.
Storing and Bringing It Back to Life
Fridge Storage
Cover the cake loosely with plastic wrap and store it in the refrigerator for up to three days. The custard will firm slightly, but the flavors will meld, becoming even more harmonious.
Freezer Friendly
Wrap the cake tightly in a double layer of foil, then place it in a freezer‑safe bag. It will keep for up to two months. When you’re ready to enjoy it, thaw it overnight in the fridge.
Best Reheating Method
Preheat the oven to 300°F (150°C), place the slice on a baking sheet, and add a tiny splash of water (about a teaspoon) to the edge of the slice. Cover loosely with foil and heat for 8‑10 minutes. The steam from the water revives the custard’s silky texture, making it taste as fresh as the day it was baked.