I was standing in my kitchen, half‑asleep, when a friend dared me to make a tiramisu that didn’t need a single drop of booze. The thought of a dessert that kept all the classic coffee‑kissed layers but skipped the adult‑only twist felt like a culinary rebellion, and I was instantly hooked. I grabbed two packs of ladyfingers, brewed a pot of strong coffee, and set out a bowl of mascarpone that looked like soft, creamy clouds waiting to be whipped into something magical. The moment the coffee hit the ladyfingers, a rich, earthy aroma rose like a warm blanket on a chilly morning, and I knew I was onto something that would make even the most skeptical sweet‑tooth grin.
The kitchen was a symphony of sounds: the gentle hiss of the espresso machine, the soft thud of ladyfingers as they sank into the coffee bath, and the occasional clink of a stainless‑steel whisk as I folded the mascarpone mixture. My senses were on overload – the dark liquid coffee glistening on the sponge, the cool silkiness of the whipped cream, and the faint vanilla perfume that seemed to whisper promises of indulgence. I could almost taste the contrast between the airy cream and the slightly spongy, coffee‑soaked biscuits, and I felt a surge of excitement that made my heart race faster than a blender on high.
Most tiramisu recipes I’ve tried either drown the cake in too much alcohol or end up dry because the ladyfingers aren’t properly soaked. This version stands out because it strikes the perfect balance: the coffee is strong enough to give a bold punch, yet the mascarpone‑cream layer is light, fluffy, and just sweet enough to make the coffee’s bitterness sing. I’m not talking about a soggy mess or a dry brick – I’m talking about a cake that holds together like a well‑orchestrated choir, each bite delivering a harmonious blend of flavors that dance on your tongue.
There’s a secret technique hidden in this recipe that most people overlook: a brief, gentle whisk of the heavy cream with a splash of vanilla before it meets the mascarpone. This tiny step creates micro‑bubbles that lift the entire mixture, giving the final cake a cloud‑like texture that melts in your mouth. I’ll walk you through every single step — by the end, you’ll wonder how you ever made tiramisu any other way. Okay, ready for the game‑changer?
What Makes This Version Stand Out
- Taste: The coffee‑to‑cream ratio is calibrated to let the espresso shine without being overpowered by sweetness.
- Texture: A light, airy mascarpone‑cream that feels like a silk scarf draped over a sturdy, coffee‑kissed sponge.
- Simplicity: No soaking in liqueur, no complicated tempering – just coffee, cream, and a dash of vanilla.
- Uniqueness: The “no‑alcohol” twist makes it family‑friendly while preserving the classic tiramisu vibe.
- Crowd Reaction: Guests often ask for seconds before they even finish the first slice – I dare you to taste this and not go back for more.
- Ingredient Quality: Using real‑deal mascarpone and freshly brewed coffee elevates the dish from “good” to “legendary.”
- Make‑Ahead Potential: This cake improves after a few hours in the fridge, allowing flavors to meld like old friends.
- Cooking Method: No oven required – the entire process is a hands‑on, no‑heat adventure that keeps your kitchen cool.
Alright, let's break down exactly what goes into this masterpiece…
Inside the Ingredient List
The Flavor Base
Coffee is the heart of tiramisu, and in this recipe we use a full cup of freshly brewed, strong espresso that’s been cooled to room temperature. The cooling step is crucial; hot coffee would melt the mascarpone, while cold coffee ensures the ladyfingers absorb just enough moisture without turning mushy. If you don’t have an espresso machine, a very strong French press or moka pot works just as well – just make sure it’s dark and aromatic. Pro tip: Add a pinch of salt to the coffee; it brings out a deeper, almost caramel‑like note that makes the whole cake sing.
The Texture Crew
Mascarpone cheese is the creamy backbone of tiramisu, and the 16‑ounce tub we use is the real deal – not a low‑fat imitation. This cheese has a buttery richness that can’t be replicated with cream cheese, and it holds its shape when folded with whipped cream. Speaking of whipped cream, the 1 cup of heavy whipping cream is whisked to soft peaks before being folded in, creating a light, airy structure. If you’re short on time, a hand mixer will do, but a stand mixer on low speed gives you the most consistent texture.
The Sweetener & Flavor Enhancer
Half a cup of granulated sugar is dissolved into the coffee, ensuring no grainy texture in the final cake. The sugar not only sweetens but also balances the bitterness of the espresso. One teaspoon of pure vanilla extract adds a fragrant undertone that ties the coffee and cream together, making every bite feel cohesive. If you prefer a deeper vanilla flavor, split the teaspoon and add half to the coffee and half to the mascarpone mixture.
The Final Flourish
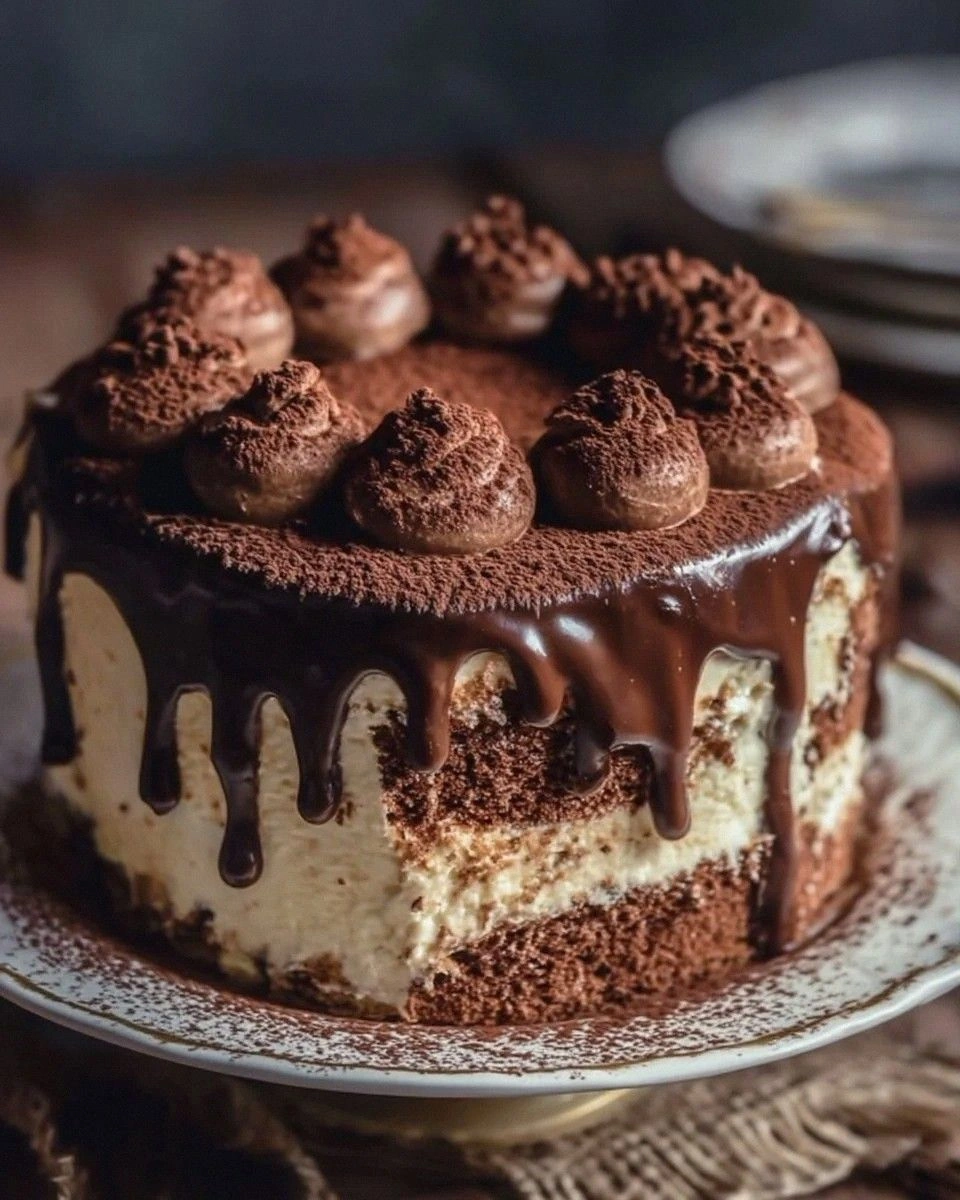
Unsweetened cocoa powder and chocolate shavings are added “to taste,” which gives you control over the final bitterness and visual appeal. A generous dusting of cocoa creates that classic, matte finish that looks like a sophisticated coffee shop dessert. Chocolate shavings add a textural contrast – a slight crunch that surprises the palate. If you’re feeling adventurous, try a pinch of espresso powder mixed with the cocoa for an extra depth of flavor.
Everything's prepped? Good. Let's get into the real action…
The Method — Step by Step
Start by brewing one cup of strong coffee. Use a dark roast, and let it cool completely on the counter. While it cools, line a 9‑inch springform pan with parchment paper – this will make the final removal painless. The coffee should be at room temperature; if it’s too warm, the ladyfingers will dissolve into a mush.
While the coffee is cooling, separate the mascarpone from any excess liquid that may have settled at the bottom of the container. Transfer the 16‑oz block into a large mixing bowl. This is the moment where the mascarpone’s buttery aroma fills the kitchen, making you wonder why you ever bothered with other cheeses.
In a separate chilled bowl, pour the 1 cup of heavy whipping cream. Add the 1/2 cup of granulated sugar and the 1 tsp of vanilla extract. Using a hand mixer, whisk on medium speed until soft peaks form – you’ll notice the cream turning glossy, almost like a sunrise on a calm sea. Kitchen Hack: Chill the mixing bowl and whisk for at least 10 minutes beforehand; this speeds up the whipping process dramatically.
Gently fold the whipped cream into the mascarpone using a spatula. The motion should be slow and deliberate, lifting the mixture from the bottom of the bowl to incorporate air without deflating the cream. This step creates that signature “cloud‑like” texture that makes every bite feel like you’re eating a dessert dream.
Now, take your ladyfingers – two packs, typically 24 pieces each – and arrange them in a single layer at the bottom of the prepared pan. Quickly dip each finger into the cooled coffee for no more than two seconds; you want them to absorb the flavor but not become soggy. Lay them side by side, overlapping slightly, until the pan is covered.
Spread half of the mascarpone‑cream mixture over the soaked ladyfingers, using an offset spatula to smooth the surface. The cream should ooze into every crevice, creating a cohesive layer that binds the biscuits together. If you notice any gaps, press the cream gently with the back of the spatula – the goal is a uniform, velvety sheet.
Repeat the soaking process with the remaining ladyfingers, creating a second layer. Once the top layer is in place, spread the remaining mascarpone mixture over it, smoothing it into a flawless top. This is the moment of truth – the cake should look like a smooth, pale slab, ready for its final adornments.
Cover the pan with plastic wrap and refrigerate for at least 4 hours, preferably overnight. During this time, the flavors meld, the ladyfingers soften just enough, and the cream sets into a firm yet creamy consistency. The longer you wait, the more the coffee infuses the cake, turning each bite into a harmonious blend of bitter, sweet, and creamy notes.
When you’re ready to serve, dust the top generously with unsweetened cocoa powder using a fine mesh sieve. Follow with a scattering of chocolate shavings for that glossy finish. Slice with a hot, wet knife to get clean cuts – the heat helps the knife glide through the creamy layers without dragging.
That's it — you did it. But hold on, I've got a few more tricks that'll take this to another level…
Insider Tricks for Flawless Results
The Temperature Rule Nobody Follows
Never use hot coffee to soak the ladyfingers. Even a warm brew will melt the mascarpone, turning your silky cream into a soupy mess. I once tried a shortcut with hot espresso and learned the hard way that the cake collapsed like a house of cards. Keep the coffee at room temperature or cooler – the ladyfingers will soak evenly, and the cream stays perfectly stable.
Why Your Nose Knows Best
Before you spread the cream, give the soaked ladyfingers a quick sniff. If you detect a faint coffee scent, you’re good to go. If the aroma is weak, add a splash more coffee to the soaking bowl. Your nose is a far better gauge than a measuring cup when it comes to flavor intensity.
The 5‑Minute Rest That Changes Everything
After assembling the cake, let it sit uncovered at room temperature for five minutes before refrigerating. This brief pause allows the outer layer of ladyfingers to firm up slightly, preventing them from becoming overly mushy once chilled. I swear by this tiny trick; it’s the difference between a cake that holds its shape and one that crumbles under a fork.
Chocolate Shavings: The Secret Crunch
Instead of pre‑grated chocolate, use a vegetable peeler on a solid chocolate bar. The resulting shavings are irregular, offering varied textures that surprise the palate. If you want an extra burst of flavor, toss the shavings in a pinch of espresso powder before sprinkling them on top.
Cocoa Dusting Without Clumps
To avoid unsightly cocoa clumps, sift the powder through a fine mesh sieve and then tap the sieve lightly over the cake. The fine dust settles evenly, creating a matte finish that looks as professional as a patisserie masterpiece. A quick tip: add a few drops of cold water to the cocoa before dusting – it helps the powder adhere without forming lumps.
Creative Twists and Variations
This recipe is a playground. Here are some of my favorite ways to switch things up:
Mocha Madness
Replace half of the coffee with an equal amount of chilled chocolate milk. The result is a richer, chocolate‑forward tiramisu that still retains the coffee’s bite. Perfect for kids who love chocolate but aren’t fans of strong espresso.
Citrus Zest Surprise
Add a teaspoon of finely grated orange zest to the mascarpone mixture and sprinkle a bit of orange zest on top along with the cocoa. The citrus lifts the heaviness and adds a fragrant brightness that feels like a summer garden.
Nutty Crunch
Fold in a handful of toasted, finely chopped hazelnuts or pistachios into the cream layer. The nuts bring a buttery crunch that contrasts beautifully with the silky mascarpone, and they add a subtle nutty aroma that complements the coffee.
Vegan Velvet
Swap mascarpone for a blend of silken tofu and coconut cream, and use a plant‑based whipping cream. The flavor profile stays close, while the texture becomes slightly lighter. This version is perfect for dairy‑free guests without sacrificing that classic tiramisu vibe.
Spiced Autumn
Add a pinch of ground cinnamon and a dash of nutmeg to the coffee before soaking the ladyfingers. The warm spices turn the dessert into a cozy, autumn‑ready treat that pairs beautifully with a cup of hot apple cider.
Storing and Bringing It Back to Life
Fridge Storage
Cover the cake tightly with plastic wrap and store it in the refrigerator for up to 3 days. The flavors continue to meld, and the texture remains creamy. If you notice the top drying out, lightly dust a bit more cocoa before serving.
Freezer Friendly
Wrap the entire cake (still in its springform pan) in a double layer of freezer‑safe cling film, then place it in an airtight container. It freezes beautifully for up to 1 month. When you’re ready to enjoy, transfer it to the fridge to thaw overnight – no need to defrost at room temperature.
Best Reheating Method
Tiramisu is best served cold, but if you crave a warm twist, place a slice on a plate, drizzle a tiny splash of water over the top, and microwave for 10‑15 seconds. The water creates steam that revives the softness of the ladyfingers without melting the cream. This trick brings the cake back to life like a phoenix rising from the ashes.