I still remember the night I ruined a whole batch of chocolate truffles because I got cocky and thought I could eyeball the cream temperature. The kitchen smelled like burnt cocoa and disappointment, and I was ready to hang up my apron forever. But then my best friend dared me to make something simpler, something foolproof, and she tossed me a jar of peanut butter like it was a life preserver. What happened next changed my dessert game forever — these peanut butter truffles were born from that beautiful disaster, and they've been my secret weapon ever since.
Picture this: it's 11 PM, you're in your comfiest pajamas, and that sweet tooth hits like a freight train. You could raid the pantry for stale cookies, or you could whip up something that tastes like it came from a fancy chocolate shop but takes less effort than ordering takeout. The first time I made these, I literally stood at the counter eating them warm, powdered sugar dusting my chin like some kind of dessert criminal. My roommate walked in, took one look at the evidence, and without saying a word, grabbed a truffle and became an instant convert.
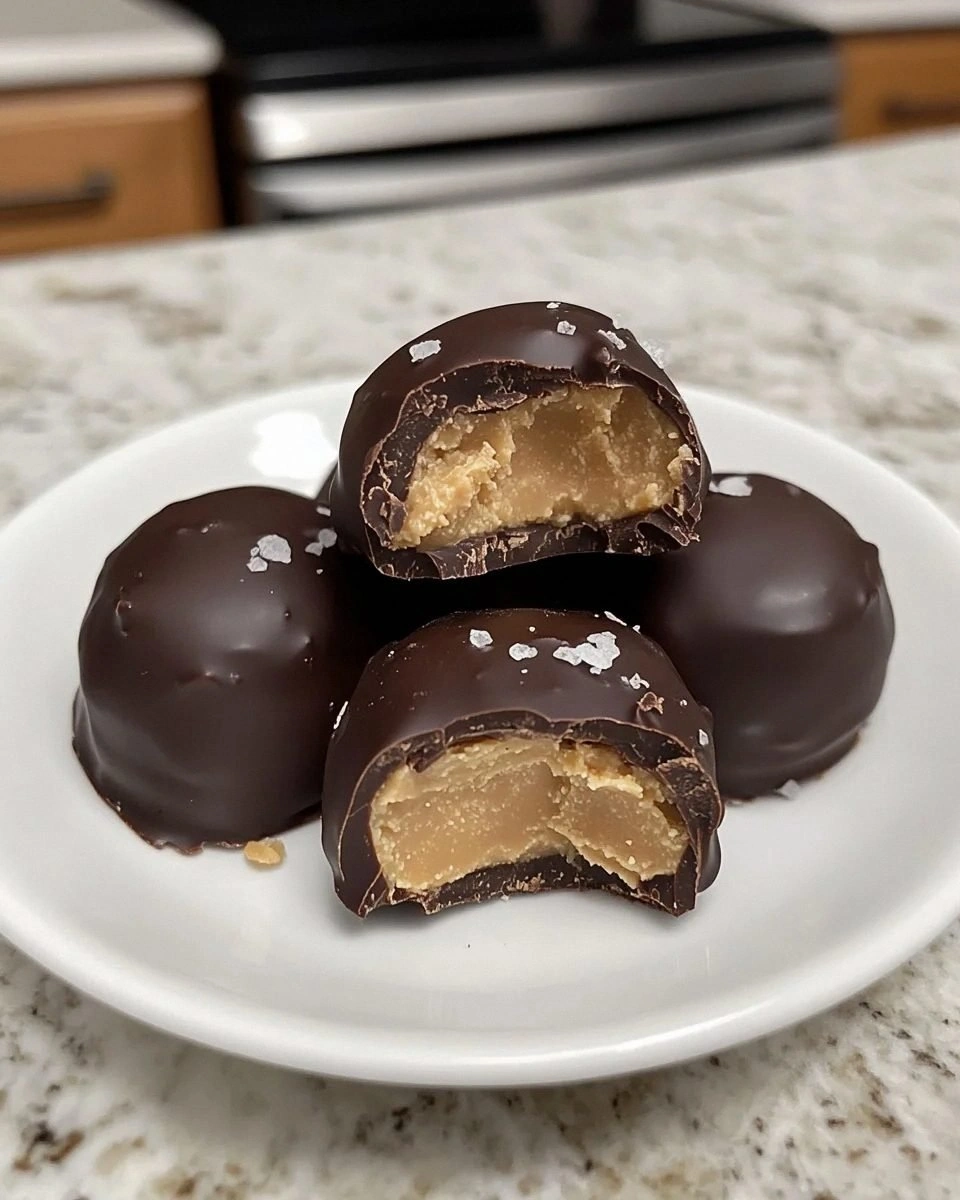
Here's what makes these little spheres of joy absolutely criminal: they require four ingredients, zero special equipment, and about fifteen minutes of your time. Yet they taste like something that should cost five dollars apiece in a glass display case. The texture is pure silk — imagine the creamiest peanut butter cloud wrapped in a chocolate shell that snaps like autumn twigs under your teeth. The filling melts on your tongue while the chocolate provides that satisfying crack, creating a contrast that'll make your eyes roll back in your head.
Most recipes get this completely wrong by adding too much sugar or using the wrong kind of peanut butter. They end up with greasy, overly sweet blobs that sit in your stomach like rocks. But here's the game-changer — we're using natural peanut butter and just enough powdered sugar to create a filling that's perfectly sweetened but still lets that roasted peanut flavor sing. Let me walk you through every single step — by the end, you'll wonder how you ever made it any other way.
What Makes This Version Stand Out
Silk-Smooth Texture: These truffles have the consistency of velvet thanks to the precise ratio of peanut butter to butter. The filling practically dissolves on your tongue, leaving behind nothing but pure peanut flavor without that gritty texture you get from cheaper versions.
Intense Peanut Flavor: By using natural peanut butter without added sugars or oils, we're letting the roasted peanut taste take center stage. It's like someone distilled a thousand peanuts into one perfect bite.
Zero Fancy Equipment: No candy thermometers, no double boilers, no specialty molds. If you've got a bowl, a spoon, and a microwave, you've got everything you need to make these beauties.
Make-Ahead Magic: These actually get better after a day in the fridge. The flavors meld and deepen, making them the perfect dessert to prep before a dinner party or holiday gathering.
Crowd-Pleasing Power: I've never met anyone who could resist these. Kids go crazy for them, adults sneak extras when they think no one's looking, and even my friend who claims to hate peanut butter devoured three before admitting defeat.
Customizable Canvas: This base recipe is just the beginning. Roll them in crushed pretzels for salt, cocoa powder for extra chocolate, or even bacon bits if you're feeling wild. The possibilities are endless.
Texture Perfection: The contrast between the smooth filling and the crisp chocolate shell creates a sensory experience that makes people close their eyes involuntarily when they bite in.
Alright, let's break down exactly what goes into this masterpiece...
Inside the Ingredient List
The Flavor Foundation
Natural creamy peanut butter is the star here, and I can't stress this enough — skip the Skippy and Jif for this one. Those commercial brands have added sugars and hydrogenated oils that'll make your truffles taste like a peanut butter sandwich from a vending machine. Natural peanut butter gives you that pure, unadulterated roasted peanut flavor that'll make your taste buds stand up and salute. The oil separation might seem annoying, but that's actually a good sign that you're working with the real deal. Just give it a good stir before measuring, and you're golden.
The Texture Crew
Unsalted butter is your secret weapon for achieving that melt-in-your-mouth consistency. Make sure it's properly softened — we're talking room temperature, not melted or cold. When butter is at the right temp, it whips into the peanut butter like a dream, creating air pockets that make the filling light instead of dense and heavy. If you forget to take it out ahead of time, cut it into small cubes and it'll soften in about fifteen minutes. Trust me, trying to mix cold butter is like trying to stir concrete, and melted butter will give you oily truffles that leak like a sad snowman in spring.
The Flavor Enhancer
Vanilla extract might seem optional, but leaving it out is like forgetting to add salt to soup — everything just tastes flat. A mere half teaspoon rounds out all the flavors and adds depth that makes people ask "what's in these?" without being able to put their finger on it. Use real vanilla extract, not the imitation stuff that tastes like a candle factory. The alcohol cooks off, leaving behind those complex vanilla notes that dance with the peanut flavor like they were made for each other.
The Sweet Science
Powdered sugar is where most recipes go wrong — they add way too much and end up with cloyingly sweet truffles that make your teeth ache. We're using just enough to sweeten and bind the filling without overwhelming the peanut flavor. Sift it if you're a perfectionist, but honestly, I usually skip this step and just make sure to mix thoroughly. The cornstarch in powdered sugar also helps absorb excess oil, keeping your truffles from turning into greasy messes on a warm day.
Everything's prepped? Good. Let's get into the real action...
The Method — Step by Step
- Start by dumping your peanut butter into a medium bowl — make sure it's the creamy kind, not chunky, unless you want textural surprises in your truffles. Give it a good stir with a sturdy spoon to make sure it's smooth and homogenous, especially if it's been sitting in your pantry for a while. The oil separation is totally normal, just keep stirring until it looks like the peanut butter you remember from childhood sandwiches. This step is crucial because if you skip it, you'll end up with oily spots in some truffles and dry, crumbly ones in others.
- Add your softened butter to the bowl — it should leave an indentation when you press it with your finger but not feel greasy or melted. Using a hand mixer or stand mixer with the paddle attachment, beat the peanut butter and butter together on medium speed for about two minutes. You're looking for a light, fluffy consistency that looks like peanut butter clouds. The color should lighten slightly, and the mixture should increase in volume as air gets incorporated. This is the foundation of your truffle filling, so don't rush it.
- Now comes the vanilla extract — just a splash, but it makes all the difference. Pour it in and mix for another thirty seconds to distribute it evenly throughout the mixture. Take a moment to appreciate how good your kitchen smells right now, like someone opened a gourmet candy store. The vanilla will enhance the peanut flavor without overpowering it, creating a more complex taste profile that'll have people guessing your secret ingredient.
- Time for the powdered sugar, and this is where you need to channel your inner zen master. Add it in three additions, mixing on low speed after each addition until just combined. Resist the urge to dump it all in at once unless you want to recreate a powdered sugar snowstorm in your kitchen. The mixture will start to thicken and pull away from the sides of the bowl, forming a soft dough that's pliable but not sticky.
- Here's the moment of truth — grab a small piece of the mixture and roll it between your palms to form a 1-inch ball. It should come together easily without crumbling or sticking to your hands. If it's too crumbly, add a teaspoon of milk or cream. If it's too sticky, add a tablespoon more powdered sugar. This is your chance to perfect the consistency before you commit to rolling the whole batch, so don't skip the test truffle.
- Scoop out rounded teaspoons of the mixture and roll them between your palms to form smooth balls. Work quickly — the warmth from your hands will soften the mixture, making it harder to shape. Place each truffle on a parchment-lined baking sheet as you go. I dare you to taste this and not go back for seconds. They're already delicious at this stage, but trust me, the chocolate coating takes them into another dimension.
- Once you've rolled all your truffles, pop the baking sheet into the freezer for at least thirty minutes. This step is non-negotiable if you want perfectly coated truffles. The cold filling will help the chocolate set quickly, creating that beautiful snap when you bite into them. While they're chilling, clean up your kitchen because things are about to get chocolatey.
- Melt your chocolate in the microwave in thirty-second bursts, stirring between each interval. Don't walk away from the microwave here — chocolate can seize faster than you can say "peanut butter truffle." When it's about 80% melted, remove it and stir until completely smooth. The residual heat will finish melting the remaining pieces, giving you perfectly tempered chocolate that'll set with a gorgeous shine.
- Remove your truffles from the freezer and working with one at a time, drop them into the melted chocolate. Use a fork to roll them around until completely coated, then lift them out, letting the excess chocolate drip off. Transfer them back to the parchment-lined sheet. This next part? Pure magic. The chocolate will start setting almost immediately, creating that professional-looking finish.
- For the final flourish, melt a little white chocolate and drizzle it over the tops, or dust them with cocoa powder while the chocolate is still slightly soft. This step is purely for aesthetics, but hey, we eat with our eyes first. Let the chocolate set completely before serving — about fifteen minutes at room temperature or five minutes in the fridge if you're impatient like me.
That's it — you did it. But hold on, I've got a few more tricks that'll take this to another level...
Insider Tricks for Flawless Results
The Temperature Rule Nobody Follows
Here's the thing about chocolate — it has a memory like an elephant and a temper like a toddler. If you melt it too hot or let it cool too much, it'll bloom with white streaks that look like your truffles have developed a case of chocolate dandruff. The sweet spot is around 88-90°F for dark chocolate, 86-88°F for milk chocolate. Don't have a thermometer? Test it by dabbing a tiny bit on your lip — it should feel barely warm, not hot. This is the difference between professional-looking truffles and sad, streaky ones that scream "homemade fail."
Why Your Nose Knows Best
Your sense of smell is your secret weapon when making these truffles. When the peanut butter and butter are properly combined, you should smell roasted peanuts with a hint of dairy sweetness. If it smells flat or one-note, add a pinch of salt — it'll wake up all the flavors like turning on a light switch. When you're melting chocolate, it should smell rich and inviting, not burnt or sharp. Trust your nose — it's been honed by thousands of years of evolution to keep you from eating things that'll make you sick.
The 5-Minute Rest That Changes Everything
After you roll your truffles but before you freeze them, let them sit for five minutes. This might seem counterintuitive, but it allows the fats to redistribute, creating a more uniform texture throughout. I learned this the hard way when I rushed through a batch and ended up with truffles that had weird oily spots. A friend tried skipping this step once — let's just say it didn't end well. Her truffles looked like they'd been through a chocolate war zone, all lumpy and sad.
The Chocolate Ratio Secret
Don't drown your truffles in chocolate — you want just enough to create a thin, crisp shell. Too thick and you lose that perfect peanut butter-to-chocolate ratio that makes these so addictive. Aim for about 1/2 cup of chocolate chips to coat 20-24 truffles. Melt a little extra and spread it on parchment to make chocolate bark for later. That sizzle when it hits the pan? Absolute perfection.
Creative Twists and Variations
This recipe is a playground. Here are some of my favorite ways to switch things up:
Crunchy Pretzel Paradise
Fold in half a cup of crushed pretzels into the peanut butter mixture before rolling. The salt and crunch create a flavor explosion that'll make you wonder why you ever ate plain truffles. Roll the finished truffles in more crushed pretzels for a double dose of that salty-sweet magic.
Dark Chocolate Dreams
Use 70% dark chocolate for coating and mix a tablespoon of instant espresso powder into the peanut butter filling. The coffee enhances the chocolate flavor without making them taste like mocha. It's sophisticated enough for dinner parties but still approachable enough for kids.
White Chocolate Raspberry
Replace half the peanut butter with raspberry jam and coat in white chocolate. The tart fruit cuts through the richness, creating a truffle that tastes like a PB&J sandwich went to finishing school. They're bright, unexpected, and perfect for spring gatherings.
Spicy Mexican Hot Chocolate
Add a teaspoon of cinnamon and a pinch of cayenne to the peanut butter mixture. Coat in dark chocolate and dust with a mixture of cocoa powder and cinnamon. The heat builds slowly, creating a warming sensation that's perfect for cold winter nights.
Coconut Joy Bombs
Mix in half a cup of toasted coconut flakes and use coconut oil instead of butter. Coat in milk chocolate and roll in more toasted coconut. It's like a peanut butter cup and a Mounds bar had a beautiful baby that'll transport you straight to the tropics.
Salted Caramel Swirl
Drizzle cooled truffles with homemade caramel sauce and sprinkle with flaky sea salt. The combination of sweet, salty, and nutty creates a flavor profile that's impossible to resist. These disappear faster than anything else I've ever made for a party.
Storing and Bringing It Back to Life
Fridge Storage
Store your truffles in an airtight container in the fridge for up to two weeks, though I guarantee they won't last that long. Layer them between sheets of parchment paper to prevent them from sticking together. The cold actually improves their texture, making the chocolate even snappier. Just let them sit at room temperature for five minutes before serving to take the chill off.
Freezer Friendly
These freeze beautifully for up to three months. Flash freeze them on a baking sheet first, then transfer to a freezer bag. When you're ready to serve, let them thaw in the fridge overnight. The texture stays perfect, and you'll always have emergency desserts on hand for unexpected guests or midnight cravings.
Best Reheating Method
If your truffles have been in the fridge and you want to serve them at optimal temperature, let them sit at room temperature for about ten minutes. Don't microwave them — you'll melt the chocolate and ruin the texture. If they've been frozen, overnight in the fridge is the way to go. Add a tiny splash of water before reheating — it steams back to perfection, though honestly, these are best served at room temperature.