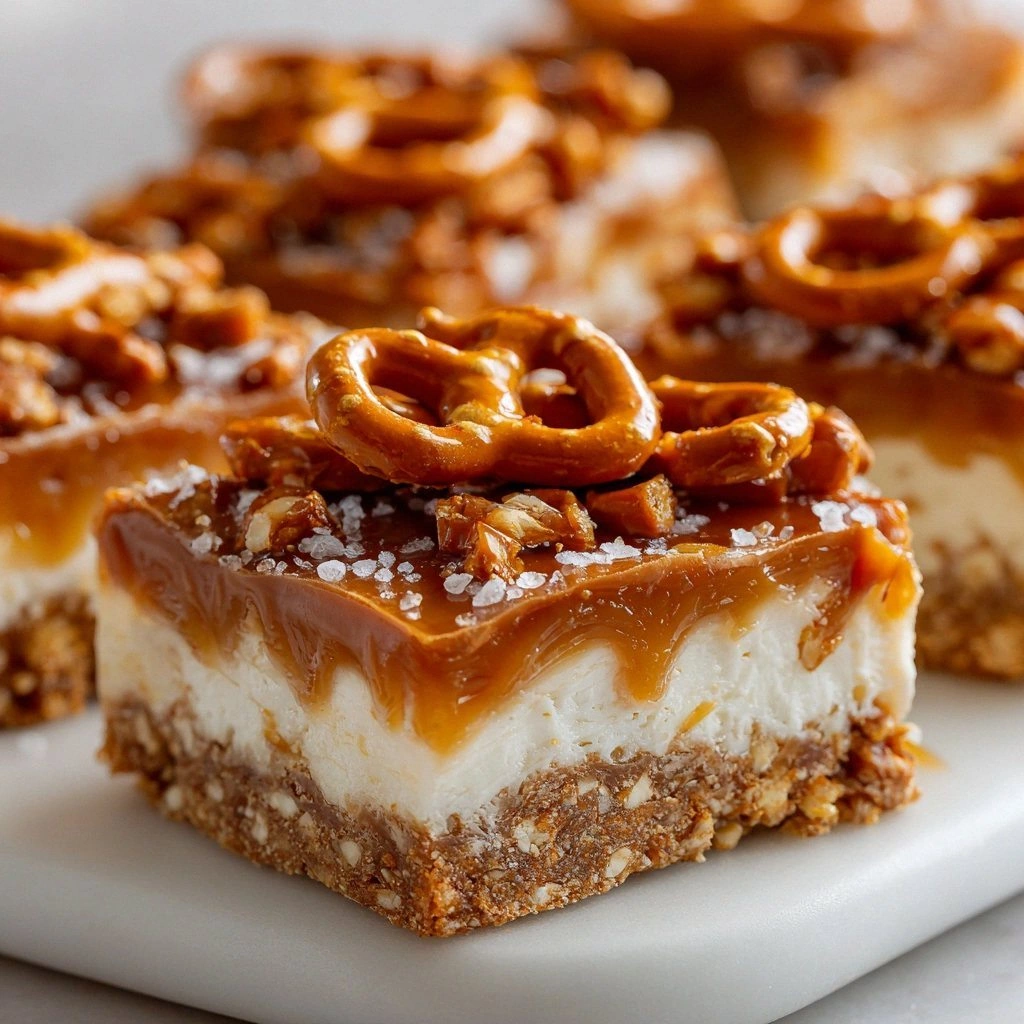
I was standing in a kitchen that smelled like burnt sugar and regret when my friend dared me to make something that could turn a flop into a triumph. The night before, I’d attempted a caramel‑pretzel bar that looked more like a soggy mess than a sweet treat, and the only thing that survived was a faint trace of salt on the counter. The moment I tasted that first bite, I knew I’d found the missing piece—a no‑bake, salted caramel pretzel that’s as smooth as velvet and as crunchy as a fresh bag of pretzels. The caramel coats the pretzel crumbs like a glossy sheen, the sea salt flakes crackle with every bite, and the whole thing melts in your mouth before it snaps back into a perfect bite‑sized piece. I’m not exaggerating; this is hands down the best version you’ll ever make at home, and I’m about to walk you through every single step so you can replicate the magic in your own kitchen.
Picture yourself pulling this out of the fridge, the whole kitchen smelling incredible, and the moment your guests bite into a piece, they’ll gasp, “Where did you get that?” I dare you to taste this and not go back for seconds. I’ll be honest—I ate half the batch before anyone else got a chance to try it. If you’ve ever struggled with pretzel bars that turn out too dry or too sticky, you’re not alone, and I’ve got the fix. Most recipes get this completely wrong by over‑cooking the caramel or under‑seasoning the pretzels. Here’s what actually works: a balanced sweetness, a touch of salt, and a texture that’s crisp on the outside and chewy inside.
This recipe is a playground. I’ve experimented with everything from different types of sugar to varying the amount of sea salt, and the result is a sweet‑savory harmony that sings in every bite. The secret? A precise ratio of butter, sugar, and milk that creates a silky caramel, then a quick burst of baking soda that gives the pretzel crumbs a light, airy crunch. The final touch is a drizzle of salted caramel that’s thick enough to cling to each piece but thin enough to melt in your mouth. By the end, you’ll wonder how you ever made this any other way. Let me walk you through every single step — by the end, you’ll wonder how you ever made it any other way.
What Makes This Version Stand Out
- Flavor: A perfectly balanced sweet‑salty profile that lingers on the palate, unlike the overly sweet pretzel bars that drown the crunch.
- Texture: The pretzel crumbs are toasted just enough to give a satisfying crunch, while the caramel stays silky, creating a delightful contrast.
- Simplicity: No oven, no baking sheet, just a stovetop and a few ingredients that you likely already have in your pantry.
- Uniqueness: The addition of sea salt flakes on top gives an unexpected pop that elevates the whole experience.
- Crowd Reaction: Friends and family can’t stop asking for the recipe after the first bite—this is the kind of treat that turns a gathering into a conversation.
- Ingredient Quality: Using real butter and a splash of vanilla extract gives depth that generic store brands can’t match.
- Cooking Method: The no‑bake approach preserves the caramel’s silky texture without scorching.
- Make‑Ahead Potential: Store in an airtight container, and the bars keep their freshness for up to a week.
Alright, let’s break down exactly what goes into this masterpiece…
Inside the Ingredient List
The Flavor Base
Granulated sugar and packed brown sugar form the sweet backbone of the caramel. The granulated sugar gives a clean sweetness, while the brown sugar adds a subtle molasses undertone that deepens the flavor profile. Skipping either sugar will leave the caramel bland and lacking that complex depth that makes it addictive. If you’re allergic to dairy, you can replace butter with a dairy‑free alternative, but the taste will shift slightly toward a nuttier profile.
The Texture Crew
Pretzel crumbs are the heart of this recipe. They provide the crunch that contrasts the silky caramel. Toasting the crumbs just before mixing them in ensures that they remain crisp even after the caramel coats them. If you forget to toast, the crumbs may become soggy and lose their signature bite. For a different crunch, try adding a handful of crushed pretzel sticks for a more rustic texture.
The Unexpected Star
Sea salt isn’t just a garnish; it’s the secret weapon that balances the sweetness. A pinch of sea salt in the caramel keeps the sugar from crystallizing, giving it a smoother finish. The sea salt flakes on top act as a final flourish, adding a pop of flavor and a visual wow factor. If you don’t have sea salt, a fine kosher salt will work, but the flavor will be less pronounced.
The Final Flourish
Milk and vanilla extract are the finishing touches that bring everything together. Milk softens the caramel, preventing it from becoming too thick and clumpy. Vanilla adds aromatic warmth that elevates the entire dish. If you’re vegan, you can use a plant‑based milk and a splash of vanilla essence; the result will still be delicious but slightly different in aroma.
Everything's prepped? Good. Let's get into the real action…
The Method — Step by Step
- Toast the Pretzel Crumbs: In a dry skillet over medium heat, add the pretzel crumbs and stir constantly until they turn golden brown and emit a nutty aroma. This should take about 4–5 minutes. The sound of the crumbs sizzling is the first hint that your bars will have that satisfying crunch. Don’t rush; let them toast slowly to avoid burning.
- Make the Caramel: In a medium saucepan, melt the butter over medium heat. Add the pre‑mixed sugars, stirring until the mixture turns a deep amber color. Keep an eye on the temperature; the caramel should reach about 320°F (160°C) for a silky consistency. If you’re using a thermometer, that’s the sweet spot.
- Add Milk and Vanilla: Remove the pan from heat and whisk in the milk and vanilla extract. The mixture will bubble vigorously—this is normal. Stir until the caramel is smooth and glossy, then let it cool for 2–3 minutes. The bubbling indicates the caramel is fully integrated.
- Combine with Pretzel Crumbs: Pour the caramel over the toasted pretzel crumbs in a large mixing bowl. Gently fold the mixture until every crumb is evenly coated. The mixture should feel sticky but manageable; if it’s too runny, let it cool a bit longer.
- Press into a Pan: Line an 8x8 inch square pan with parchment paper. Transfer the mixture into the pan and press firmly with a spatula or the back of a spoon to create an even layer. This step is crucial for uniform bars that bake (or set) evenly.
- Refrigerate: Chill the pan in the refrigerator for at least 30 minutes, or until the mixture has set firmly. The bars should firm up, making them easy to cut later. This step also allows the flavors to meld together beautifully.
- Cut and Finish: Remove the set mixture from the pan and cut into bars or squares. While the bars are still slightly warm, sprinkle sea salt flakes over each piece. The salt will melt slightly into the caramel, creating a glossy finish.
That’s it — you did it. But hold on, I’ve got a few more tricks that’ll take this to another level. These insider tips will help you avoid common pitfalls and elevate the flavor profile to a new height.
Insider Tricks for Flawless Results
The Temperature Rule Nobody Follows
Caramelizing sugar is a science, not an art. The key is reaching 320°F (160°C) before adding milk. If you’re using a thermometer, aim for that sweet spot. If you don’t have a thermometer, look for the caramel to emit a pleasant, nutty aroma and turn a deep amber color. Skipping this step often results in a brittle, chalky texture that’s not worth the effort.
Why Your Nose Knows Best
Smell is a powerful indicator of caramel perfection. A sweet, buttery aroma with a hint of toasted sugar signals that the caramel has reached the right stage. If it smells raw or overly sweet, give it a few more minutes. Trust your nose; it’s a reliable guide for achieving that silky finish.
The 5‑Minute Rest That Changes Everything
After removing the pan from heat, let the caramel rest for 5 minutes before adding milk. This brief pause allows the sugars to settle, reducing the risk of crystallization. I’ve seen friends skip this step and end up with a gritty texture that’s hard to fix.
Keep the Crumbs Toasted
Even a minute too long on the heat can burn the pretzel crumbs, turning them bitter. Keep a close eye and stir constantly. If you’re cooking in a hot kitchen, consider lowering the heat slightly to avoid burning.
Use Real Butter, Not Margarine
The flavor of butter is a cornerstone of this recipe. Margarine lacks the depth and richness that butter brings, resulting in a flatter taste. If you’re vegan, a high‑quality plant‑based butter that mimics the flavor of real butter will still give you a good result, but the authentic experience is unmatched.
Creative Twists and Variations
This recipe is a playground. Here are some of my favorite ways to switch things up:
Chocolate‑Covered Pretzel Bars
After the bars have set, dip them in melted dark chocolate and let them chill again. The chocolate adds a rich, bittersweet layer that pairs beautifully with the salty caramel.
Nutty Pretzel Crunch
Add chopped pecans or walnuts to the pretzel crumbs before toasting. The nutty flavor complements the caramel, creating a multi‑textured bite.
Coconut‑Infused Delight
Replace half the milk with coconut milk and sprinkle toasted coconut flakes on top. The tropical flavor adds a fresh twist that’s perfect for summer gatherings.
Spiced Caramel Pretzels
Add a pinch of ground cinnamon or cayenne pepper to the caramel for a warm, spicy kick. The heat balances the sweetness and gives a new dimension to the flavor profile.
Low‑Sugar Version
Use a sugar substitute that measures like regular sugar, such as erythritol or xylitol. Keep the same ratios and watch the caramel’s color; it will darken slightly but still achieve a smooth finish.
Vegan Pretzel Bars
Swap butter for coconut oil, use a plant‑based milk, and replace vanilla extract with vanilla essence. The result is a vegan version that still delivers on flavor and texture.
Storing and Bringing It Back to Life
Fridge Storage
Store the bars in an airtight container at room temperature for up to 5 days. The caramel will firm up, making the bars easier to cut. If you notice them drying out, wrap them in parchment paper to preserve moisture.
Freezer Friendly
Wrap the bars tightly in plastic wrap and place them in a freezer bag. They’ll stay fresh for up to 2 months. Thaw at room temperature for 30 minutes before serving to restore the caramel’s silky texture.
Best Reheating Method
Add a splash of water to a small saucepan, heat until warm, then place a single bar in the pan. The steam will gently reheat the caramel without making the bars soggy. This method keeps the bars crisp on the outside and soft on the inside.
Now that you’ve mastered the base recipe, it’s time to experiment. Try adding a dash of espresso powder to the caramel for a mocha‑flavored twist, or sprinkle a handful of toasted sesame seeds on top for an Asian-inspired crunch. The beauty of this recipe is that it invites you to be creative. Your kitchen is your laboratory, and the possibilities are endless. Happy baking, and may your pretzel bars always taste like a triumph.