I was standing in my kitchen at 11:47 PM, hair tied up with a rubber band I found in the junk drawer, wearing mismatched socks and the determination of someone who had just demolished half a jar of peanut butter with a spoon. The problem wasn't the peanut butter consumption—let's be honest, we've all been there. The problem was that I needed something more. Something that would satisfy the creamy-salty-crunchy-sweet quadrinity that was keeping me awake and haunting my taste buds like a ghost with a sweet tooth.
I'd already scoured the internet for no-bake desserts, but everything looked either too complicated or too sad. You know those recipes that promise "healthy dessert" but taste like someone punished a protein bar? Yeah, no thanks. I wanted the richness of peanut butter, the tang of yogurt, and the snap of chocolate without turning on my oven or my food processor. I wanted layers that would make my mouth do a happy dance, textures that would keep me guessing, and a dessert that would justify my midnight kitchen expedition to anyone who might judge my life choices.
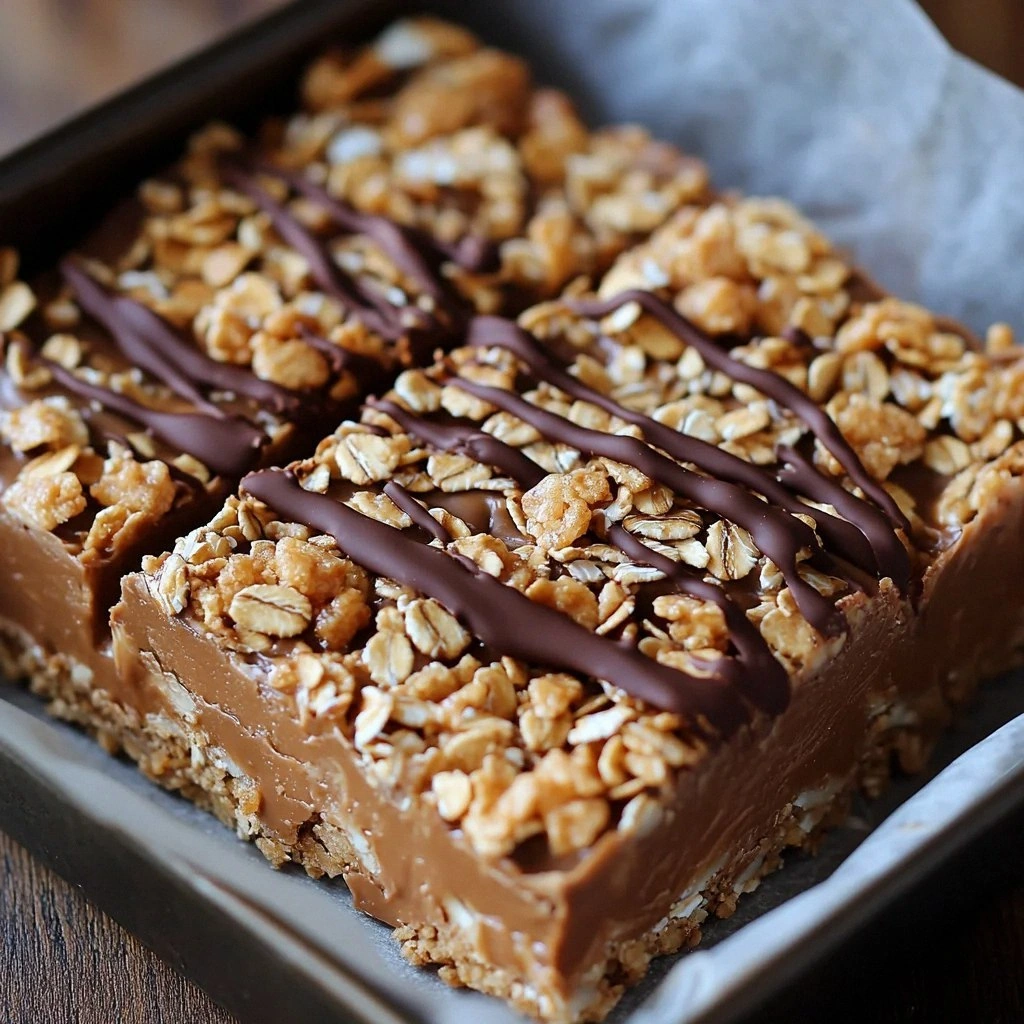
After three failed attempts that ranged from "weirdly soggy" to "concrete would be easier to chew," I stumbled upon the holy grail combination. The moment I pressed that first peanut-buttery crust into the pan and watched the yogurt layer spread like silk across the top, I knew I was onto something magical. But when I scattered those chocolate crisp pearls across the surface and they caught the light like tiny edible disco balls, I actually did a little dance right there on my kitchen tiles.
This isn't just another no-bake bar recipe—this is the one that made my neighbor knock on my door at 7 AM asking if I had any left, the one that disappeared from the office break room in twelve minutes flat, the one that has friends texting me months later asking for "those incredible peanut butter things you made." Let me walk you through every single step—by the end, you'll wonder how you ever made it any other way.
What Makes This Version Stand Out
Lightning-Fast: We're talking fifteen minutes of active work, max. While other recipes have you chilling things for hours or wrestling with springform pans, this one sets up beautifully in the freezer and slices like a dream. You could literally start this during a commercial break and be done before your show comes back on.
Texture Paradise: Most no-bake bars are either all mush or all crunch. These beauties give you the creamy peanut butter base, the silky yogurt middle, and those addictive chocolate crisp pearls that pop between your teeth like tiny cocoa fireworks. It's like a symphony where every instrument gets a solo.
Protein Powerhouse: Greek yogurt and peanut butter team up to give you a respectable 25 grams of protein per serving. That's basically dessert that doubles as a post-workout snack, which means you can totally justify eating these for breakfast. I won't tell if you won't.
Pantry Magic: Everything you need is probably sitting in your kitchen right now. No specialty flours, no obscure extracts, no ingredients that require a treasure hunt through three different stores. Just honest, real food that transforms into something extraordinary.
Make-Ahead Champion: These bars actually taste better after a day in the fridge. The flavors meld and deepen like they're at a flavor cocktail party getting to know each other. Make them Sunday, enjoy them all week, feel like a meal-prep genius.
Crowd-Thriller: I've never seen a pan of these last longer than a day, even when I strategically hid them behind the broccoli in the fridge. Kids love them because they taste like candy, adults love them because they're not cloyingly sweet, and everyone loves them because they're just different enough to be interesting.
Inside the Ingredient List
The Flavor Foundation
Creamy peanut butter is the star here, and not the natural kind that separates into an oil slick and concrete paste. You want the commercial stuff that stays emulsified and smooth, the kind that makes stirring feel like spreading silk across your tongue. Natural peanut butter will work if you're patient enough to stir until your arm falls off, but the commercial variety gives you that perfect texture without the workout. If you're feeling fancy, the honey-roasted variety adds this subtle sweetness that plays beautifully with the tangy yogurt.
Powdered sugar might seem like an odd choice, but trust me on this one. Granulated sugar stays grainy and crunchy in cold desserts, like tiny sweet landmines in your smooth peanut butter base. Powdered sugar dissolves instantly and gives you that bakery-smooth texture that makes people think you went to culinary school. Plus, it thickens the peanut butter just enough to hold everything together without being dense.
The Tangy Middle
Full-fat Greek yogurt is non-negotiable here. The low-fat stuff turns icy and crystalline in the freezer, like eating sweetened snow. Full-fat yogurt stays creamy and luxurious, with that pleasant tang that cuts through the richness of the peanut butter like a bright spotlight on a dark stage. Vanilla Greek yogurt works in a pinch, but plain lets you control the sweetness and gives you that cheesecake vibe that makes these feel sophisticated.
Honey is your liquid gold here, doing triple duty as sweetener, flavor enhancer, and natural antifreeze. It keeps the yogurt layer from turning into a solid block of ice and adds these floral notes that make the whole thing taste artisanal. Maple syrup works too, but honey has this way of binding everything together that maple just can't match. Plus, the slight stickiness helps your chocolate crisps adhere like delicious little barnacles.
The Crunch Factor
Chocolate crisp pearls are the game-changer that takes these from "pretty good" to "where have these been all my life." They're like Rice Krispies that went to finishing school—delicate, airy, with a sophisticated chocolate flavor that doesn't overwhelm the peanut butter. If you can't find them, crushed chocolate-covered rice cereal works, but you'll miss that elegant pop and the way they catch light like tiny edible jewels. They stay crispy even after days in the fridge, which is basically a dessert miracle.
A touch of coconut oil in the chocolate layer gives you that snappy texture when you bite into it, like the chocolate shell on a premium ice cream bar. It also helps the chocolate set up quickly in the freezer so you're not waiting around for your dessert fix. If coconut oil isn't your thing, butter works too, but coconut oil gives you that satisfying crack when you bite into it.
The Unexpected Star
Sea salt flakes might seem unnecessary in a dessert, but here's the thing: they make everything taste more like itself. A tiny sprinkle on top awakens the peanut butter flavor, makes the chocolate sing, and turns the honey into liquid gold. It's like turning up the contrast on a photo—suddenly everything pops. Maldon salt is the gold standard here, with its pyramid-shaped crystals that dissolve on your tongue in tiny flavor explosions.
Vanilla extract in the yogurt layer is your background singer—not the star, but the whole thing falls apart without it. It bridges the gap between peanut butter and yogurt, creating this cohesive flavor profile that tastes intentional instead of like you just threw things together. Go for the good stuff here, not the imitation vanilla that tastes like sadness and artificial hope.
Everything's prepped? Good. Let's get into the real action...
The Method — Step by Step
- Start with your 8x8 pan and line it with parchment paper like you're tucking it into bed. Leave some overhang on the sides—these are your handles for lifting the whole glorious block out later. If you skip this step, you'll be chiseling dessert out of your pan with a butter knife while crying quietly. Trust me, I've been there, and it's not pretty. Smooth out any wrinkles because they're going to show up in your final bars like unwanted texture.
- In a medium bowl, combine your peanut butter and powdered sugar with the enthusiasm of someone who's about to win the lottery. Use a rubber spatula and really work it together, pressing and folding until you have a smooth, pliable dough that doesn't stick to everything it touches. This should take about two minutes of vigorous stirring, during which you can practice your acceptance speech for "Best Dessert Creator Ever." The mixture should hold together when you squeeze it but not be so dry that it crumbles like your resolve during swimsuit season.
- Dump this peanut butter mixture into your prepared pan and start pressing it down with the flat bottom of a measuring cup. This is where you channel your inner sculptor, creating an even layer that's smooth as silk and level as a spirit level. Work from the center out, pushing gently but firmly until you can't see any pan peeking through. If it starts sticking to your measuring cup, dust it lightly with powdered sugar—think of it as peanut butter Teflon.
- Now for the yogurt layer—whisk together your Greek yogurt, honey, and vanilla until it's smoother than a pickup artist at last call. You want it completely homogenous with no streaks of white yogurt fighting against the golden honey. This should take about thirty seconds of vigorous whisking, just enough to incorporate some air and make the mixture light and spreadable. Taste it now and adjust the honey if you want it sweeter, remembering that the peanut butter base will add plenty of richness.
- Pour this creamy mixture over your peanut butter base and gently spread it to the edges with an offset spatula or the back of a spoon. Work slowly here—if you rush, you'll disturb the peanut butter layer and end up with swirls that look like abstract art instead of distinct layers. The yogurt should be about half as thick as the peanut butter layer, creating perfect ratio when you bite into the finished bars. Give the pan a gentle tap on the counter to release any air bubbles and create a smooth surface.
- Time for the chocolate magic—in a small bowl, combine your chocolate chips and coconut oil and microwave in 15-second bursts, stirring between each one. This is not the time to walk away and check Instagram—chocolate can go from perfectly melted to a seized disaster faster than you can say "scorched cocoa." When it's 90% melted, stop microwaving and just stir until the residual heat melts the rest. You want it glossy and pourable but not hot enough to melt the yogurt layer.
- Drizzle this chocolate river over the yogurt layer in long, elegant stripes. Don't just dump it all in the center—channel your inner Jackson Pollock and create a pattern that makes you happy. Immediately sprinkle those chocolate crisp pearls across the surface while the chocolate is still warm and welcoming. Work quickly but not frantically, letting them fall where they may like chocolate confetti at the world's best party.
- Finish with the tiniest sprinkle of sea salt flakes across the top. Hold your hand high and let them drift down like savory snow—too close and you'll get concentrated salt bombs that nobody wants. This is your moment of zen, creating tiny flavor crystals that will make every bite sing. Give the whole pan one last gentle press to help everything adhere, then slide it into the freezer for at least two hours.
That's it—you did it. But hold on, I've got a few more tricks that'll take this to another level...
Insider Tricks for Flawless Results
The Temperature Rule Nobody Follows
Here's the thing about no-bake desserts—they're actually all about temperature. Your peanut butter should be at room temperature so it mixes smoothly with the powdered sugar. Cold peanut butter fights back like a toddler at bedtime, creating lumps that no amount of stirring will fix. Leave it on the counter for an hour before you start, or if you're impatient (no judgment), microwave it for exactly 8 seconds. Not 7, not 9—8 seconds is the sweet spot that makes it spreadable without turning it into liquid gold.
Why Your Nose Knows Best
When you're mixing the yogurt layer, stop and smell it. Seriously. Your nose can detect when the honey, vanilla, and yogurt are perfectly balanced before your tongue even gets a chance. If it smells sharp and tangy, add a touch more honey. If it smells cloyingly sweet, a squeeze of lemon juice will brighten everything up. This is your built-in quality control system that most people ignore because they're too busy following recipes like robots.
The 5-Minute Rest That Changes Everything
After you spread the yogurt layer, let the pan sit on the counter for exactly 5 minutes before adding the chocolate. This brief rest allows the yogurt to settle and firm up slightly, creating a better surface for the chocolate to adhere to. Skip this step and your chocolate will sink into the yogurt like quicksand, creating marbled swirls that might look pretty but mess up your textural experience. Five minutes is enough time to check Instagram, refill your coffee, or just stare at the refrigerator like it holds all life's answers.
The Patience Paradox
I know, I know—you want to eat these immediately. But here's the paradox: they're actually better after 24 hours in the fridge. The flavors meld and deepen like they're at a flavor wine tasting, getting to know each other better. The peanut butter softens slightly, the yogurt firms up perfectly, and the chocolate develops this satisfying snap that makes you feel like you're eating a gourmet candy bar. If you absolutely cannot wait (been there), 2 hours in the freezer will do, but 24 hours in the fridge is where the magic happens.
Creative Twists and Variations
This recipe is a playground. Here are some of my favorite ways to switch things up:
The Elvis Remix
Replace half the peanut butter with almond butter and add a layer of thin banana coins between the peanut butter and yogurt layers. The banana adds this tropical sweetness that makes the whole thing taste like a sophisticated version of Elvis's favorite sandwich. Top with chopped honey-roasted peanuts instead of chocolate crisps for a nuttier crunch that would make the King himself do a hip shake of approval.
The White Chocolate Dream
Swap the chocolate chips for white chocolate and add a teaspoon of orange zest to the yogurt layer. The white chocolate creates this vanilla-cream flavor profile that tastes like a peanut butter creamsicle, while the orange zest adds brightness that cuts through all the richness. Use chopped pistachios on top for color contrast and that sophisticated pistachio flavor that makes everything taste expensive.
The Salty Sweet Addiction
Add crushed pretzels to the peanut butter base for a salty crunch that creates an addiction you won't want to fight. Mix some caramel sauce into the yogurt layer for a turtle candy vibe that'll have you hiding these from your family. Top with crushed potato chips—yes, really—for the ultimate salty-sweet experience that hits every craving receptor in your brain.
The Tropical Escape
Replace the honey with mango puree and add shredded coconut to the yogurt layer. Suddenly you're on a beach somewhere, eating something that tastes like a peanut butter mango lassi in bar form. Use chopped dried mango on top instead of chocolate crisps for a chewy texture that transports you straight to a tropical paradise, no plane ticket required.
The Breakfast Bar
Add some instant espresso powder to the chocolate layer and replace the honey with maple syrup. The coffee flavor makes these taste like a peanut butter mocha, perfect for those mornings when you need breakfast but want dessert. Stir some chia seeds into the yogurt layer for added nutrition that makes these feel virtuous enough for 7 AM consumption.
The Spicy Surprise
Add a pinch of cayenne to the chocolate layer and some cinnamon to the peanut butter base. The heat builds slowly, creating this sophisticated flavor profile where sweet and spicy dance together like they were meant to be. Use candied ginger on top for an extra zing that'll wake up your taste buds and make these the most interesting dessert at the potluck.
Storing and Bringing It Back to Life
Fridge Storage
These bars are fridge divas—they like their space and they like it consistent. Store them in an airtight container with parchment paper between layers if you're stacking them. They'll keep beautifully for up to a week, though I've never personally witnessed a batch survive that long. The chocolate might develop a slight bloom (those white streaks) after a few days, but don't panic—it's just cocoa butter coming to the surface, not mold, and it doesn't affect the taste one bit.
Freezer Friendly
Wrap individual bars tightly in plastic wrap, then pop them into a freezer bag for up to three months of instant dessert gratification. The key is wrapping them well—freezer burn is the enemy of all that creamy goodness. When you're ready to eat, let them sit at room temperature for about 10 minutes. They'll soften just enough to bite through without cracking your teeth, while staying cold enough to feel refreshing on a hot day.
Best Reheating Method
These are meant to be eaten cold, but if they've been in the freezer and you want them softer, resist the urge to microwave them. Instead, let them sit on the counter for 15-20 minutes, or pop them in the fridge overnight. Microwaving turns the yogurt layer into a watery mess and makes the chocolate seize up like it's having a panic attack. Room temperature is your friend here—slow and steady wins the dessert race.