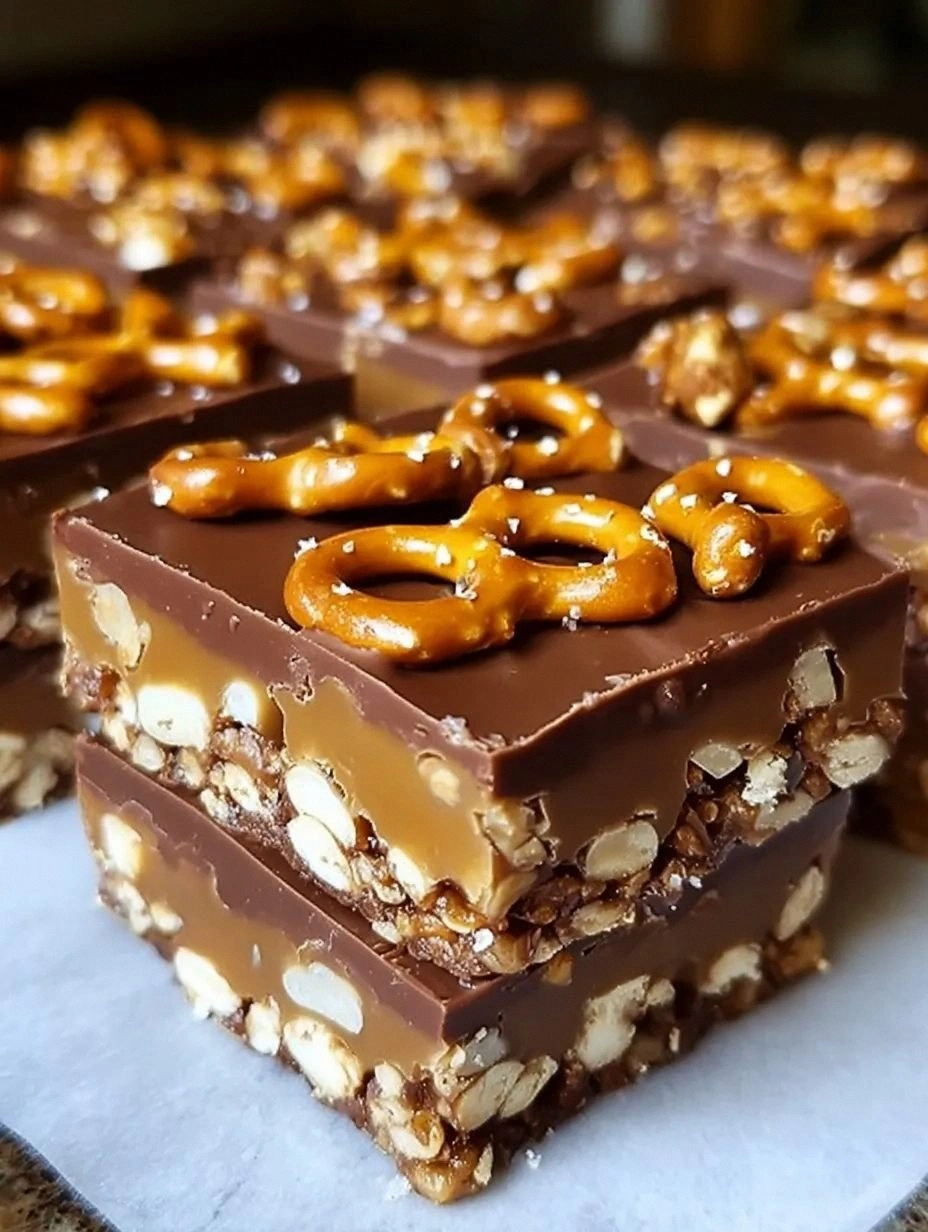
I’ll be honest — I ate half the batch before anyone else got to try it, and that’s because this version of No‑Bake Caramel Pretzel Crunch Bars is nothing short of a revelation. It started as a frantic midnight snack experiment after a friend dared me to create something that could survive a road trip, a movie marathon, and a sudden craving for both salty and sweet at the same time. The kitchen smelled like a carnival mixed with a candy‑store, the caramel bubbling in the pan like a golden sunrise, and the pretzel pieces were doing a jitter‑bug in the bowl, waiting for their moment of glory. Most recipes get this completely wrong, either by over‑cooking the caramel until it turns bitter or by using flimsy pretzels that dissolve into mush. This one, however, balances the buttery caramel with a crunchy pretzel backbone and a glossy chocolate finish that shatters like thin ice when you bite into it.
Picture yourself pulling this out of the fridge, the whole kitchen smelling incredible, the glossy top catching the light like a caramel‑kissed mirror. The first bite is a symphony: the salty snap of pretzel, the buttery melt of caramel, and the deep, slightly bitter chocolate that rounds everything out. I dare you to taste this and not go back for seconds, because the texture is so addictive that you’ll find yourself reaching for that second piece before the first one even fully disappears. The secret? A pinch of sea salt that makes the caramel sing, and a dash of vanilla that adds a whisper of warmth without stealing the spotlight.
Most no‑bake bars rely on a single layer of flavor, but this version layers it like a well‑crafted lasagna, each component distinct yet perfectly harmonious. The pretzel crunch provides a sturdy foundation, the caramel acts as the creamy middle, and the chocolate glaze crowns the whole thing with a glossy finish that’s as satisfying to look at as it is to eat. The technique I’m about to share involves a quick caramelization trick that locks in flavor without turning the mixture into a sticky mess — a technique most home cooks overlook, but you’ll see why it matters in just a moment.
Okay, ready for the game‑changer? I’m about to walk you through every single step — by the end, you’ll wonder how you ever made it any other way. Stay with me here — this is worth it. The only thing you’ll need besides a few pantry staples is a willingness to get a little sticky, a dash of confidence, and a love for that perfect sweet‑salty crunch that only pretzels and caramel can deliver.
What Makes This Version Stand Out
- Texture: The pretzel pieces stay crunchy, never soggy, thanks to a quick toss in butter before the caramel binds them together.
- Flavor Depth: A splash of vanilla and a pinch of sea salt elevate the caramel from basic to unforgettable.
- Simplicity: No oven, no complicated equipment — just a saucepan, a mixing bowl, and a spatula.
- Versatility: The base can be swapped for nuts, dried fruit, or even popcorn, making it a playground for flavor experiments.
- Crowd Reaction: One bite and you’ll hear the “wow” chorus at parties, office break rooms, or any gathering where you decide to share.
- Ingredient Quality: Using real butter and a good-quality caramel sauce makes the difference between “meh” and “mind‑blowing.”
- Make‑Ahead Potential: These bars keep their texture for up to a week in the fridge, so you can prep ahead for busy weeks.
- Cooking Method: The no‑bake approach preserves the pretzel’s snap and prevents the caramel from scorching.
Inside the Ingredient List
The Flavor Base
Butter is the silent hero here; its richness carries the caramel and prevents it from hardening too quickly. Using unsalted butter lets you control the salt level precisely, and the melt‑in‑your‑mouth feel is what makes the caramel spread like silk. If you skip the butter, the caramel will set too hard and the pretzels will lose their crunch, turning the bars into a dense, un‑pleasant slab. For a dairy‑free twist, try coconut oil, but expect a subtle coconut aftertaste that changes the flavor profile.
The Sweet Symphony
Caramel sauce is the star, providing that deep, buttery sweetness that makes your taste buds do a happy dance. I recommend a high‑quality store‑bought caramel or, better yet, a homemade version made with brown sugar, butter, and a splash of heavy cream for extra silkiness. If you use a low‑sugar caramel, the bars will lack that signature gooey center. A pinch of sea salt is the secret weapon that cuts through the sweetness and brings out a layered flavor, much like a good wine balances acidity.
The Texture Crew
Pretzel sticks are the backbone, delivering that satisfying snap that makes each bite addictive. Choose large, salty pretzels for maximum crunch; broken into bite‑size pieces, they create a lattice that holds the caramel in place. If you opt for mini pretzels, the texture becomes more uniform but loses that dramatic crunch contrast. Adding chopped peanuts or almonds can introduce an extra nutty dimension, but keep the ratio balanced so the pretzel remains the star.
The Unexpected Star
Chocolate chips form the glossy crown that not only looks stunning but also adds a bittersweet counterpoint to the caramel’s sweetness. Using dark chocolate (70% cacao) gives a sophisticated edge, while milk chocolate leans into pure comfort. If you’re feeling adventurous, a mix of white and dark chocolate creates a marbled effect that’s as eye‑catching as it is tasty. Skipping the chocolate means you lose that snap‑and‑crackle surface that makes the bars feel like a professional confection.
The Final Flourish
A splash of vanilla extract ties the whole flavor ensemble together, adding a fragrant backdrop that whispers rather than shouts. Heavy cream rounds out the caramel, giving it a velvety mouthfeel that prevents it from becoming grainy. Finally, a drizzle of corn syrup (optional) ensures the caramel stays glossy and prevents crystallization during cooling. If you leave any of these out, the bars will still be good, but they’ll miss that luxurious, restaurant‑quality finish.
Everything's prepped? Good. Let's get into the real action…
The Method — Step by Step
Gather all ingredients and line a 9×13‑inch baking pan with parchment paper, letting the excess overhang for easy lift‑out later. This step sounds simple, but the parchment acts as a non‑stick shield that prevents the bars from sticking, especially when the chocolate sets. Feel the cool paper against your fingertips — that tactile cue tells you you’re ready for the next move.
Kitchen Hack: Lightly spray the parchment with cooking spray before adding the pretzel mixture; this creates an extra slip‑away layer that makes unmolding a breeze.In a large saucepan, melt ½ cup (1 stick) of butter over medium heat until it foams, then add 1 cup of brown sugar and stir until dissolved. The mixture should bubble gently, releasing a caramel aroma that fills the kitchen like a warm hug. Keep the heat moderate; too high and the sugar will scorch, turning bitter — a watch‑out moment.
Watch Out: If the caramel starts to smoke, immediately remove the pan from heat and add the heavy cream to stop the burn.Stir in ¼ cup heavy cream, 1 tsp vanilla extract, and ½ tsp sea salt. The sauce will thicken quickly, turning a deep amber that looks like liquid gold. At this point, a quick taste test should reveal a buttery, slightly salty sweetness that makes you grin. Let the mixture simmer for another 2‑3 minutes, just until it coats the back of a spoon.
While the caramel simmers, place 2 cups of broken pretzel sticks into a large mixing bowl. Toss them with the remaining ½ cup of butter, melted, so each pretzel piece gets a glossy coat. This step is pure magic because the butter creates a barrier that keeps the pretzels from absorbing too much caramel, preserving their crunch.
Kitchen Hack: If you want extra crunch, toast the pretzel pieces on a dry skillet for 2 minutes before mixing with butter.Pour the hot caramel over the butter‑coated pretzels, stirring gently with a spatula until every piece is evenly cloaked. You’ll hear a faint sizzle as the caramel meets the butter‑glazed pretzels — that sizzle when it hits the pan? Absolute perfection. Keep the mixture moving to avoid any caramel pockets that could harden into chewy blobs.
Transfer the caramel‑pretzel mixture into the prepared pan, pressing it down with the back of a spoon or a piece of parchment to create an even layer about ½ inch thick. The surface should be glossy and slightly sticky; if it looks dry, drizzle a teaspoon more caramel on top and smooth it out.
Now for the chocolate crown: melt 1 cup of chocolate chips in a heat‑proof bowl over a simmering pot of water (double boiler) or in short bursts in the microwave, stirring between intervals. The chocolate should be smooth, glossy, and just warm enough to spread without cooling too fast. Pour the melted chocolate over the pretzel layer, using a spatula to spread it into a thin, even sheet.
Allow the bars to set at room temperature for 10 minutes, then transfer the pan to the refrigerator for at least 20 minutes, or until the chocolate hardens and the caramel firms up. Patience is key; the bars will slice cleanly only when fully set. While waiting, you can prep a serving plate or make a quick coffee to enjoy alongside the eventual treat.
Once chilled, lift the parchment out of the pan, place it on a cutting board, and slice the slab into 12‑16 bars using a sharp knife warmed under hot water. Warm the blade between cuts to achieve clean, crisp edges that don’t crumble. That first bite? It’s the crescendo of salty pretzel, buttery caramel, and silky chocolate — pure bliss.
That's it — you did it. But hold on, I've got a few more tricks that'll take this to another level…
Insider Tricks for Flawless Results
The Temperature Rule Nobody Follows
Never let the caramel exceed a gentle boil; once it reaches a rolling boil, the sugar crystals can reform, turning your silky sauce into a grainy mess. Keep the heat at a medium‑low simmer and watch the edges of the mixture pull away from the pan — that's your cue that the caramel is ready to coat. I once tried to speed things up by cranking the heat, and the result was a bitter, burnt batch that no amount of chocolate could rescue.
Why Your Nose Knows Best
Your sense of smell is a more reliable indicator than a timer when caramelizing. When the buttery scent turns sweet and slightly nutty, you’re at the sweet spot. If you detect a faint burnt smell, pull the pan off the heat immediately and add a splash of heavy cream to halt the process. Trusting your nose saves you from a disaster and gives the caramel that deep, caramelized flavor.
The 5‑Minute Rest That Changes Everything
After mixing the caramel with pretzels, let the mixture sit uncovered for five minutes before pressing it into the pan. This brief rest lets the pretzel pieces absorb a tiny amount of caramel, creating a subtle internal moisture that prevents the bars from feeling dry. I tried skipping this step once, and the bars were crisp on the outside but oddly hollow inside — a texture no one wants.
Chocolate Tempering Shortcut
If you don’t have a tempering machine, you can still achieve a glossy, snap‑ready chocolate by melting two‑thirds of the chips, removing the bowl from heat, and stirring in the remaining third until smooth. This “seeding” method cools the chocolate just enough to set with a nice sheen, without the need for a candy thermometer. The result looks professional and gives that satisfying snap when you bite.
The Secret of the Sea Salt Sprinkle
A light dusting of flaky sea salt right after the chocolate sets adds a final burst of flavor that dances on the palate. Use a fine mesh sieve to distribute the salt evenly; too much will overpower the caramel, while too little will go unnoticed. This finishing touch is the difference between “good” and “wow‑factor” bars.
Creative Twists and Variations
This recipe is a playground. Here are some of my favorite ways to switch things up:
Nutty Banana Bliss
Add ½ cup mashed ripe banana to the caramel before mixing with pretzels, and sprinkle chopped walnuts on top of the chocolate layer. The banana brings a subtle fruitiness that pairs beautifully with the salty pretzel, while walnuts add an extra crunch. Perfect for brunch gatherings where you want a hint of breakfast flavor.
Spicy Chili Crunch
Stir in ¼ tsp cayenne pepper and a pinch of smoked paprika into the caramel for a gentle heat that awakens the palate. Finish with a drizzle of dark chocolate and a light dusting of smoked sea salt. This version is ideal for those who love a sweet‑heat contrast, and it’s a hit at game‑day parties.
White Chocolate Raspberry Dream
Swap the dark chocolate for white chocolate chips and fold in ¼ cup freeze‑dried raspberry pieces before the final pour. The tart raspberries cut through the sweetness, creating a balanced flavor that feels luxurious. Great for spring celebrations or a romantic dessert.
Matcha Green Tea Twist
Add 2 tsp matcha powder to the melted butter before tossing the pretzels, and drizzle a thin layer of white chocolate over the top. The earthy matcha notes provide a sophisticated contrast to the caramel, and the green hue makes the bars visually striking. Perfect for a tea‑time treat.
Coconut Paradise
Replace the butter with coconut oil, stir in ¼ cup shredded toasted coconut into the pretzel mixture, and use milk chocolate for the glaze. The coconut adds a tropical aroma, and the milk chocolate keeps the flavor mellow and kid‑friendly. Ideal for beach picnics or summer barbecues.
Storing and Bringing It Back to Life
Fridge Storage
Place the bars in an airtight container lined with parchment paper and keep them in the refrigerator for up to 7 days. The cool environment preserves the chocolate shine and prevents the caramel from becoming too soft. If you notice a slight hardening, let the bars sit at room temperature for 10 minutes before serving.
Freezer Friendly
Wrap each bar individually in plastic wrap, then arrange them in a zip‑top freezer bag. They’ll stay fresh for up to 3 months. To revive, transfer a bar to the fridge for 30 minutes, then let it sit at room temperature for another 10 minutes. Adding a tiny splash of water before reheating in the microwave (10‑second bursts) creates steam that restores the caramel’s gooey texture.
Best Reheating Method
If you prefer a warm treat, microwave a single bar on low (30% power) for 10‑15 seconds. The chocolate will soften just enough to become pliable, and the caramel will melt into a luscious sauce. Pair with a scoop of vanilla ice cream for an indulgent dessert that feels restaurant‑grade.