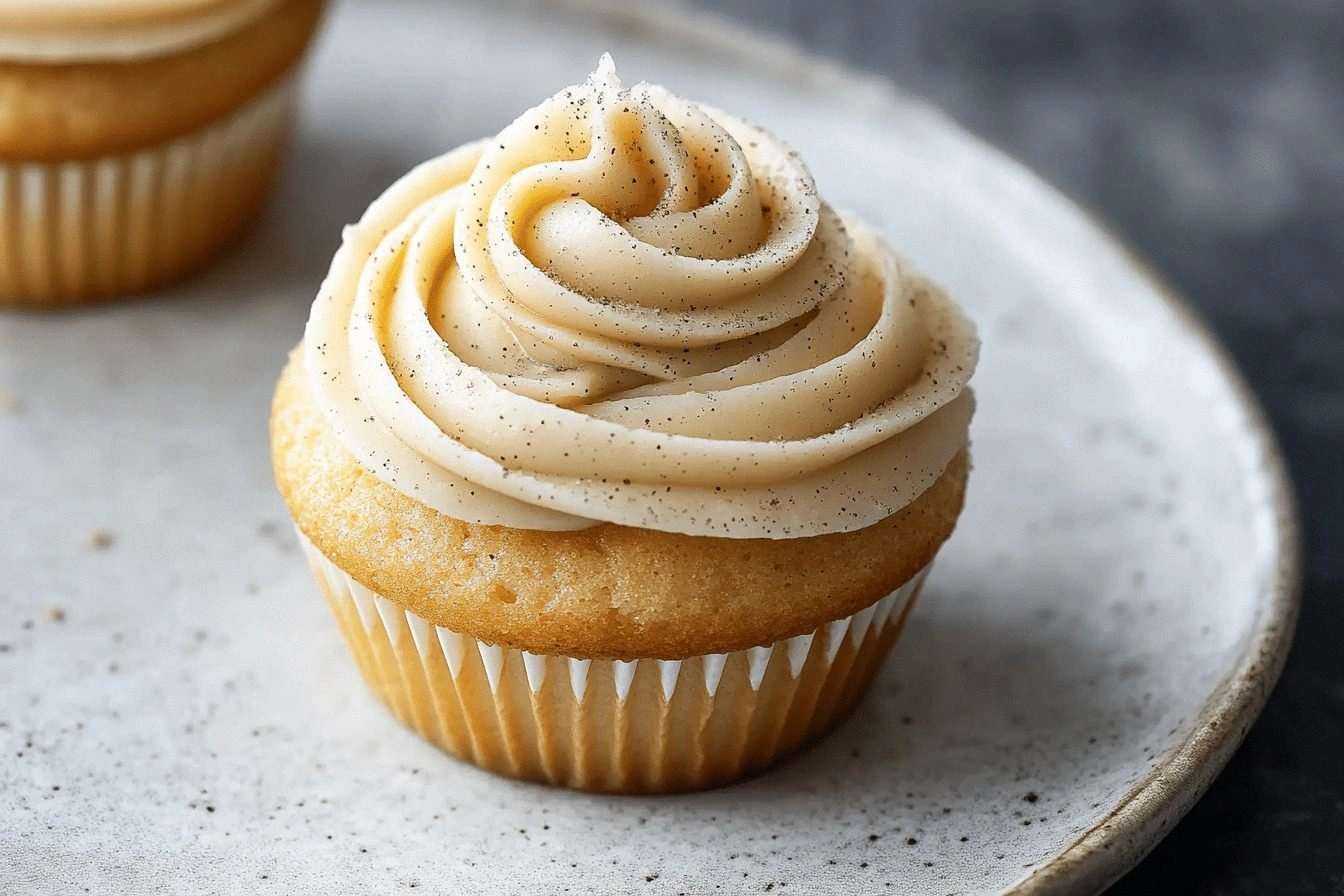
It was a Tuesday that should have been ordinary, but the kitchen turned into a battleground when I attempted a vanilla cupcake recipe from a random blog I found on a late‑night scroll. The batter looked like a pale, watery cloud, the batter’s texture was more like a sad, deflated balloon, and the oven temperature was a cruel joke. I stared at the timer, the timer ticked, and the cupcakes looked like they were about to collapse into a sad, crumbly mess. That disaster sparked a relentless quest: to find the perfect vanilla cupcake that could turn any kitchen mishap into a sweet triumph.
Fast forward to today, and I’ve discovered a version that feels like a warm hug in cupcake form. The batter is a silky, buttery cloud that glides into the oven, the aroma of browned butter filling the room like a golden sunrise. When the cupcakes rise, they do so with a gentle lift, the edges turning a caramel‑golden hue while the interior remains moist and tender, as if a secret vault of flavor is tucked inside each one. The first bite is a symphony: a whisper of vanilla, a subtle nutty undertone from the brown butter, and a sweet, almost caramelized finish that lingers on the palate.
What sets this recipe apart is not just the flavor but the method that locks in moisture and depth. I dare you to taste this and not go back for seconds; the texture is so airy yet dense that it practically melts in your mouth. I’ll be honest— I ate half the batch before anyone else got to try it, and that was a sign that I had finally cracked the code. Most recipes get this completely wrong, over‑baking the batter or using regular butter that leaves a flat, dry crumb. Here, the brown butter infuses a nutty richness that elevates the vanilla to a new level of decadence.
Picture yourself pulling these out of the oven, the whole kitchen smelling incredible, a golden glow from the oven light reflecting off the freshly glazed cupcakes. The anticipation is a delicious tension that only a perfectly balanced batter can release. And now, let me walk you through every single step—by the end, you’ll wonder how you ever made them any other way. Get ready for the ultimate cupcake experience, because this is hands down the best version you’ll ever make at home.
What Makes This Version Stand Out
- Flavor: The brown butter gives a toasted, nutty undertone that pairs beautifully with vanilla, creating a depth rarely achieved in standard cupcakes.
- Texture: A moist crumb that holds together without becoming soggy, thanks to the careful balance of fats and leavening.
- Simplicity: Only eight core ingredients, no fancy gadgets—just a skillet and a reliable oven.
- Uniqueness: The method of browning the butter before mixing sets this apart from the usual vanilla cupcake recipes.
- Crowd Reaction: Friends who’ve tried it say they’ve never tasted a cupcake that could keep them from asking for seconds.
- Ingredient Quality: Uses only unsalted butter and fresh eggs to ensure the purest flavor profile.
- Cooking Method: Brown butter technique adds a caramelized aroma that lingers long after the cupcakes are done.
- Make‑Ahead Potential: Batter can be prepared a day ahead and baked fresh, making it perfect for parties.
Alright, let’s break down exactly what goes into this masterpiece…
Inside the Ingredient List
The Flavor Base
Unsalted butter is the cornerstone of this recipe. When you brown it, the milk solids caramelize, creating a deep, nutty aroma that lingers in the batter. If you skip this step, the cupcakes will lack that signature depth and feel flat. For the best results, use a high‑quality European butter; its higher fat content yields a richer brown butter.
The Texture Crew
Granulated sugar, eggs, and whole milk work together to create a tender crumb. Sugar dissolves into the batter, providing moisture and sweetness; eggs bind everything, adding structure and richness; milk hydrates the flour, allowing for a softer texture. If you use brown sugar instead, the cupcakes will be denser and carry a caramel flavor that competes with the vanilla.
The Unexpected Star
Baking powder and baking soda are the leavening agents that give the cupcakes their lift. Baking soda reacts immediately upon contact with acidic components, while baking powder provides a gradual rise. If you omit baking soda, the cupcakes will be denser and may not rise properly. Conversely, too much baking soda can give a metallic aftertaste.
The Final Flourish
All‑purpose flour gives structure without weighing the cupcakes down, and a pinch of salt balances the sweetness and enhances the vanilla flavor. Salt is a subtle flavor enhancer that brings out the other ingredients’ best qualities. If you prefer a gluten‑free version, use a blend that mimics all‑purpose flour, but remember to adjust the leavening slightly.
Everything’s prepped? Good. Let’s get into the real action…
The Method — Step by Step
- Begin by placing 1/3 cup of unsalted butter in a small saucepan over medium heat. Stir constantly until the butter foams, then turns a golden amber color and emits a nutty aroma. This is the moment the butter transforms from plain to extraordinary—watch the milk solids brown and toast.
- Whisk 1/4 cup of granulated sugar with 1/2 cup all‑purpose flour, 1/2 tsp baking powder, 1/4 tsp baking soda, and a pinch of salt in a separate bowl. This dry mix ensures even distribution of leavening agents and prevents clumps.
- In a larger bowl, beat 1 egg until light and frothy. Add the browned butter, 1 tsp vanilla extract, and 1/4 cup whole milk, whisking until the mixture is silky and glossy. The batter should have a smooth, uniform consistency.
- Gradually fold the dry ingredients into the wet mixture, stirring until just combined. Over‑mixing can develop gluten, making the cupcakes tough. The batter should be thick enough to hold its shape when scooped.
- Line a muffin tin with paper liners and fill each cup 2/3 full with the batter. This gives the cupcakes room to rise without overflowing. The batter should sit in a slightly uneven mound, like a miniature volcano.
- Bake at 350°F (177°C) for 18–20 minutes, or until a toothpick inserted into the center comes out clean. The tops should be golden brown and slightly cracked, indicating a perfect rise.
- Let the cupcakes cool in the tin for 5 minutes, then transfer them to a wire rack to cool completely. Cooling is essential; otherwise the cupcakes will remain soft and lose their structure.
- Once cooled, glaze or decorate as desired. A simple dusting of powdered sugar or a swirl of chocolate ganache works wonders. The glaze should coat the cupcakes like velvet, adding a glossy finish.
That’s it— you did it. But hold on, I’ve got a few more tricks that will take this to another level…
Insider Tricks for Flawless Results
The Temperature Rule Nobody Follows
Many bakers bake cupcakes at 375°F, but the lower temperature of 350°F allows the batter to rise evenly without over‑browning the exterior. This ensures a moist interior and a golden crust. I’ve tried 375°F and the cupcakes were dry on the inside, a lesson that temperature matters more than I initially thought.
Why Your Nose Knows Best
The aroma of browned butter is a reliable indicator of progress. When the butter turns a deep amber and releases a nutty scent, it’s ready. If you wait too long, the butter will burn and impart a bitter taste. Trust your nose— it’s a more accurate gauge than the timer.
The 5‑Minute Rest That Changes Everything
After removing cupcakes from the oven, let them rest in the tin for 5 minutes. This rest period allows the interior to finish cooking without drying out. A friend once skipped this step and the cupcakes were oddly dense; the rest period is essential for optimal texture.
Use Room‑Temperature Milk for Smoothness
Cold milk can cause the batter to become lumpy when mixed with the dry ingredients. Always let the milk sit at room temperature for at least 30 minutes before use. This simple step ensures a silky batter that spreads evenly.
The Final Touch: A Splash of Water
If you’re reheating cupcakes after a few days, add a teaspoon of water to the batter before baking again. The steam created will re‑soften the crumb and bring back that fresh, moist quality. I’ve used this trick for holiday parties, and the cupcakes came out as good as new.
Creative Twists and Variations
This recipe is a playground. Here are some of my favorite ways to switch things up:
Cocoa‑Infused Delight
Add 1/4 cup cocoa powder to the dry mix for a chocolate version. The brown butter pairs beautifully with chocolate, creating a rich, indulgent cupcake that feels like a dessert cake.
Lemon‑Zest Surprise
Replace 1 tsp vanilla extract with 1 tsp lemon zest and 1 tsp lemon juice. The bright citrus cuts through the buttery richness, giving a refreshing, airy cupcake.
Almond‑Infused Elegance
Add 1/4 cup finely ground almond flour to the batter. The almond adds a subtle nutty flavor that complements the brown butter, creating a sophisticated, nutty cupcake.
Salted Caramel Swirl
Swirl a caramel sauce through the batter before baking. A pinch of sea salt on top after baking will provide a perfect sweet‑and‑salty contrast.
Espresso Kick
Stir 1 tsp instant espresso powder into the batter for a coffee‑infused cupcake. The espresso deepens the flavor profile and pairs well with a chocolate glaze.
Storing and Bringing It Back to Life
Fridge Storage
Store cupcakes in an airtight container in the refrigerator for up to 3 days. The cool environment preserves moisture and prevents mold. Wrap them loosely in parchment before placing in the container to avoid sticking.
Freezer Friendly
Freeze cupcakes in a single layer on a parchment‑lined tray, then transfer to a freezer bag. They stay fresh for up to 2 weeks. Thaw at room temperature before serving for best texture.
Best Reheating Method
Reheat cupcakes in a preheated 350°F oven for 5–7 minutes, or until warm. Add a tiny splash of water to the batter before baking again; it steams back to perfection, restoring the original moisture level.