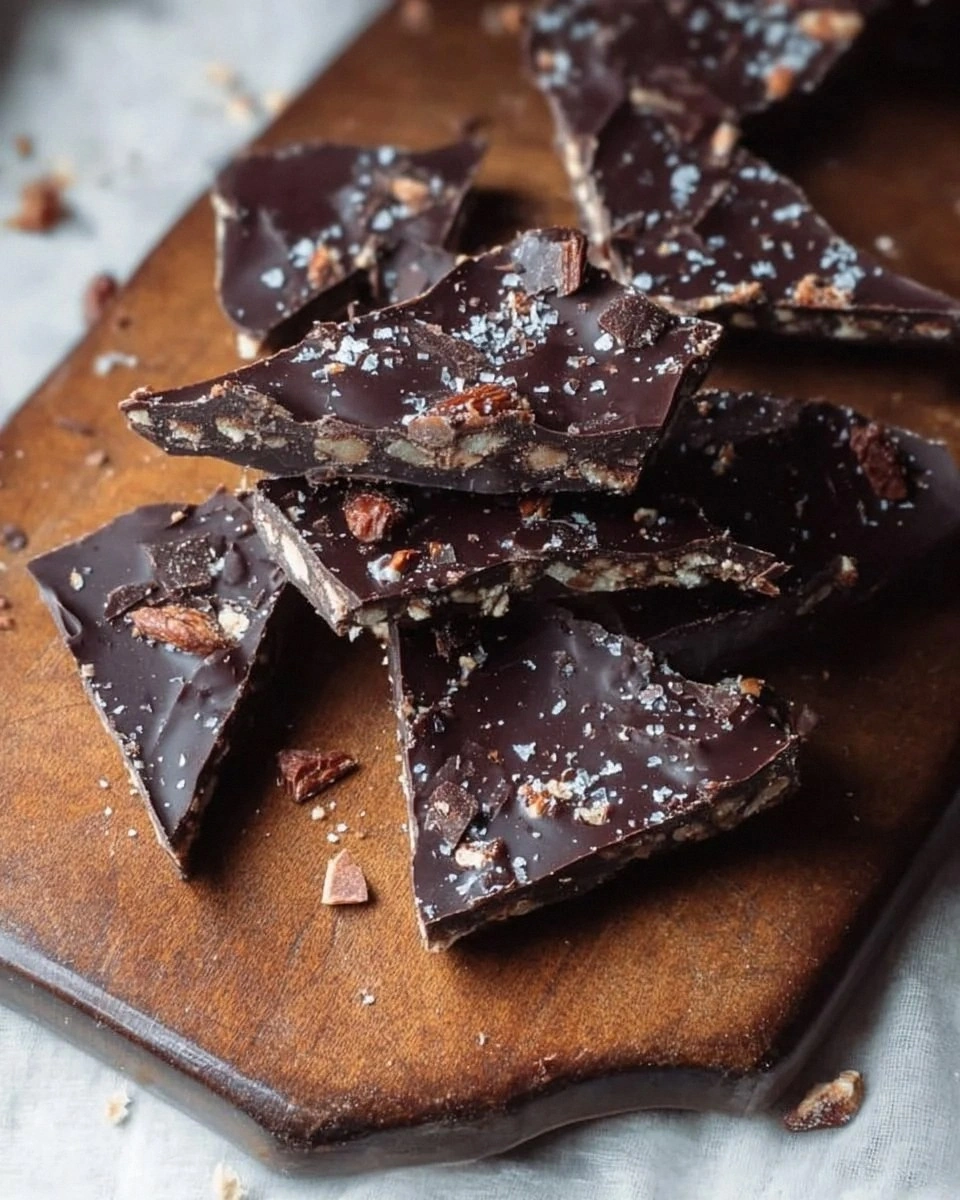
I’ll be honest — I ate half the batch before anyone else got to try it, and that’s because this version of dark chocolate date bark is hands down the best you’ll ever make at home. It all started on a rainy Tuesday when I was craving something sweet, but my pantry was looking like a desert. I rummaged through a half‑empty drawer, found a lonely bag of dark chocolate chips, a jar of dates that had been waiting for a proper partner, and a handful of nuts that were begging for redemption. I tossed them together, and what emerged was a glossy, crackly sheet that smelled like a midnight forest after rain, tasted like a hug from a cocoa‑loving grandma, and had a texture that reminded me of the perfect snow‑crusted mountain peak.
Picture yourself pulling this out of the oven, the whole kitchen smelling incredible, the dark sheen of the chocolate catching the light like a polished river stone. The aroma hits you first — a deep, earthy cocoa note that immediately makes you think of the best artisanal bars, followed by a subtle caramel whisper from the dates that makes your mouth water before you even take a bite. When the bark finally cools, you hear that satisfying snap as you break it, and the pieces separate like shards of a midnight sky, each one studded with glimmering nuts and coconut flecks. The taste is a perfect balance: the bittersweet chocolate, the natural sweetness of dates, a salty kiss of sea salt, and a crunch that’s both buttery and slightly chewy.
Most recipes get this completely wrong. They either drown the dates in too much sugar, use low‑quality chocolate that melts into a greasy puddle, or skip the crucial pinch of sea salt that lifts the whole flavor profile. Here’s what actually works: high‑quality dark chocolate (70% cacao or higher), dates that are soft but not mushy, and a quick‑flash bake that sets the bark without overcooking the chocolate. I dare you to taste this and not go back for seconds, because the moment you bite into that first piece, you’ll understand why this is the ultimate snack for anyone who loves a little healthy indulgence.
Let me walk you through every single step — by the end, you’ll wonder how you ever made it any other way. Okay, ready for the game‑changer? We’ll start with the ingredient lineup, then move into a method that feels more like a magic trick than a recipe, and I’ll sprinkle in a few insider tricks that will make your bark shine brighter than a polished gemstone. Stay with me here — this is worth it.
What Makes This Version Stand Out
- Taste: The dark chocolate provides a rich, slightly bitter backbone that is perfectly countered by the natural caramel of dates, creating a flavor duet that sings on the palate.
- Texture: A crisp, glass‑like snap on the outside gives way to a chewy, buttery center where the dates and nuts mingle, delivering a multi‑dimensional mouthfeel.
- Simplicity: Only five ingredients, five minutes of prep, and a 30‑minute bake — no fancy equipment, no extra sauces, just pure, honest ingredients.
- Uniqueness: The pinch of sea salt is the secret weapon; it amplifies the chocolate’s depth and makes the sweetness of the dates feel sophisticated rather than cloying.
- Crowd Reaction: This bark has a reputation for disappearing within minutes of being placed on a countertop; it’s the kind of treat that turns casual guests into loyal fans.
- Ingredient Quality: Using 70%+ cacao chips ensures a robust flavor and antioxidant boost, while pitted dates give natural sweetness without added sugars.
- Cooking Method: A low‑and‑slow bake locks in the glossy finish and prevents the chocolate from scorching, guaranteeing a professional‑look finish.
- Make‑Ahead Potential: Once cooled, the bark stores beautifully for up to two weeks, making it an ideal grab‑and‑go snack for busy mornings or post‑workout refuel.
Inside the Ingredient List
The Flavor Base
The star of the show is the dark chocolate chips. I source mine from a fair‑trade brand that guarantees a minimum of 70% cacao, because the higher the cacao, the richer the flavor and the more antioxidants you get. If you skip this and use milk chocolate, you’ll lose the bittersweet depth that makes the bark feel grown‑up, not kiddie candy. A quick tip: give the chips a quick sniff before you melt them; you should smell a deep cocoa note with hints of roasted coffee. If the chocolate smells faint or overly sweet, replace it — the flavor foundation is non‑negotiable.
The Texture Crew
Dates are the natural sweetener that also add a chewy contrast. I prefer Medjool dates because they’re plump, caramel‑like, and hold their shape when chopped. If you use deglet noor, the bark might become too soft, and the texture will suffer. Roughly chop them so each bite gets a burst of sticky sweetness without overwhelming the chocolate. A handy swap: dried apricots or figs work too, but they’ll shift the flavor profile toward a fruitier note.
Nuts bring that satisfying crunch. Almonds give a buttery snap, while walnuts add an earthy richness. I like a mix of both for complexity, but feel free to stick to one. Toast them lightly on a dry skillet for 3‑4 minutes; this releases their oils and intensifies the flavor, turning a bland nut into a toasted treasure. If you’re allergic, pumpkin seeds or roasted chickpeas can fill the void while keeping the crunch factor alive.
The Unexpected Star
Unsweetened shredded coconut is the surprise guest that adds a whisper of tropical breeze. It doesn’t melt into the chocolate; instead, it stays as tiny, toasted islands that pop with each bite. If you’re not a coconut fan, try toasted quinoa or a sprinkle of chia seeds for a similar texture without the coconut flavor. Buying coconut in bulk ensures you get the freshest, most aromatic flakes — look for a package that’s still slightly moist, not bone‑dry.
The Final Flourish
A pinch of sea salt might seem trivial, but it’s the magic that pulls everything together. Salt reduces the perceived bitterness of dark chocolate while amplifying the sweetness of the dates, creating a harmonious balance. Use a flaky sea salt for a delicate crunch, or a fine Himalayan pink salt for a subtle mineral note. If you’re watching sodium, a quarter‑pinch will still do the trick, but don’t skip it entirely — the flavor will feel flat.
Everything's prepped? Good. Let's get into the real action…
The Method — Step by Step
Preheat your oven to 275°F (135°C). This low temperature is the secret to a glossy, crack‑free bark. While the oven warms, line a large baking sheet with parchment paper; the paper prevents sticking and makes cleanup a breeze. I like to lightly grease the parchment with a brush of coconut oil — it adds a subtle sheen and helps the chocolate release cleanly later.
Place the dark chocolate chips in a heat‑proof bowl and set it over a pot of simmering water (a double boiler). Stir constantly; you’ll notice the chocolate softening into a silky river of darkness. Watch out: If any water droplets splash into the chocolate, it will seize and become grainy. Keep the water at a gentle simmer, never a rolling boil.
Once fully melted, remove the bowl from heat and stir in a teaspoon of neutral oil (grapeseed or canola). This extra fat creates a glossy finish and makes the bark easier to break later. The mixture should look glossy and fluid, like molten lava flowing over a dark riverbed.
Quickly fold in the chopped dates, toasted nuts, and shredded coconut. The chocolate should coat each piece like velvet, leaving no dry spots. If you see clumps, use a silicone spatula to break them up; you want an even distribution so every bite gets a balanced mix.
Spread the mixture onto the prepared parchment sheet, using an offset spatula to achieve a uniform thickness of about 1/8 inch. The thinner you spread, the crisper the edges will become; too thick and the bark may stay soft in the center. I recommend a gentle rocking motion to smooth the surface without introducing air bubbles.
Sprinkle the pinch of sea salt evenly over the top. The salt will sit on the surface, creating tiny specks that catch the light and add a subtle crunch. This is the moment where the flavor profile truly lifts — you’ll notice the scent of salt mingling with the chocolate as it bakes.
Slide the sheet into the preheated oven and bake for 20‑25 minutes. You’re looking for the edges to start pulling away from the parchment and a faint, toasty aroma that fills the kitchen.
Watch Out: Do not overbake; the chocolate will turn brittle and lose its glossy finish, turning the bark into a dry snap rather than a melt‑in‑your‑mouth treat.While the bark bakes, prepare a cooling rack nearby. As soon as the timer dings, remove the sheet and place it on the rack to cool for 10 minutes. This short rest lets the chocolate set just enough to handle without breaking, but it’s still pliable enough to break into shards later.
After 10 minutes, transfer the sheet to the refrigerator for an additional 15‑20 minutes. The chill solidifies the chocolate, giving it that satisfying snap when you break it. If you’re impatient, you can speed this up with a blast of cool air from a fan, but the fridge method yields the most consistent texture.
Finally, break the bark into irregular shards using your hands or a sturdy knife. The pieces will fall apart like cracked river stones, each one unique in size and shape. Store the shards in an airtight container, and you’ve got a snack that stays fresh for up to two weeks. That sizzle when it hits the pan? Absolute perfection.
That's it — you did it. But hold on, I've got a few more tricks that'll take this to another level. The next section dives into insider secrets that will make your bark shine brighter than a polished gemstone, and guarantee that every batch is as flawless as the first.
Insider Tricks for Flawless Results
The Temperature Rule Nobody Follows
Most home cooks think “just melt the chocolate” is enough, but the truth is temperature control is everything. Keep the chocolate between 115°F and 120°F (46‑49°C) while melting; this is the tempering sweet spot that ensures a glossy finish and a firm snap. If the chocolate climbs above 130°F, you’ll lose that snap and get a dull, waxy surface. I use an instant‑read thermometer and pause the heat the moment it hits 118°F, then remove the bowl from the steam.
Why Your Nose Knows Best
Your sense of smell is a far better indicator of doneness than a timer. When the chocolate starts to emit a faint roasted aroma, you’re nearing the perfect bake. If you catch that nutty, toasty scent early, pull the bark out a minute or two before the timer. This prevents over‑drying and keeps the edges crisp while the center stays tender.
The 5‑Minute Rest That Changes Everything
After you pull the bark from the oven, give it a solid five‑minute rest on the counter before chilling. This short pause lets the chocolate settle, reducing the risk of cracks forming during the fridge blast. It also allows the flavors to meld, so the salt doesn’t sit on top but integrates throughout the chocolate matrix.
The “Cold‑Water Splash” Trick
If your bark looks a little dull after refrigeration, a quick mist of cold water on the surface (just a few drops) before the final chill can revive that high‑gloss shine. The water creates a thin steam layer that smooths the surface, giving it a professional bakery look without any extra ingredients.
The Double‑Layer Technique
For an extra‑crunchy texture, spread half the chocolate mixture, let it set for 5 minutes, then add the remaining half and finish baking. This creates a subtle layering effect where the first layer becomes a firm base and the second adds a softer, melt‑in‑your‑mouth top. A friend tried skipping the pause and ended up with a uniform texture that lacked that delightful contrast.
Creative Twists and Variations
This recipe is a playground. Here are some of my favorite ways to switch things up:
Spicy Chili‑Chocolate
Add a pinch of cayenne pepper or a dash of smoked paprika to the melted chocolate before mixing in the dates. The heat pairs surprisingly well with the sweet dates, creating a warm, lingering finish that’s perfect for autumn evenings.
Citrus Zest Burst
Stir in the zest of one orange or lemon after the chocolate has melted. The citrus brightens the deep chocolate, giving it a fresh, vibrant edge that works wonderfully as a post‑workout snack.
Nut‑Free Crunch
Swap the almonds or walnuts for roasted pumpkin seeds and toasted oat flakes. This keeps the crunch factor while making the bark safe for nut‑allergic friends, and adds a subtle earthy flavor.
White Chocolate Dream
Replace the dark chocolate chips with high‑quality white chocolate and halve the sea salt. The result is a sweeter, creamier bark that pairs beautifully with dried cranberries instead of dates.
Coffee‑Infused Delight
Dissolve a tablespoon of instant espresso powder into the melted chocolate for a mocha twist. The coffee’s bitterness deepens the chocolate’s flavor, making it a sophisticated treat for brunch gatherings.
Storing and Bringing It Back to Life
Fridge Storage
Place the bark shards in an airtight glass container or a zip‑top bag with a paper towel to absorb any excess moisture. Stored in the refrigerator, the bark stays crisp for up to two weeks. If you notice condensation, simply pat the container dry with a paper towel before resealing.
Freezer Friendly
For longer-term storage, lay the shards on a parchment‑lined tray and freeze for 30 minutes, then transfer them to a freezer‑safe bag. They’ll keep for three months without losing texture. When you’re ready to enjoy, let them sit at room temperature for 10 minutes; the chocolate will soften just enough to bite without melting.
Best Reheating Method
If the bark feels a bit too firm after refrigeration, place the desired portion on a microwave‑safe plate, add a tiny splash (about 1 teaspoon) of water, and microwave for 5‑10 seconds. The steam revives the glossy finish and makes the chocolate melt‑in‑your‑mouth again. Avoid direct microwaving without water, as it can over‑heat and cause a grainy texture.