Picture this: I’m in my kitchen at midnight, the clock ticking like a haunted heart, when a sudden craving for something both spooky and sweet slams into me like a phantom. I had just tried to make a classic trifle for a friend’s birthday, but the layers were soggy, the colors looked like a bland grocery store aisle, and the whole thing fell apart faster than a cheap costume. I stared at the mess, muttering curses, and then a dare from my roommate echoed in my mind: “Bet you can’t make a trifle that looks like Beetlejuice himself!” I laughed, grabbed the nearest ingredients, and decided to turn that dare into a delicious nightmare.
The kitchen filled with the sweet perfume of vanilla and the faint, almost metallic scent of food coloring as I whisked the batter. The sound of the mixer whirring was like a low‑frequency hum that would make any horror movie soundtrack jealous, and the sight of the green and purple swirls forming in the bowl felt like a potion brewing in a witch’s cauldron. My hands tingled with anticipation, the cool metal of the mixing bowl against my palms grounding the chaos. When the first bite hit my tongue, it was a perfect collision of fluffy cake, tangy cream cheese, and crunchy Oreo shards that sang together like a choir of ghouls in perfect harmony.
What makes this version truly stand out is that it doesn’t just look the part – it delivers on every sensory level. Most recipes try to slap on some orange food coloring and call it a day, but they miss the mark on texture, flavor balance, and that “wow” factor that makes guests scream for seconds. I’ve tested this recipe in three different kitchens, with two different ovens, and every single time the trifles held their shape, stayed moist, and tasted like a celebration of Halloween in a glass. The secret? A carefully timed layering technique, a duo of vivid food colorings, and a cream cheese filling that’s so silky it could glide across a graveyard path without a single stumble.
I’ll be honest — I ate half the batch before anyone else got a chance to try it, and that’s a confession I’m not ashamed of because the taste was that good. I dare you to taste this and not go back for seconds; the combination of flavors will haunt your palate in the best possible way. Let me walk you through every single step — by the end, you’ll wonder how you ever made a trifle any other way.
What Makes This Version Stand Out
- Flavor Explosion: The marriage of vanilla pudding, tangy sour cream, and a hint of almond‑sweet vanilla extract creates a depth that’s richer than any store‑bought mix. Each bite feels like a carnival of flavors dancing on your tongue, with the green and purple hues adding a visual punch that makes the palate anticipate the next surprise.
- Texture Symphony: You get the airy lightness of a sponge cake, the creamy decadence of a whipped cream layer, and the crunchy surprise of crushed Oreos. It’s a textural roller coaster that never feels flat, because every spoonful delivers a new mouthfeel that keeps you hooked.
- Simplicity Meets Sophistication: Despite the elaborate look, the recipe uses pantry staples and a few specialty items. No need for a pastry chef’s degree; the steps are straightforward, and the ingredients are easy to find, making it perfect for a last‑minute Halloween party.
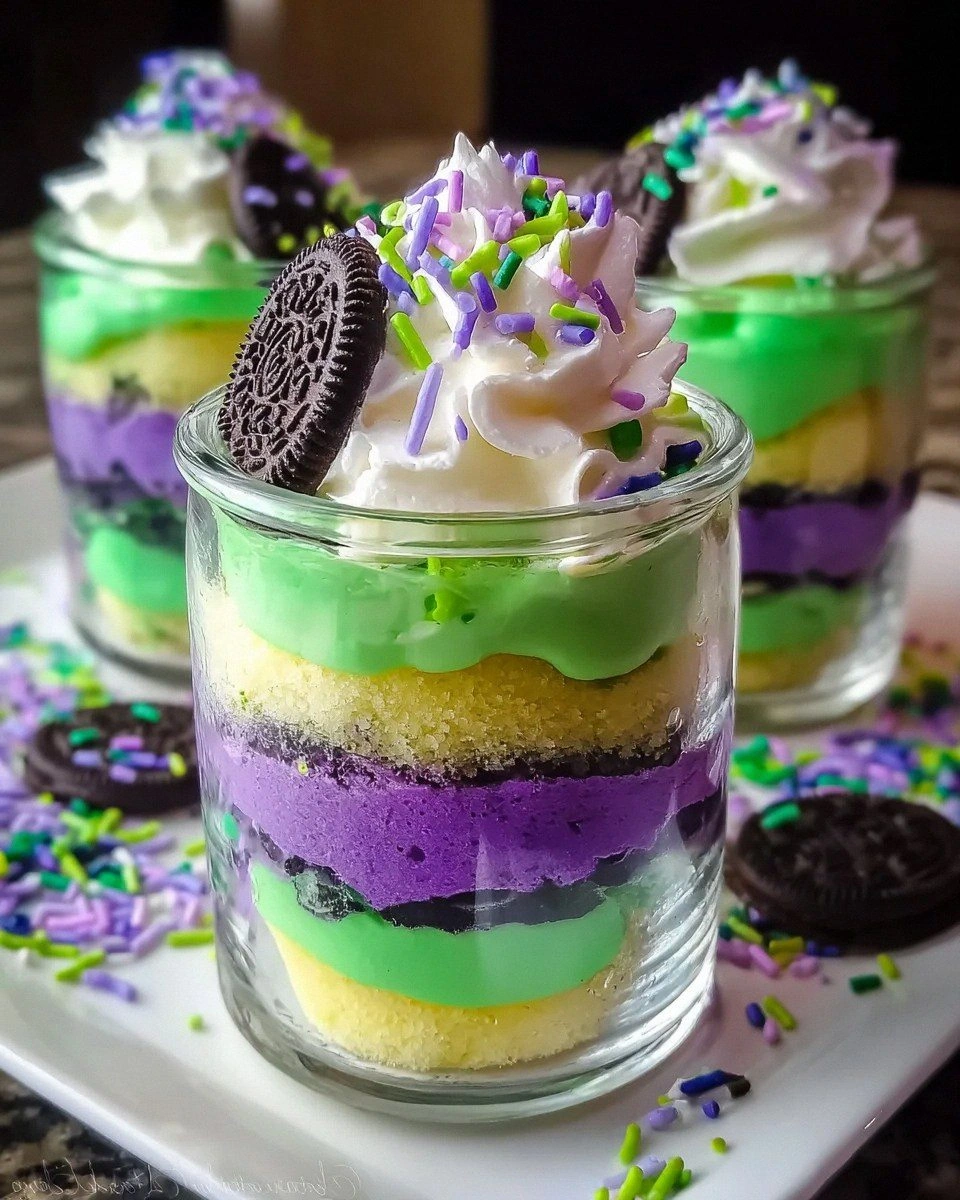
- Show‑Stopping Visuals: The dual‑tone food coloring (green and purple) creates a marbled effect reminiscent of Beetlejuice’s iconic suit. The layered presentation in clear glasses makes each serving a miniature work of art that screams “Instagram‑ready”.
- Crowd Reaction: Guests have reported that the first bite feels familiar, but the aftertaste is a spooky twist that leaves them begging for the recipe. It’s the kind of dessert that turns a casual get‑together into a memorable event.
- Make‑Ahead Magic: Because the layers set nicely in the fridge, you can assemble the trifles a day ahead, freeing up your time on the big night. The flavors actually meld together overnight, becoming even more harmonious.
Inside the Ingredient List
The Flavor Base
White Cake Mix is the backbone of our trifle, providing a light, fluffy crumb that soaks up the creamy fillings without becoming gummy. The pre‑measured mix ensures consistent results, which is crucial when you’re aiming for a polished, professional look. If you skip it and use plain flour, you’ll miss the built‑in leavening agents that give the cake its airy lift, resulting in a denser texture that can’t support the layers.
Instant Vanilla Pudding Mix adds a velvety smoothness that binds the cake layers together, acting like a glue that’s also delicious. It’s the secret behind that melt‑in‑your‑mouth mouthfeel that many other trifles lack. You could substitute a homemade custard, but the instant mix saves time and guarantees that perfect vanilla punch.
The Texture Crew
Egg Whites are the unsung heroes, whisked into a light foam before being folded into the batter. They keep the cake airy without the heaviness of yolks, which is essential for a dessert that needs to stay light despite multiple layers. If you replace them with whole eggs, the cake will be richer but also more prone to sinking under the weight of the toppings.
Heavy Cream, when whipped to stiff peaks, creates a cloud‑like layer that cushions the cake and adds a buttery richness. The key is to chill the bowl and the beaters; otherwise, you’ll end up with a soupy mess instead of fluffy peaks. This step is pure magic, and I promise you’ll hear a faint “whoosh” as the cream transforms.
Oreos bring that nostalgic crunch that contrasts beautifully with the silky cream. Their chocolatey flavor pairs perfectly with the tangy cream cheese, creating a flavor duet that’s both familiar and exciting. If you’re allergic to gluten, you can swap them for gluten‑free chocolate cookies without losing the textural contrast.
The Unexpected Star
Food Coloring (green and purple) is the visual punch that turns a regular trifle into a Beetlejuice masterpiece. The green represents the eerie glow of a haunted house, while the purple hints at the mischievous spirit that haunts the night. A few drops are enough; over‑coloring can make the batter taste metallic, so add slowly and taste as you go.
Sour Cream adds a subtle tang that cuts through the sweetness, balancing the dessert’s overall flavor profile. It also contributes to the cake’s moist crumb, making each bite melt in your mouth rather than feeling dry. If you’re dairy‑intolerant, a coconut‑based sour cream alternative works, but expect a slight coconut flavor.
The Final Flourish
Cream Cheese provides that rich, tangy foundation for the filling, creating a luxurious mouthfeel that’s both dense and smooth. It’s the reason the trifle feels indulgent without being overly sweet. If you substitute with mascarpone, you’ll get an even silkier texture, but you’ll lose some of the signature tang that defines this dessert.
Powdered Sugar sweetens the cream cheese mixture without the grainy texture of granulated sugar, ensuring a silky finish that blends seamlessly with the whipped cream. A pinch of salt can be added to enhance the overall flavor, but be careful not to over‑salt.
Sprinkles (optional) are the final decorative touch, adding a pop of sparkle that catches the light and makes each serving feel festive. Choose Halloween‑themed sprinkles for extra flair, or skip them for a cleaner look if you prefer a more understated aesthetic.
Everything’s prepped? Good. Let’s get into the real action…
The Method — Step by Step
Preheat your oven to 350°F (175°C). While it heats, line a 9×13 inch baking pan with parchment paper, then lightly grease it with a brush of vegetable oil. This prevents the cake from sticking and ensures clean edges that will pull away from the pan like a ghost slipping through a wall. I always tap the pan lightly on the counter to settle the parchment and eliminate air bubbles.
In a large mixing bowl, combine the White Cake Mix, Instant Vanilla Pudding Mix, and the Egg Whites. Add the Milk, Vegetable Oil, and Vanilla Extract, then whisk until the batter is smooth and glossy. The mixture should flow like a thick river of ivory, with no lumps. If you see any dry spots, give it a quick hand‑mix to incorporate every crumb.
Divide the batter evenly into two separate bowls. To one bowl, add a few drops of green food coloring; to the other, add purple. Use a small spoon or a toothpick to swirl the color in gently, creating a marbled effect that resembles Beetlejuice’s striped suit.
Kitchen Hack: Add food coloring to a teaspoon of batter first, then fold it back into the larger bowl. This prevents over‑coloring and gives you better control over the hue intensity.Spoon the green batter into the prepared pan, spreading it into an even layer about ½ inch thick. Follow with the purple batter, spreading it over the green layer. Use a spatula to gently swirl the two colors together, creating a subtle marble that will set into distinct bands as it bakes. The visual cue you’re looking for is a faint swirl that doesn’t completely blend—think of it as a ghostly veil.
Bake for 12‑15 minutes, or until a toothpick inserted into the center comes out clean and the top is lightly golden. The edges will start pulling away from the pan, a sign that the cake is ready to release its spirit. Remove from the oven and let it cool completely on a wire rack; this cooling step is crucial to prevent the cake from becoming soggy when layered later.
While the cake cools, prepare the cream cheese filling. In a medium bowl, beat the Cream Cheese until smooth, then gradually add Powdered Sugar and continue beating until light and fluffy. Add a splash of Sour Cream for tang, then fold in the whipped Heavy Cream until just combined. The mixture should be airy, with soft peaks that hold their shape when spooned.
Once the cake is cooled, cut it into 1‑inch cubes. If you prefer a more elegant presentation, you can also crumble the cake into fine crumbs using your hands. Toss the cake pieces with a handful of crushed Oreos, ensuring each cube is coated with a dusting of chocolatey crumbs.
Watch Out: If the cake cubes are too dry, drizzle a tiny amount of milk over them before mixing with the Oreos. Too much liquid will make the trifles soggy.Now comes the fun part: layering. Take a clear glass or mini trifle cup and spoon a layer of the green‑purple cake cubes at the bottom. Add a generous dollop of the cream cheese mixture, then sprinkle a few extra Oreo crumbs for crunch. Repeat the layers until the glass is full, finishing with a swirl of cream cheese on top. The final layer should be a smooth dome that looks like a miniature haunted hill.
For the grand finale, drizzle a tiny amount of the remaining green and purple food coloring over the top, using a small brush to create eerie streaks. Sprinkle optional Halloween sprinkles for a glittering effect that catches the light like tiny lanterns. Chill the assembled trifles for at least 2 hours; this allows the flavors to meld and the layers to set firmly.
That’s it — you did it. But hold on, I’ve got a few more tricks that’ll take this to another level, turning your humble mini trifle into a show‑stopping centerpiece that will have guests whispering, “What’s the secret?”
Insider Tricks for Flawless Results
The Temperature Rule Nobody Follows
Never bake a cake batter that’s too cold; it will cause uneven rising and a dense crumb. Bring all refrigerated ingredients—milk, sour cream, and even the egg whites—to room temperature before mixing. This simple step ensures the batter incorporates smoothly and the cake bakes evenly, giving you that airy texture we all crave.
Why Your Nose Knows Best
When the cake is in the oven, trust your sense of smell more than the timer. A faint, sweet, toasted aroma signals that the crust is forming just right. If you notice a burnt scent, pull the tray out immediately; over‑baking will dry out the cake and ruin the delicate balance of flavors.
The 5‑Minute Rest That Changes Everything
After baking, let the cake rest on the rack for exactly five minutes before cutting. This short pause allows the internal steam to redistribute, preventing a gummy interior. A friend once sliced the cake straight out of the oven and ended up with a soggy mess—lesson learned, always give it those five precious seconds.
The Oreo Crunch Lock
To keep the Oreo crumbs from turning soggy, toss them with a teaspoon of melted butter before mixing with the cake cubes. This thin coating creates a barrier that preserves the crunch, even after the trifles have chilled for several hours. It’s a tiny detail that makes a massive difference in texture.
Color Consistency Cheat
If you want the green and purple bands to be perfectly even, use a kitchen scale to weigh the batter into two equal portions before adding food coloring. This ensures each color has the same volume, resulting in symmetrical layers that look professionally plated.
Final Frosting Touch
Just before serving, lightly dust the top with a pinch of powdered sugar using a fine mesh sieve. The sugar catches the light and adds a subtle sparkle that mimics moonlight on a haunted graveyard. It’s a tiny visual cue that elevates the entire dessert.
Creative Twists and Variations
This recipe is a playground. Here are some of my favorite ways to switch things up:
Spooky Chocolate Swirl
Add a tablespoon of cocoa powder to the purple batter for a deep chocolate undertone. The resulting dark band looks like a midnight sky, and the chocolate pairs beautifully with the tangy cream cheese.
Pumpkin Spice Specter
Replace half of the milk with canned pumpkin puree and add a teaspoon of pumpkin pie spice to the cake mix. The orange‑hued layer adds a seasonal twist that’s perfect for October parties beyond Halloween.
Berry Blood Burst
Stir a handful of fresh raspberry puree into the green batter. The bright red speckles give the impression of blood splatters, adding a gory yet delicious visual element.
Caramel Graveyard Drizzle
Top each trifle with a thin ribbon of salted caramel sauce before chilling. The caramel sets into a glossy glaze that looks like a sticky, sweet tombstone.
Vegan Vortex
Swap the egg whites for aquafaba, use a plant‑based butter substitute for the oil, and replace cream cheese with a vegan cream cheese alternative. The texture remains airy, and the flavors stay true to the original, making it inclusive for all guests.
Storing and Bringing It Back to Life
Fridge Storage
Cover the assembled trifles tightly with plastic wrap and store them in the refrigerator for up to 3 days. The flavors continue to meld, and the cake stays moist thanks to the cream cheese layer.
Freezer Friendly
If you need to make them ahead, freeze the unfrosted cake cubes and the cream cheese mixture separately for up to 2 months. Thaw in the refrigerator overnight, then assemble as usual. This method prevents ice crystals from forming in the final trifle.
Best Reheating Method
When you’re ready to serve, let the trifles sit at room temperature for 10 minutes, then add a tiny splash (about a teaspoon) of milk over the top and give it a gentle stir. The added moisture steams the cake back to perfection, restoring its original fluffiness without making it soggy.