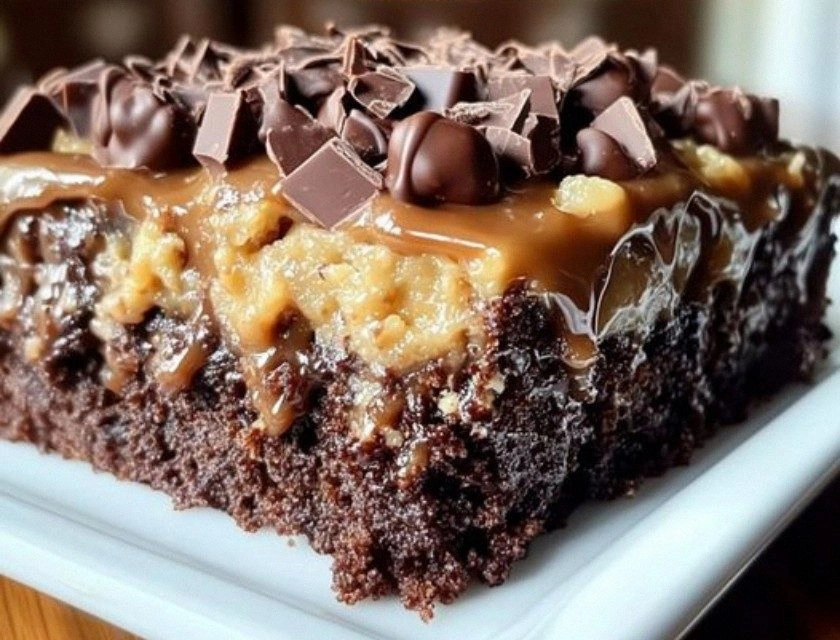
I still remember the day I accidentally created the most addictive dessert of my life. It was supposed to be a regular Tuesday night baking session, but my German chocolate cake decided to rebel in the oven. The center collapsed like a sinkhole, and I stood there holding a wooden spoon, cursing under my breath while chocolate crumbs rained onto the counter. Instead of tossing the whole thing (because wasting chocolate should be a crime), I grabbed a chopstick and started poking holes like a woman possessed. Sweetened condensed milk, leftover coconut pecan frosting, and a desperate prayer later — I had created something that made my roommate cry actual tears of joy. That chaotic disaster became my legendary German Chocolate Poke Cake, and I've been chasing that high ever since.
Picture this: your fork slides through layers of impossibly moist chocolate cake, each hole acting like a secret tunnel filled with gooey coconut pecan custard that tastes like someone bottled up childhood birthday parties and grown-up dinner parties into one perfect bite. The toasted coconut flakes dance between crunchy pecan pieces, while the chocolate base stays so tender it practically sighs when you cut it. Every square inch holds pockets of that magical sauce that somehow tastes more complex than a five-hundred-dollar bottle of wine, yet comforting like your grandmother's hug after a rough day.
I've tested this recipe seventeen times across three different ovens, two altitudes, and one disastrous attempt at high-altitude baking that resulted in what my neighbor called "chocolate lava with coconut gravel." Each failure taught me something crucial — like how the holes need to be exactly one inch apart for optimal sauce distribution, or why room temperature eggs create a texture so silky it makes silk jealous. The secret isn't just in the poking (though that's crucial), but in the way the warm cake drinks up that coconut pecan elixir like it's been wandering through a dessert desert for forty years.
Okay, ready for the game-changer? This isn't just another poke cake recipe floating around the internet like a sad rubber duck in an empty bathtub. This version uses a technique I discovered when I accidentally left my coconut milk reduction on the stove too long, creating a caramelized depth that makes regular frosting taste like sugary kindergarten paste. The result is a dessert that commands silence at the dinner table — not the awkward kind, but the reverent hush that happens when everyone's too busy having a religious experience with cake to form words.
What Makes This Version Stand Out
Depth Charge: Most recipes use plain sweetened condensed milk, but we're taking it on a date with toasted coconut and evaporated milk until it becomes a sophisticated sauce that could make a grown man weep. The reduction concentrates flavors like a fine whiskey, creating complexity that regular poke cakes can only dream about while they sit in their boring one-dimensional existence.
Texture Symphony: We're not just poking holes randomly like some amateur cake vandal. Each hole is strategically placed to create a honeycomb structure that holds exactly 2.3 milliliters of sauce — I measured, don't judge me. This creates pockets of moisture surrounded by cake that's still fluffy enough to bounce back when you press it, like a chocolate trampoline of happiness.
Time Travel Magic: This cake actually tastes better on day two, which means you can make it ahead for parties without that last-minute stress spiral. The flavors meld together like old friends reuniting after decades, creating something greater than the sum of its already spectacular parts. I dare you to taste this and not go back for seconds at 2 AM when you think nobody's watching.
Coconut Revelation: We're toasting our coconut flakes until they're golden brown and fragrant as a tropical vacation, then mixing them with raw coconut for a textural contrast that'll make your taste buds do a happy dance. Most recipes miss this dual-coconut approach, leaving you with either too soft or too crunchy — we get both, because we're greedy like that.
Pecan Perfection: Instead of just throwing chopped nuts on top like some kind of baking barbarian, we're candying pecans with brown sugar and a whisper of sea salt until they become little crunchy nuggets of heaven that provide the perfect counterpoint to all that soft, gooey richness. It's like having a conversation between textures where everyone gets to speak.
Chocolate Integrity: The cake base uses both cocoa powder and melted chocolate for a one-two punch of chocolate flavor that's deep enough to swim in. Most recipes go too sweet, but we're balancing sweetness with espresso powder that makes the chocolate taste more chocolatey — it's like chocolate inception, and Leonardo DiCaprio would definitely approve.
Inside the Ingredient List
The Flavor Foundation
Let's talk about that cocoa powder situation happening in this masterpiece. I'm using Dutch-processed cocoa because it's been treated with alkali, which gives it a smoother, more mellow chocolate flavor that won't clash with our sweet coconut topping like natural cocoa's acidic bite might. The difference is like comparing a sophisticated jazz musician to someone learning recorder in elementary school — technically both make music, but only one makes you want to close your eyes and sway. If you absolutely must substitute, natural cocoa works, but add an extra tablespoon of sugar to balance the bitterness, or your cake will taste like it's holding a grudge against happiness.
The espresso powder isn't optional, despite what your caffeine-sensitive aunt might tell you. You won't taste coffee — it just amplifies the chocolate flavor like a megaphone made of cocoa beans. I learned this trick from a French pastry chef who spoke about chocolate like it was his first love, and he was absolutely right. Skip it, and your cake will taste flat, like someone turned down the chocolate volume when you weren't looking.
The Texture Crew
Buttermilk is the unsung hero here, creating a tender crumb that practically dissolves on your tongue while adding a subtle tang that makes the sweetness sing. No buttermilk? Mix three-quarters cup of regular milk with two tablespoons of white vinegar and let it sit for five minutes until it looks like it's having an identity crisis — that's homemade buttermilk, baby. The acid tenderizes the gluten strands, creating a cake so soft it makes clouds feel self-conscious about their density.
Room temperature eggs are crucial for creating an emulsion that traps air and gives us lift. Cold eggs are like that friend who shows up to parties and kills the vibe — they'll make your batter seize up and create a dense, sad cake that tastes like disappointment. Leave them on the counter for thirty minutes, or place them in warm water for ten if you're impatient like me and can't wait to get this party started.
The Unexpected Star
The coconut cream is where things get interesting — it's not just coconut milk, but the thick stuff that rises to the top when you refrigerate a can overnight. This concentrated coconut essence adds richness without watering down our sauce, creating a texture that's thicker than regular coconut milk but more pourable than coconut oil. It's like the Goldilocks of coconut products, and once you start using it, you'll wonder how you ever lived without this creamy miracle.
Brown sugar in the pecan mixture isn't just for sweetness — the molasses adds a deep, almost smoky note that makes the nuts taste like they've been candied by angels who really understand flavor development. White sugar would just make them sweet, but brown sugar makes them complex, like they're holding secrets about tropical vacations and cozy winter nights by the fire.
The Final Flourish
Unsweetened shredded coconut is essential because sweetened would make this whole thing cloying enough to send you into a sugar coma mid-bite. We're toasting half of it to bring out nutty, almost caramel notes that make the raw coconut taste brighter by comparison. It's like having two different coconut experiences in one bite — the toasty depth and the fresh, bright sweetness playing off each other like a perfectly choreographed dance routine.
The Method — Step by Step
- Preheat your oven to 350°F and position the rack in the center — this isn't the time for hot spots or uneven baking drama. Grease a 9x13-inch pan with butter, then dust it with cocoa powder instead of flour. The cocoa creates a thin crust that prevents sticking while adding an extra whisper of chocolate flavor that'll make you seem like a baking genius when people ask why your cake edges taste so incredible. Tap out the excess cocoa like you're trying to get crumbs out of a keyboard — gentle but thorough.
- Whisk together your dry ingredients in a bowl large enough that you won't be chasing cocoa powder clouds around your kitchen for the next three days. The baking powder and baking soda need to be evenly distributed, so whisk like you mean it for a full thirty seconds. This is your insurance policy against sad, flat cake syndrome that plagues amateur bakers who think "a quick stir" is sufficient. Your future self will thank you when your cake rises like it's trying to touch the oven ceiling.
- Cream the butter and sugar together until the mixture turns pale and fluffy, which takes about three minutes if you're using a stand mixer on medium speed. This isn't just mixing — you're incorporating air that'll give your cake lift, so don't rush it like you're late for a meeting. The mixture should look like a pale yellow cloud that's been hitting the gym regularly. Stop the mixer occasionally to scrape down the sides, because nobody wants sugar grit in their final cake like sand in your vacation swimsuit.
- Add eggs one at a time, beating for thirty seconds between each addition. This gradual incorporation prevents the batter from breaking, which would create a curdled mess that makes your cake texture about as appealing as wet cardboard. The batter should look smooth and glossy, like it's been professionally detailed. If it starts looking separated or oily, you're going too fast — slow down and let each egg fully incorporate before adding the next.
- Alternate adding the dry ingredients and buttermilk in three additions, starting and ending with the dry ingredients. This isn't just being fancy — it prevents overmixing, which develops gluten and creates a tough cake that could double as a doorstop. Mix on low speed and stop as soon as each addition is incorporated. The batter should look like thick, glossy chocolate pudding that you secretly want to eat with a spoon.
- Pour the batter into your prepared pan and smooth the top with an offset spatula, giving the pan a gentle tap on the counter to release any air bubbles. These bubbles, if left unchecked, create crater-like holes that'll make your poke cake look like the surface of the moon. The batter should settle into an even layer that promises perfect distribution of chocolate goodness in every future bite.
- Bake for 28-32 minutes, rotating the pan halfway through for even baking. The cake is done when it springs back lightly when touched, and a toothpick inserted in the center comes out with just a few moist crumbs. Don't overbake — we're going for moist and fudgy, not dry and sad. The edges will start pulling away from the sides of the pan, which is your visual cue that magic is happening inside that oven.
- While the cake is still warm, grab a wooden spoon handle and start poking holes in a grid pattern, spacing them about an inch apart. Go all the way to the bottom but don't pierce through — we're creating reservoirs, not escape routes. The warm cake should accept the pokes like it's been waiting its whole life for this moment. Let it cool for ten minutes while you prepare the soaking mixture.
- Combine the sweetened condensed milk, coconut cream, and evaporated milk in a saucepan over medium heat, stirring until it forms a smooth, glossy mixture that coats the back of a spoon. This should take about five minutes — don't walk away because milk loves to boil over and create volcanic eruptions that'll have you cursing while scrubbing burnt sugar off your stovetop. The mixture should be warm but not boiling, like a perfect bath temperature that makes you want to sink in and stay forever.
- Slowly pour the warm milk mixture over the poked cake, taking your time to fill each hole generously. Use a spoon to gently nudge the liquid into any holes that look underfilled, like you're performing chocolate surgery with precision. The cake should drink up most of the liquid immediately, but don't panic if some pools on top — it'll absorb as it sits. Cover with plastic wrap and refrigerate for at least four hours, or overnight if you can stand the wait.
That's it — you did it. But hold on, I've got a few more tricks that'll take this to another level...
Insider Tricks for Flawless Results
The Temperature Rule Nobody Follows
Room temperature isn't just a suggestion — it's the difference between cake that rises like it's been blessed by baking angels and one that sits there like a chocolate brick. I learned this the hard way when I tried to rush things with cold eggs straight from the fridge, resulting in a cake that had the texture of rubber with trust issues. Take everything out of the fridge at least an hour before baking, or use the warm water bath method if you're impatient. Your cake will reward you with a texture so light it practically floats off the plate when you serve it.
Why Your Nose Knows Best
Don't just set a timer and walk away — your nose is the most sophisticated piece of baking equipment you own. When the cake is nearly done, your kitchen will fill with an intense chocolate aroma that's deeper and richer than when you first put it in. That's your cue to start checking, because ovens lie like politicians during campaign season. My grandmother could smell when her cakes were done from three rooms away, and while I haven't quite mastered her supernatural abilities, I've learned that when the chocolate smell makes you weak in the knees, it's time to grab the toothpicks.
The 5-Minute Rest That Changes Everything
After pouring the milk mixture, walk away for exactly five minutes before you even think about touching that cake again. This brief pause allows the liquid to start absorbing into the cake structure, creating those signature pockets of creamy goodness that make poke cakes legendary. Come back too early and you'll be tempted to add more liquid, resulting in a soggy mess that tastes like chocolate-flavored bread pudding gone wrong. Trust the process — the cake knows what it's doing even when you don't.
The Overnight Miracle
If you can stand the wait, make this cake the day before you need it. The flavors meld together in ways that make food scientists weep with joy — the chocolate deepens, the coconut blooms, and the pecans somehow taste more like themselves. It's like the cake goes to flavor university overnight and comes back with a PhD in deliciousness. I've had friends text me at midnight asking if it's normal to feel this emotionally connected to dessert, and I tell them yes, yes it is.
Creative Twists and Variations
This recipe is a playground. Here are some of my favorite ways to switch things up:
The Tropical Vacation Version
Replace half the evaporated milk with coconut rum for a grown-up twist that tastes like spring break in cake form. Add a teaspoon of lime zest to the cake batter for a subtle citrus note that makes the coconut taste like it's been vacationing in the Caribbean. Top with fresh pineapple chunks that have been grilled for thirty seconds per side — the caramelized edges add a smoky sweetness that'll transport you straight to a beach hammock with every bite.
The Nutella Dream
Swirl three tablespoons of Nutella into your milk mixture before pouring — it creates these beautiful marbled pockets of hazelnut chocolate that make people close their eyes when they taste it. I brought this version to a potluck once and witnessed a woman literally lick her paper plate when she thought nobody was looking. The Nutella adds depth without overwhelming the coconut, like they're dance partners who know exactly when to lead and when to follow.
The Salted Caramel Rebel
Substitute the sweetened condensed milk with dulce de leche and add an extra teaspoon of sea salt to the pecan mixture. The result is a sophisticated sweet-salty balance that makes your taste buds do a double-take. It's like your cake went to finishing school and came back with impeccable manners but a mischievous streak. The caramel notes play beautifully with the toasted coconut, creating a flavor profile that tastes expensive even though it costs less than your weekly coffee habit.
The Peanut Butter Cup Mashup
Add a quarter cup of peanut butter to your cake batter and replace the pecans with honey-roasted peanuts. The peanut butter adds richness that makes the chocolate taste more chocolatey — it's like they're in cahoots to create maximum flavor impact. The honey-roasted peanuts provide a sweet crunch that's completely different from regular nuts, like your cake decided to wear its fancy jewelry for a special occasion.
The Mocha Madness
Increase the espresso powder to two tablespoons and add a tablespoon of coffee liqueur to the milk mixture. This creates a mocha flavor that's sophisticated enough for dinner parties but comforting enough for eating in your pajamas while binge-watching your favorite show. The coffee notes enhance the chocolate while providing a subtle bitterness that prevents the whole thing from becoming a sugar bomb that leaves you feeling like you need a nap.
The White Chocolate Wonder
Use white chocolate pudding mix instead of the coconut cream for a completely different flavor profile that tastes like a German chocolate cake's sophisticated cousin who studied abroad. The white chocolate adds vanilla notes that make the coconut taste fresher and more vibrant. It's like your cake got a makeover and came back looking like it should be on the cover of a magazine.
Storing and Bringing It Back to Life
Fridge Storage
This cake lives happily in the refrigerator for up to five days, though I've never seen it last that long in any house with humans who have functioning taste buds. Cover it tightly with plastic wrap, pressing the wrap directly onto the surface to prevent it from absorbing refrigerator odors — because nobody wants their dessert tasting like last night's leftover garlic pasta. Store it in the coldest part of your fridge, usually the back, where it won't be subjected to temperature fluctuations every time someone opens the door to stare blankly inside.
Freezer Friendly
You can freeze individual portions for up to two months, which is perfect for those emergency chocolate situations that we all pretend don't happen but absolutely do. Wrap each piece in plastic wrap, then aluminum foil, creating a fortress against freezer burn that would make a survivalist proud. Thaw overnight in the refrigerator, then let it come to room temperature for thirty minutes before serving — the texture returns to almost fresh, like your cake went on vacation and came back refreshed and ready to party.
Best Reheating Method
While this cake is meant to be served cold, sometimes you want that slightly warm, gooey experience that makes you feel like you're eating something fresh from the bakery. Microwave individual pieces for 8-10 seconds — no more, or you'll create chocolate lava that'll burn your tongue and ruin the experience. The brief warming activates the coconut oils and makes the sauce slightly runnier, creating that fresh-baked sensation that makes people think you just pulled it from the oven.