Picture this: it's a Friday night, your friends are on their way over, and you're staring at a sad block of feta in your fridge, wondering how to turn it into something that'll make everyone forget you almost served chips and dip. Again. I've been there more times than I care to admit. But here's where the story gets good — I discovered a way to transform that humble feta into crispy, golden rolls that vanish faster than free drinks at a wedding.
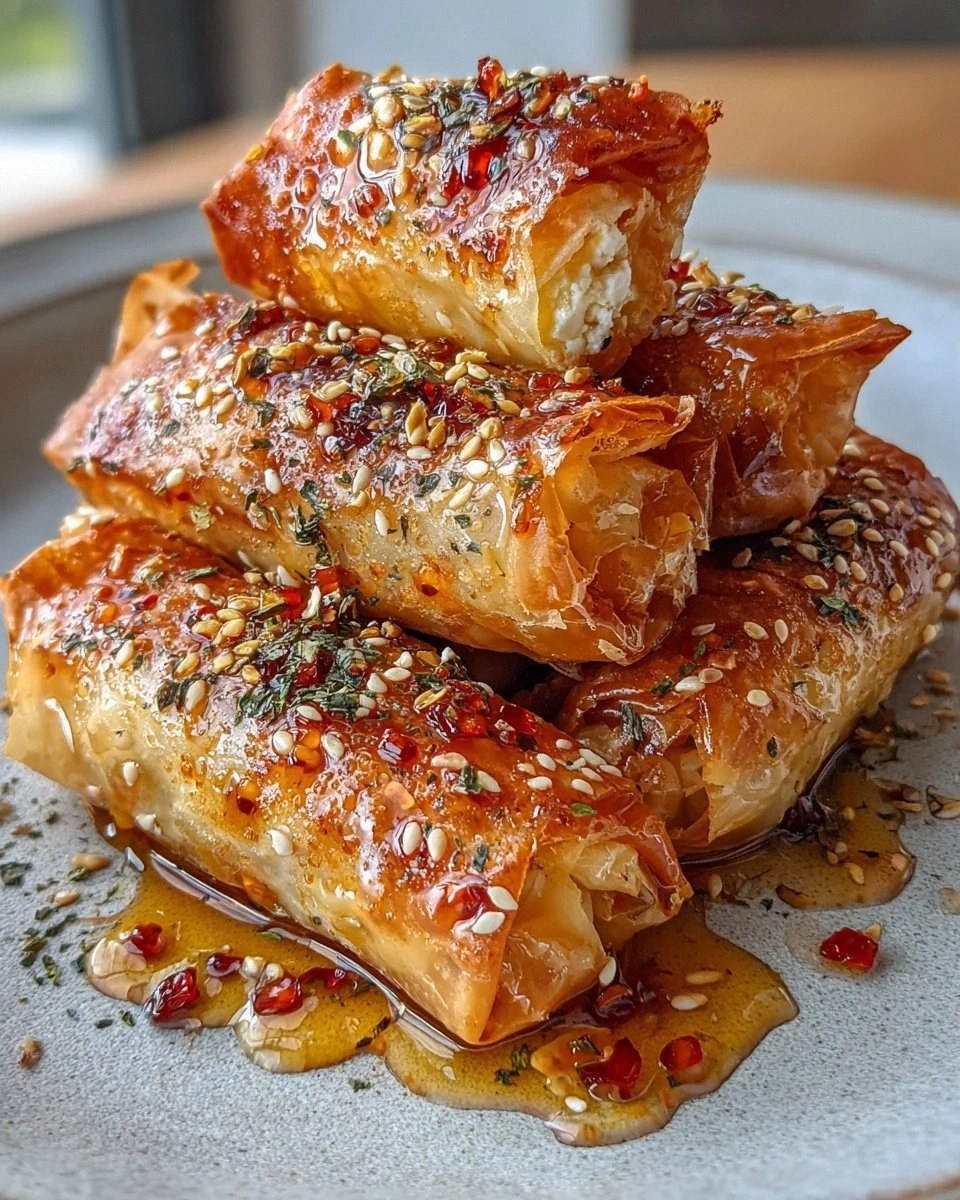
The first time I made these crispy fried feta rolls, I was actually trying to impress a date who claimed they didn't like feta cheese. Bold move, right? But something magical happened when that tangy feta met the buttery phyllo, when the dill danced with the garlic, when those crispy edges shattered like thin ice to reveal molten, salty perfection. My date — who's now my partner — ate eight of them in complete silence, then asked if I had more. That's when I knew I had created something special.
Most recipes for fried cheese appetizers get it completely wrong. They either go too heavy, leaving you feeling like you swallowed a brick, or too light, where the cheese disappears into a sad, greasy mess. This version? It's the Goldilocks of appetizers. The phyllo gets so shatteringly crisp that your neighbors will hear the crunch through the walls, but the feta inside stays creamy and molten, creating that perfect contrast that makes people close their eyes when they take a bite.
Here's what really sets this apart: instead of just wrapping and frying, we're building layers of flavor that'll make your taste buds do a happy dance. Fresh dill brings brightness, garlic adds depth, and that final drizzle of honey with chili flakes? Pure genius. Trust me, once you master this technique — and it's easier than you think — you'll be the person everyone begs to bring appetizers to every gathering.
What Makes This Version Stand Out
- Shatter-Crunch Guarantee: The phyllo gets brushed with just enough oil to create those paper-thin layers that crackle like autumn leaves under your teeth, while staying grease-free and light as air.
- Feta That Actually Tastes Like Feta: Instead of disappearing into a bland, salty puddle, our feta mixture holds its character thanks to the right mix-ins and cooking temperature that preserves its tangy personality.
- One-Bite Wonder Design: These are engineered to be exactly the right size — two bites max — so nobody has to navigate awkward party conversations while wrestling with a cheese string.
- Make-Ahead Magic: You can assemble these beauties up to 24 hours ahead, keep them covered in the fridge, and fry them fresh when guests arrive. No last-minute panic.
- The Honey-Chili Plot Twist: Just when your brain thinks "savory cheese roll," the sweet-heat finish flips the script in the most delicious way possible.
- Foolproof Frying Formula: Forget everything you know about deep-frying anxiety. We've got the oil temperature and timing dialed in so perfectly that even frying-phobic friends succeed.
- Freezer Friendly Champions: Double the batch, freeze half, and you've got emergency appetizers that go straight from freezer to frying pan without any quality loss.
Alright, let's break down exactly what goes into this masterpiece...
Inside the Ingredient List
The Flavor Base
Feta cheese is obviously the star here, but not all feta is created equal. Skip the pre-crumbled stuff that tastes like salty sawdust — you want a block of good Greek or Bulgarian feta packed in brine. That brine is liquid gold, keeping the cheese moist and tangy. When you crumble it yourself, you get these beautiful varied textures that create little pockets of intense flavor throughout each roll. The brine-packed blocks cost maybe a dollar more but deliver ten times the flavor, making this the easiest upgrade you can make.
Fresh dill transforms this from "meh" to "more please" in a way that dried dill simply cannot touch. Those feathery fronds bring a bright, almost citrusy note that cuts through the feta's richness like a flavor lightsaber. If you absolutely must substitute, fresh mint works, but you'll lose that Greek taverna vibe that makes these rolls transport you straight to a Mediterranean seaside. Strip the leaves from woody stems, give them a rough chop, and watch how they wake up the entire mixture.
The Texture Crew
Phyllo dough is your ticket to textural nirvana, but it needs respect and a light touch. Those paper-thin sheets are delicate divas that tear if you look at them wrong, but when treated right, they create layers so thin and crisp they make puff pastry seem chunky. Buy the frozen stuff — fresh phyllo is a myth invented by people with too much time on their hands. Thaw it overnight in the fridge, not on the counter, because rushing this step leads to gummy, unusable sheets that'll make you want to cry into your apron.
Extra virgin olive oil brushed between layers serves multiple missions: it prevents the sheets from sticking together, helps them brown to that perfect golden amber, and adds a subtle fruitiness that plays beautifully with the feta. Don't drown them — think of it as applying expensive face cream, not painting a fence. A light, even brush creates those distinct layers that shatter dramatically when bitten.
The Unexpected Star
That single clove of garlic might seem insignificant, but trust me on this one. When grated into the feta mixture, it disperses so completely that every bite carries this gentle hum of garlic warmth rather than aggressive chunks that'll ruin your breath for days. Use a microplane or the fine side of a box grater — you want it practically liquid so it melts into the cheese rather than creating little garlic landmines. This is the difference between amateur and restaurant-quality filling.
The Final Flourish
The honey-chili drizzle is what separates the adults from the kids at the party. Good honey brings floral sweetness that makes the feta's saltiness sing, while chili flakes add just enough heat to make things interesting without sending anyone running for milk. Warm the honey slightly so it flows like liquid amber, and sprinkle the chili flakes on top so they stay vibrant and don't sink to the bottom. This isn't just garnish — it's the plot twist that makes people pause mid-chew and say "wait, what is that?"
Everything's prepped? Good. Let's get into the real action...
The Method — Step by Step
- Start by making your feta mixture because it needs a few minutes to let the flavors meld together. In a medium bowl, combine your crumbled feta, chopped dill, and grated garlic. Here's the key — use a fork to mash everything together, but don't overwork it. You want some texture remaining, not a smooth paste. Think of it like making guacamole: you want distinct pieces that provide little bursts of flavor rather than a homogeneous blob that tastes like one-note salt. Taste it now and adjust — need more herb? Add it. Want it creamier? A tiny splash of milk works wonders.
- Now comes the phyllo ballet. Lay out one sheet of phyllo on your clean counter — keep the rest covered under that barely-damp towel we talked about. Brush it lightly with olive oil, then place another sheet on top. Repeat until you have a stack of three sheets. This triple-layer creates the perfect balance: enough layers to get shatteringly crisp, but not so many that you're eating all dough and no filling. The oil should be barely visible — if you can see puddles, you've gone too far. Think of it as makeup for pastry: enhance, don't drown.
- Time to cut and fill. Using a sharp knife or pizza cutter (seriously, pizza cutter is a game-changer here), cut your stacked phyllo into strips about 3 inches wide and 8 inches long. You're aiming for cigar-size rolls, not burritos. Place about a tablespoon of your feta mixture at one end, then roll it up like you're making mini burritos or spring rolls. Don't overfill — this is where most people go wrong. Too much filling and they'll explode in the oil like tiny cheese bombs, creating a mess that'll haunt your stove for weeks.
- Heat your oil in a heavy-bottomed pot or deep skillet. You're aiming for 350°F — use a thermometer if you have one, or test by dropping in a small piece of phyllo. It should sizzle immediately but not brown too quickly. The right temperature is crucial: too low and your rolls absorb oil like greedy sponges, too high and the outside burns before the inside heats through. I like to use a mix of oil and butter for flavor, but straight oil works if you're keeping it simple. The butter adds richness and helps with browning, but watch it carefully since butter solids can burn.
- Carefully lower 3-4 rolls into the hot oil using tongs or a slotted spoon. Don't drop them in — that's how you get splattered with hot oil and spend the rest of the night nursing burns instead of impressing guests. They'll sink briefly, then float to the surface as they cook. This is where the magic happens: the phyllo layers separate and crisp, creating those flaky, golden tubes of joy. Turn them occasionally for even browning, but resist the urge to constantly fuss with them. Let them do their thing.
- After about 2-3 minutes, when they're golden brown and look like they belong in a Greek bakery window, remove them to a paper towel-lined plate. Here's the pro move: immediately sprinkle with a tiny pinch of salt while they're still hot. This seasons them perfectly and makes them even more addictive. Let them drain for a minute — they'll continue to crisp as they cool slightly. Don't rush this step or you'll burn your mouth and miss out on the full experience.
- While your second batch fries, make the honey-chili drizzle. Warm your honey in a small saucepan or microwave until it's runny but not hot — about 20 seconds should do it. Stir in your chili flakes and let them infuse. The warmth helps release the chili oils, creating a more complex heat that builds rather than slaps. If you're feeling fancy, add a tiny pinch of salt to the honey — it sounds weird, but salt makes sweet things taste sweeter, and you'll get this beautiful balance of sweet, salty, and spicy.
- Arrange your golden rolls on a platter, drizzle with the honey mixture, and serve immediately. This is not a make-ahead serving situation — they need to be enjoyed within minutes of frying for maximum impact. Watch what happens: people will pick one up cautiously, take a bite, pause, then immediately reach for another. It's like a choreographed dance of human greed and joy. I dare you to taste one and not go back for seconds.
That's it — you did it. But hold on, I've got a few more tricks that'll take this to another level...
Insider Tricks for Flawless Results
The Temperature Rule Nobody Follows
Here's where most home cooks mess up: they think hotter oil means faster cooking, but with phyllo, patience pays off. Your oil should hover between 340-350°F — use a thermometer religiously. Too cool and the rolls absorb oil like they're trying to bulk up for winter. Too hot and the outside burns before the inside gets warm and melty. I keep my thermometer clipped to the pot like it's monitoring a patient in intensive care. When you add the rolls, the temperature will drop about 10-15 degrees, so adjust accordingly. This is hands down the best version you'll ever make at home, and temperature control is your secret weapon.
Why Your Nose Knows Best
Don't just rely on timers — your nose is your best kitchen tool here. When the rolls are nearly done, you'll smell this incredible aroma that's part nutty, part buttery, with hints of dill and garlic dancing in the background. That's your cue to start checking for doneness. The edges should be deep golden, not pale blonde, and they should feel light when you lift them. A friend tried skipping this step once — let's just say it didn't end well. She served pale, doughy rolls that tasted like raw flour wrapped around cold cheese. Trust your senses, not just your watch.
The 5-Minute Rest That Changes Everything
After frying, let your rolls rest for exactly five minutes before serving. This isn't just about avoiding burned mouths — though that's important too. During this rest, the filling settles and the flavors meld together. The exterior stays crisp but loses that initial oiliness, while the inside reaches the perfect molten consistency. It's like letting a steak rest, but faster. Picture yourself pulling this out of the oven, the whole kitchen smelling incredible, and having the willpower to wait those crucial five minutes. Future you will thank present you for this patience.
The Filling Texture Secret
If your feta mixture seems too crumbly and won't hold together, don't panic — that's actually perfect. You want it to hold its shape when rolled but not be so wet that it makes the phyllo soggy. If it's falling apart, add a teaspoon of cream cheese or Greek yogurt to bind it. If it's too wet, let it sit for five minutes — the salt will draw out moisture and it'll firm up. I'll be honest — I ate half the batch before anyone else got to try it because I kept "testing" the filling consistency. Quality control, right?
The Double-Fry Method for Extra Crunch
Okay, ready for the game-changer? If you really want to impress, fry these twice. The first fry at a lower temperature (325°F) cooks them through without browning. Let them cool completely, then fry again at 375°F for the final golden crunch. This is how restaurants get that impossibly crisp exterior while keeping the inside creamy. It's extra work, but for special occasions, it's pure magic. Most recipes get this completely wrong — they think one fry does it all, but the double-fry creates layers that shatter like thin ice.
Creative Twists and Variations
This recipe is a playground. Here are some of my favorite ways to switch things up:
The Mediterranean Mix-Up
Swap the dill for fresh oregano and add a tablespoon of sun-dried tomatoes, finely chopped, to the feta mixture. The tomatoes bring umami depth and a chewy texture that plays beautifully against the crispy exterior. Finish with a drizzle of balsamic reduction instead of honey. This version tastes like summer in Santorini and makes people think you've been secretly studying under a Greek grandmother.
Spicy Spanish Nights
Replace the dill with fresh cilantro, add a pinch of smoked paprika to the feta, and include some minced jalapeño for heat. Serve with a romesco sauce for dipping instead of the honey drizzle. The smokiness from the paprika and the brightness of the cilantro create this incredible flavor profile that transports you straight to a tapas bar in Barcelona. Your guests will wonder when you became so worldly.
French Onion Dream
Caramelize some onions until they're dark and sweet, chop them finely, and mix into the feta with fresh thyme instead of dill. Top with crispy fried shallots and a drizzle of aged balsamic. This version is richer and more autumnal, perfect for when you want something that feels cozy and sophisticated at the same time. The caramelized onions bring sweetness that makes the feta taste even tangier by comparison.
Everything Bagel Vibes
Everything bagel seasoning is having a moment, and for good reason. Mix some into your feta filling, then sprinkle more on top after frying. Swap the honey for a maple-butter drizzle with a pinch of cayenne. The combination of sesame, poppy seeds, garlic, and onion with the creamy feta creates this incredible everything-bagel-but-better experience. Breakfast-for-dinner fans will lose their minds over this one.
Mini Caprese Rolls
Add a small piece of fresh mozzarella and a basil leaf to each roll along with the feta. After frying, top with a tiny piece of fresh tomato and a drizzle of pesto. These are like caprese salad but in crispy roll form, and they're absolutely stunning for summer parties. The colors are gorgeous, and the combination of three cheeses creates this incredible melty texture that's completely addictive.
Breakfast of Champions
Add some cooked, crumbled breakfast sausage to the feta mixture and serve with maple syrup for dipping. These are dangerous for brunch because people can't stop eating them. The sausage adds richness and makes them more substantial, while the maple plays off the feta's saltiness in the most delicious way. If you've ever struggled with what to serve at brunch that isn't the same old quiche, you're not alone — and I've got the fix.
Storing and Bringing It Back to Life
Fridge Storage
Let any leftover rolls cool completely, then store them in an airtight container with paper towels between layers to absorb moisture. They'll keep for up to 3 days in the fridge, but let's be real — I've never seen them last more than 24 hours. The paper towels are crucial because they prevent the rolls from getting soggy and sad. Store them un-sauced if possible, because the honey mixture will make them soggy over time.
Freezer Friendly
These freeze beautifully before frying. Assemble the rolls, place them on a baking sheet to freeze individually, then transfer to a freezer bag. They'll keep for up to 2 months. When you're ready to serve, fry them straight from frozen — just add an extra minute or two to the cooking time. This is my emergency entertaining secret. Unexpected guests? I've got appetizers that go from freezer to fabulous in under 10 minutes.
Best Reheating Method
Skip the microwave unless you enjoy soggy disappointment. Instead, reheat in a 375°F oven for 5-7 minutes until warmed through and crisp again. If they seem a bit dry, add a tiny splash of water to the baking sheet — it creates steam that revives them without making them soggy. For extra credit, pop them under the broiler for 30 seconds at the end to re-crisp the exterior. They won't be quite as perfect as fresh-fried, but they're still miles better than most appetizers.