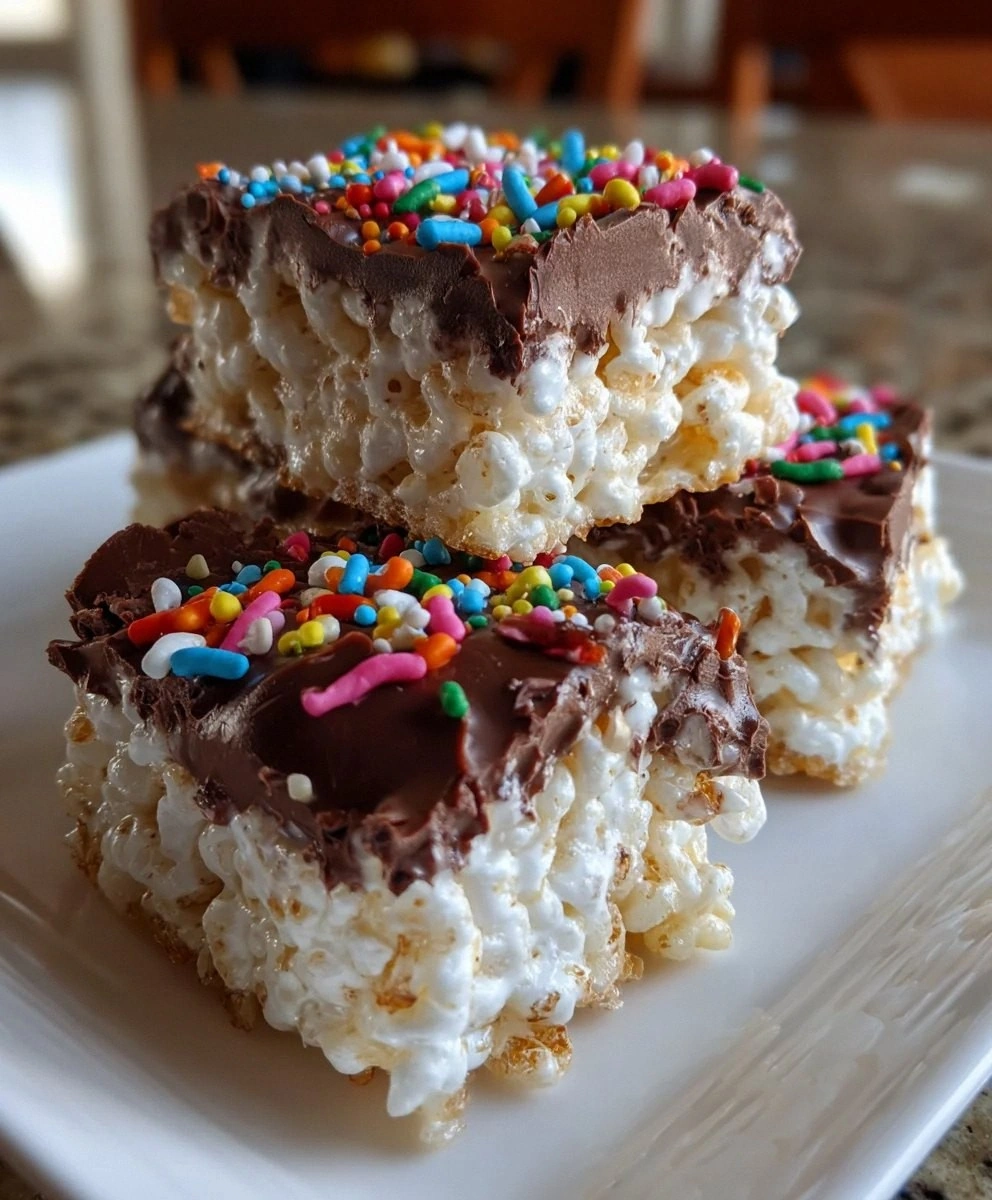
I still remember the first time I tried to make chocolate covered rice krispy treats for my nephew's birthday party. What started as a simple plan turned into a sticky, chocolatey disaster that had me scraping burnt marshmallow off my favorite saucepan and wondering if I should just buy store-bought treats instead. But here's the thing — once you've tasted the perfect chocolate covered rice krispy, with its shatteringly thin chocolate shell giving way to that gooey, marshmallowy center, there's no going back to plain old squares again. This recipe is the result of three months of obsessive testing, late-night taste sessions, and enough failed batches to fill a small bakery's trash bin. But oh, was it worth it.
Picture this: it's 11 PM on a Tuesday, and I'm standing in my kitchen wearing my ratty "Kiss the Cook" apron, watching melted chocolate cascade over a pan of perfectly pressed rice krispy treats like a glossy waterfall. The smell of butter and vanilla hangs thick in the air, mixing with the rich aroma of dark chocolate that's just barely warm enough to melt on contact. My roommate wanders in, takes one look at the chocolate-covered masterpiece cooling on the counter, and without saying a word, breaks off a corner piece. The crack of the chocolate shell is so satisfying, so crisp, that we both stop and stare at each other. That first bite? Pure magic. The way the chocolate snaps between your teeth before yielding to that familiar chewy crunch, now elevated to something almost sophisticated — it's like your childhood favorite went to finishing school and came back with a PhD in delicious.
What makes this version different from every other chocolate covered rice krispy recipe cluttering up the internet? It's all in the details that most people rush through or skip entirely. We're talking about the precise temperature for melting marshmallows (too hot and they turn into sticky cement, too cool and they won't bind properly), the specific ratio of butter to marshmallow that creates that perfect chew without being tooth-achingly sweet, and a chocolate coating technique that gives you that professional candy-shop finish every single time. Plus, I've discovered a few game-changing tricks along the way — like the secret ingredient that keeps your chocolate from blooming (you know, those weird white streaks that make homemade chocolates look sad) and the exact moment when you should cut these beauties for cleanest edges.
Let me walk you through every single step — by the end, you'll wonder how you ever made it any other way.
What Makes This Version Stand Out
Restaurant-Quality Chocolate Shell: Most recipes just tell you to melt chocolate and pour it on. That's amateur hour. We're using a specific ratio of chocolate to oil that creates a coating so glossy and professional, your guests will swear you bought these from an upscale chocolatier. The secret is in the temperature control — too hot and your chocolate turns dull and streaky, too cool and it won't spread smoothly.
The Perfect Marshmallow Ratio: After testing literally dozens of batches, I discovered that most recipes use way too many marshmallows, creating a sickly-sweet treat that makes your teeth ache. My version uses just enough to bind everything together while letting the crispy rice flavor shine through. The result? A treat that's sweet but balanced, with that nostalgic flavor profile that made you fall in love with these as a kid.
Texture That Actually Lasts: Here's a confession — I ate half the batch before anyone else got to try it, but not because I'm greedy (okay, maybe a little). I was testing how these hold up over time. Most chocolate covered rice krispies turn into a soggy mess after a day, but these stay crispy for up to five days when stored properly. The trick? A specific technique for pressing the base that prevents moisture from ruining your crunch.
Foolproof Chocolate Tempering: Don't let the word "tempering" scare you off — I've simplified the process so much that even my cooking-phobic brother can nail it. You'll get that satisfying snap when you bite into the chocolate, without any fancy equipment or candy thermometers. Just five minutes of your attention and a method that actually works in a home kitchen.
Customizable Flavor Base: While the classic version is absolutely perfect, I've included easy ways to customize these for any occasion. Want to make them for a baby shower? Add a touch of almond extract and pink food coloring. Making them for game day? Stir in some peanut butter and top with team-colored sprinkles. The base recipe is bulletproof, but it's flexible enough to play around with.
Crowd-Pleasing Presentation: These cut into perfect, Instagram-worthy squares that look like they came from a fancy bakery. No more jagged edges or chocolate that cracks in weird patterns. I share the exact technique for getting those clean lines that'll have everyone asking for your secret.
Make-Ahead Friendly: Most chocolate covered rice krispy recipes need to be eaten the same day. Not this one. You can make these up to a week in advance if you follow my storage instructions, making them perfect for parties, gift-giving, or just having a stash ready when those late-night sweet cravings hit.
Inside the Ingredient List
The Flavor Foundation
Unsalted butter is where it all begins, and please don't try to substitute with margarine or those "buttery spreads" — I can taste the difference from across the room, and so will anyone you serve these to. Real butter brings a richness that coats your mouth in the most luxurious way, carrying all the other flavors and making them sing together in perfect harmony. When it melts and mingles with the marshmallows, it creates this caramel-like undertone that makes people close their eyes and sigh with happiness. If you're dairy-free, coconut oil works surprisingly well, adding a subtle tropical note that pairs beautifully with the chocolate coating.
The fine sea salt might seem optional when you're scanning the ingredient list, but leaving it out would be like watching a movie without the soundtrack — technically complete but missing all the emotional impact. Just a pinch amplifies every other flavor, turning up the volume on the butter's richness and keeping the sweetness from becoming cloying. It's the difference between a treat that's merely good and one that's absolutely unforgettable.
The Texture Masters
Mini marshmallows are the unsung heroes here, and size absolutely matters. The minis melt more evenly than their larger counterparts, creating a smooth, elastic binding that holds everything together without any unpleasant lumps. When they hit the warm butter, they transform from pillowy squares into a glossy, stretchy web that captures every single rice krispy in its sugary embrace. Don't even think about using marshmallow fluff — I've tried, and it creates a dense, heavy texture that completely misses the light, airy quality we're after.
Rice Krispies cereal is obviously essential, but here's something most recipes get wrong: they tell you to use fresh cereal straight from a newly opened box. I actually prefer cereal that's been open for a day or two. It's slightly less brittle, meaning it won't shatter into sad little crumbs when you're mixing everything together. The cereal should still snap satisfyingly between your teeth, but it needs enough structure to hold up under that molten marshmallow mixture.
The Chocolate Coating
Semisweet or dark chocolate chips are your canvas for that gorgeous top layer, and the quality here really matters. Skip the bargain basement chocolate that tastes like wax and sadness — you want something with at least 60% cocoa for that deep, complex flavor that makes grown adults fight over the last piece. The chocolate should melt into a smooth, pourable consistency that spreads like liquid velvet over your rice krispy base. When it sets, it should have that professional sheen that makes people ask if you went to culinary school.
Vegetable or coconut oil is the magic ingredient that keeps your chocolate smooth and workable, preventing it from seizing up into a grainy, unspreadable mess. Just a teaspoon or two makes the difference between chocolate that flows like a dream and chocolate that clumps up like mud. The oil also helps the chocolate set with that beautiful glossy finish that makes these look like they came from an expensive chocolate shop.
The Finishing Touch
Rainbow sprinkles or chopped nuts are where you get to express your personality and tailor these treats to any occasion. Sprinkles add a playful pop of color that makes these instantly more fun and celebratory — kids go absolutely wild for them, but I'll be honest, I love them just as much as an adult. Chopped nuts bring a sophisticated crunch and richness that elevates these from playground treat to dinner party dessert. Toasted pecans or almonds are particularly spectacular, adding a depth of flavor that complements the chocolate beautifully.
The Method — Step by Step
- Start by preparing your pan properly — this isn't the time to get lazy with parchment paper. Line an 8x8 inch baking pan with parchment, leaving overhang on the sides so you can lift the whole slab out later. Trust me, trying to dig these out of an unlined pan is like trying to remove concrete from a mold with a toothpick. Spray the parchment lightly with cooking spray, even though it seems like overkill. This extra step prevents any sticking and ensures your edges stay pristine when you lift everything out for cutting.
- Melt your butter over medium-low heat in the largest saucepan you own — you'll need plenty of room for all that cereal later. Watch it closely as it melts, swirling the pan occasionally. The moment it starts to foam and turn golden at the edges, you're in the sweet spot. This slight browning adds a nutty depth that takes your treats from good to absolutely transcendent. Don't walk away during this part — butter can go from perfectly browned to burnt and bitter in the blink of an eye.
- Once your butter is melted and just starting to turn golden, dump in all your mini marshmallows at once. Stir constantly with a silicone spatula, scraping the bottom and sides to prevent any burning. The marshmallows will start to shrink and release their sugary liquid, creating a sticky, stretchy mass that looks like edible spider webs. This is pure magic happening right before your eyes — resist the urge to stick your finger in for a taste, because molten sugar will burn like nobody's business.
- When about 80% of the marshmallows have melted and you're left with a few stubborn lumps, remove the pan from heat immediately. The residual heat will finish melting everything, and removing it from direct heat prevents the sugar from overcooking and turning your treats into a rock-hard disaster. Stir in your pinch of sea salt now, while the mixture is still warm enough to incorporate it evenly. The salt will dissolve into the sticky base, seasoning every single bite.
- Now comes the fun part — dump in your rice krispies all at once and fold them in with swift, confident movements. Use a cutting motion with your spatula, slicing through the marshmallow mixture and lifting from the bottom to ensure every cereal piece gets coated. Work quickly but gently, like you're folding egg whites into a soufflé. The marshmallow will start to cool and set up fast, so you want everything incorporated before it becomes too stiff to work with.
- Transfer the mixture to your prepared pan and press it down firmly but not aggressively. Use the back of a spoon or the bottom of a measuring cup, but first spray it with cooking spray so nothing sticks. Press just until everything is compact and level — you're not trying to squeeze the life out of it. Over-pressing is the enemy of crispy treats, creating dense, tooth-breaking bricks instead of the light, airy squares we're after.
- Let the base cool completely before even thinking about the chocolate coating. I know you're excited, but patience here is everything. A warm base will melt your chocolate into a streaky mess, and you'll end up with chocolate that soaks into the treats instead of sitting on top like a glossy crown. Go watch an episode of your favorite show, fold some laundry, or better yet, clean up your kitchen so you can fully enjoy the chocolate-dipping process.
- Melt your chocolate chips with the oil in short bursts in the microwave, stirring between each 30-second interval. You want it just melted and smooth, not hot — hot chocolate will seize up faster than you can say "kitchen disaster." When it's glossy and flows off your spoon in a smooth ribbon, you're ready for the magic moment. This is where ordinary rice krispy treats transform into something that makes grown adults weak in the knees.
- Pour the melted chocolate over your cooled base and spread it to the edges with an offset spatula or the back of a spoon. Work quickly but deliberately, creating an even layer that completely covers the surface. The chocolate will start to set almost immediately, so don't dawdle. If you're using sprinkles or nuts, scatter them over the top right now, while the chocolate is still soft enough for them to adhere.
That's it — you did it. But hold on, I've got a few more tricks that'll take this to another level...
Insider Tricks for Flawless Results
The Temperature Rule Nobody Follows
Here's what separates amateur chocolate covered rice krispies from the professional-quality ones: temperature control at every single stage. Your marshmallow mixture should be warm enough to stay pliable but cool enough that it doesn't continue cooking your cereal into mush. I test this by touching a tiny bit to my wrist — it should feel warm but not hot enough to make me jerk away. If you can hold your finger in it for five seconds comfortably, you're in the sweet spot. This prevents that dreaded soggy texture that ruins so many otherwise perfect treats.
Why Your Nose Knows Best
Your sense of smell is your most reliable tool for knowing when each component is perfectly cooked. When the butter starts to brown, you'll smell a nutty, almost caramel-like aroma that's distinctly different from regular melted butter. The marshmallows release a vanilla-scented steam when they're perfectly melted, and if you catch even a whiff of anything toasty or caramel-like, you've gone too far and need to pull the pan off heat immediately. This is the kind of intuitive cooking that transforms you from recipe follower to kitchen confident.
The 5-Minute Rest That Changes Everything
After pressing your mixture into the pan, walk away for exactly five minutes before you even think about moving on to the chocolate. This brief rest allows the marshmallow to set up just enough that your treats will hold together perfectly when you cut them, but not so long that they become difficult to slice cleanly. It's like letting a steak rest after cooking — this short pause redistributes the sugars and ensures every bite has that perfect chewy texture instead of falling apart in your hands.
The Chocolate Secret Weapon
Adding just a teaspoon of honey to your melted chocolate creates a glossy finish that rivals anything from a professional chocolatier. The honey interacts with the chocolate's natural cocoa butter, creating a coating that sets shiny and snaps beautifully when you bite into it. Plus, it adds a subtle floral note that complements the chocolate without making things overly sweet. Just stir it in right after melting, before you pour the chocolate over your base.
Creative Twists and Variations
This recipe is a playground. Here are some of my favorite ways to switch things up:
Peanut Butter Paradise
Replace half the butter with creamy peanut butter for a flavor combination that tastes like the world's most sophisticated candy bar. The peanut butter adds richness and depth while keeping that familiar chewy texture. Top with chopped peanuts and a drizzle of melted peanut butter for a treat that'll make Reese's lovers weep with joy. The saltiness of the peanut butter balances the sweetness perfectly, creating a more complex flavor profile that adults particularly love.
Salted Caramel Dream
Stir in two tablespoons of caramel sauce with your melted marshmallows and sprinkle flaky sea salt over the chocolate before it sets. The combination of sweet caramel, bitter chocolate, and crunchy salt creates an addictive treat that disappears faster than you can say "just one more piece." The caramel adds a buttery richness that makes these feel incredibly indulgent, perfect for special occasions or when you really want to impress someone.
Mint Chocolate Fresh
Add a quarter teaspoon of peppermint extract to your marshmallow mixture and use dark chocolate for the coating. Top with crushed candy canes for a refreshing twist that's particularly popular during the holidays. The mint cuts through the richness of the chocolate, creating a treat that feels lighter and more refreshing than the original. These are dangerously addictive — I once made a batch for a Christmas party and had to hide them from myself to save some for guests.
Coconut Bliss
Replace the regular oil with coconut oil and stir in a half cup of toasted coconut flakes with your rice krispies. The coconut oil helps the chocolate set with an extra glossy finish, while the toasted flakes add a nutty, tropical flavor that transports you straight to a beach vacation. Top with extra coconut flakes for visual appeal and an extra crunch. Even people who claim they don't like coconut usually love these — the flavor is subtle but present, like a whisper of the tropics in every bite.
Espresso Elegance
Dissolve a teaspoon of instant espresso powder in your melted butter before adding the marshmallows. The coffee flavor enhances the chocolate without making these taste like a coffee dessert — it's more like a mocha note that adds sophistication. Use dark chocolate for the coating and dust with cocoa powder for a treat that feels worthy of the fanciest dinner party. The bitterness of the coffee balances the sweetness beautifully, creating a more adult version of this childhood favorite.
Birthday Cake Celebration
Stir in rainbow sprinkles with your rice krispies and use white chocolate for the coating. Add a teaspoon of clear vanilla extract to the marshmallow mixture for that classic birthday cake flavor. Top with more sprinkles for a fun, colorful treat that's perfect for celebrations. The white chocolate makes these feel extra special and indulgent, while the sprinkles add a playful crunch that makes everyone smile.
Storing and Bringing It Back to Life
Fridge Storage
Store your chocolate covered rice krispies in an airtight container in the refrigerator for up to five days. The cold helps the chocolate stay snappy and prevents the cereal from going stale. Layer them between sheets of parchment paper to prevent sticking, and make sure the container is completely sealed — rice krispies have a sneaky way of absorbing every odor in your fridge, and chocolate that tastes like leftover pizza is nobody's idea of a good time. They'll actually improve in texture after the first day as the flavors meld together.
Freezer Friendly
These freeze beautifully for up to three months, making them perfect for making ahead for parties or keeping a stash ready for emergencies. Wrap individual squares in plastic wrap, then store in a freezer-safe container. Thaw them in the refrigerator overnight for best results — don't try to rush the process at room temperature or the chocolate can develop condensation and lose its shine. They'll taste just as fresh as the day you made them, with that perfect snap from the chocolate coating.
Best Reheating Method
While these are best served at room temperature, if they've been in the fridge and you want to serve them slightly warmed, let them sit out for about 15 minutes first. The chocolate will lose its chill while the base stays crispy. Never microwave them — the chocolate will melt unevenly and the cereal will turn tough and chewy. If you must warm them, place them in a 200°F oven for just 2-3 minutes, but honestly, room temperature is where these really shine.