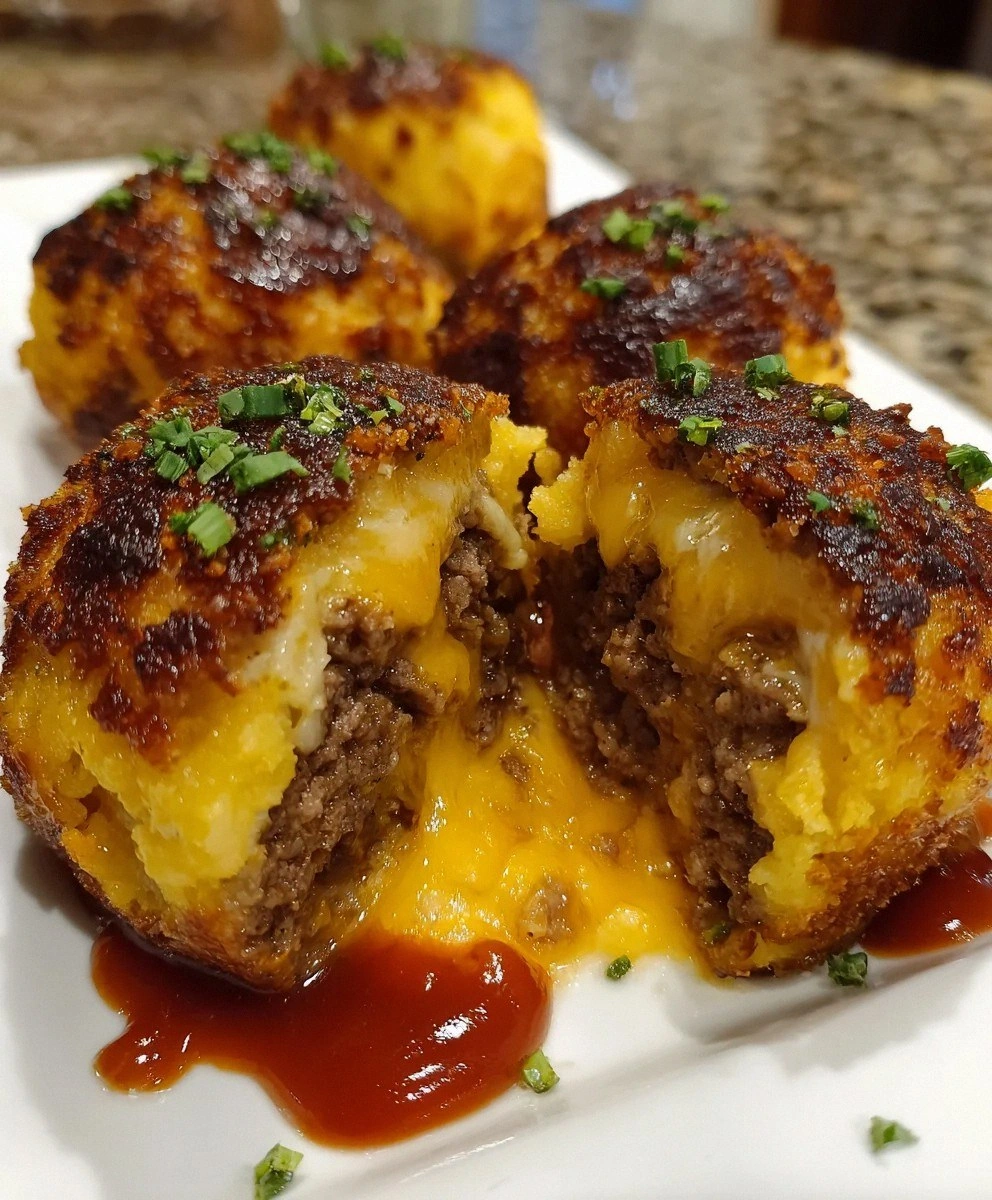
I'll be honest — I set out to make regular cheeseburgers last Saturday night. Somewhere between my third beer and that moment when the cheese refused to melt properly, I had a beautiful disaster on my hands. The beef was browning in little cake-like clumps, the cheddar was bubbling like a volcano, and my roommate dared me to "just bake the whole mess together and see what happens." Challenge accepted. What emerged from my oven twenty-five minutes later was nothing short of a revelation: individual savory cakes with molten cheese centers that tasted like the love child of a Big Mac and a chocolate lava cake. I ate three before my friends even arrived, then had to pretend the recipe "only made four" while frantically scribbling notes for what would become this glorious monstrosity.
Picture yourself pulling these out of the oven, the whole kitchen smelling like the world's most dangerous burger joint. The tops are golden and slightly crisp, giving way to a molten river of three-cheese magma that flows like slow-motion Niagara Falls when you split them open with your fork. That first bite? It's the crackle of a perfectly seared patty edge, followed by an eruption of molten cheddar and mozzarella that stretches like edible elastic bands. The cream cheese in the center keeps everything silky smooth, while the seasoned beef provides that unmistakable backyard barbecue flavor wrapped in a neat, personal-sized package.
Most recipes get this completely wrong by trying to make actual burgers with molten centers — they fall apart, the cheese leaks, and you're left with a greasy plate of disappointment. Here's what actually works: think savory cake, not burger. We're creating individual beef-based cakes with cheese centers that hold their shape while staying gloriously molten inside. The technique is closer to making a chocolate lava cake than grilling patties, and once you understand this fundamental shift, everything clicks into place like the final piece of a jigsaw puzzle.
Okay, ready for the game-changer? The secret lies in partially freezing your cheese mixture before assembly, creating a solid core that melts perfectly during baking without exploding through the beef exterior. I discovered this after three failed attempts where my cheese decided to make a break for it like prisoners escaping Alcatraz. Trust me here — this next part? Pure magic. Let me walk you through every single step — by the end, you'll wonder how you ever made it any other way.
What Makes This Version Stand Out
Molten Guarantee: While other recipes leave you with partially melted cheese or dry centers, this method ensures a river of molten cheese every single time. The partially frozen cheese core technique combined with precise baking temperatures creates the perfect lava flow consistency that makes grown adults gasp with delight.
Texture Symphony: You get the crispy, caramelized edges of a well-seared burger combined with the soft, yielding interior of a fresh-baked cake. The contrast between the golden exterior and the molten center creates a textural experience that keeps every bite interesting from first to last.
Weeknight Simple: Despite sounding like restaurant fare, these come together in under 45 minutes with ingredients you probably already have. No special equipment needed — just a bowl, a muffin tin, and the willpower to wait while they bake.
Show-Stopping Presentation: These individual servings look incredibly impressive despite being dead simple to make. Serve them at your next dinner party and watch your guests' eyes widen as they cut into the molten center. Bonus: they're naturally portion-controlled, though I won't judge if you eat two.
Flavor Depth: The combination of three cheeses with seasoned beef creates a complex flavor profile that tastes like the best cheeseburger you've ever had, but somehow more concentrated and intense. The paprika adds warmth, the garlic and onion powders provide savory backbone, and the cream cheese adds luxurious richness.
Make-Ahead Magic: You can assemble these completely, freeze them on a tray, then bake straight from frozen whenever the craving hits. They're like having a gourmet cheeseburger delivery service hiding in your freezer, ready at a moment's notice.
Crowd-Pleasing Versatility: Kids love them because they're fun and cheesy. Adults love them because they taste like elevated comfort food. They're perfect for game day, movie night, or that moment when you need something indulgent but can't decide between a burger and something cheesy.
Alright, let's break down exactly what goes into this masterpiece...
Inside the Ingredient List
The Flavor Base
Ground Beef forms the foundation of our lava cakes, and the 80/20 blend is non-negotiable here. The 20% fat content keeps everything moist and flavorful while providing enough structure to hold the cakes together. Go leaner and you'll dry out faster than a phone in a swimming pool. The fat also carries flavor, ensuring every bite tastes like the best burger joint in town decided to make personal-sized portions. When selecting your beef, look for bright red color with white fat marbling throughout — avoid anything gray or with dark spots.
Garlic Powder is the unsung hero that adds depth without the harsh bite of fresh garlic. It distributes evenly throughout the beef, giving consistent flavor in every bite. Fresh garlic would create pockets of intense flavor that might overpower the cheese. The powder also helps with the overall texture, as fresh garlic would add unwanted moisture that could compromise the structural integrity of our cakes.
Onion Powder works in tandem with garlic powder to create that classic burger flavor profile we all crave. It adds subtle sweetness and umami that makes people say "this tastes like a burger" even when they can't identify why. The powder form ensures even distribution and prevents the moisture issues that fresh onions would introduce. Think of it as the flavor backbone that supports all the other ingredients.
The Texture Crew
Shredded Cheddar Cheese brings that unmistakable sharp, tangy flavor that screams "cheeseburger" louder than a drive-through speaker. It melts beautifully while maintaining enough structure to create that dramatic lava flow when you cut into the cake. Pre-shredded works fine here, but if you're feeling fancy, shredding your own from a block of extra-sharp cheddar will give you superior melting and flavor. The key is using it in combination with other cheeses for the perfect molten texture.
Shredded Mozzarella is the stretch champion that creates those Instagram-worthy cheese pulls that make grown adults abandon their dignity for a photo. It's mild enough to let the cheddar shine while adding that essential gooey, elastic texture that defines molten dishes. Fresh mozzarella would add too much moisture, so stick with the low-moisture shredded variety for best results. The combination of cheddar for flavor and mozzarella for texture is what separates amateur attempts from professional results.
Cream Cheese is the secret weapon that holds everything together while adding luxurious silkiness to the molten center. When softened and mixed with the shredded cheeses, it creates a cohesive filling that doesn't separate or become greasy during baking. It also tempers the sharpness of the cheddar and adds body to what would otherwise be a thin, runny cheese sauce. Make sure it's properly softened or you'll end up with lumps that won't melt smoothly.
The Unexpected Star
Paprika might seem like an afterthought, but this humble spice brings warmth and subtle smokiness that elevates the entire dish from good to unforgettable. Hungarian sweet paprika adds complexity without heat, while smoked paprika can add an extra layer of barbecue flavor if you're feeling adventurous. It's the difference between a dish that tastes flat and one that makes people ask for your secret ingredient.
The Final Flourish
Unsalted Butter is crucial for achieving that beautiful golden crust on the exterior of your lava cakes. It allows you to control the salt level precisely while adding richness that helps with browning. The milk solids in butter create those delicious caramelized flavors through the Maillard reaction. Clarified butter works too if you want to avoid any potential burning, but I find the flavor trade-off isn't worth it.
Everything's prepped? Good. Let's get into the real action...
The Method — Step by Step
- Start by making your cheese filling because it needs time to firm up in the freezer. In a medium bowl, combine your shredded cheddar, mozzarella, and softened cream cheese. Work them together with a fork until you have a homogeneous mixture that looks like orange-tinged Play-Doh. This should take about two minutes of enthusiastic mashing — think of it as stress relief that will later become molten gold. Taste it now (I dare you to taste this and not go back for seconds) and adjust with a pinch of salt if needed. Cover the bowl and pop it in the freezer for 20 minutes while you prep everything else.
- While your cheese mixture chills, season your ground beef like you're trying to impress someone who really loves burgers. In a large bowl, combine the beef with garlic powder, onion powder, paprika, salt, and black pepper. Use your hands — yes, your actual hands — to mix everything thoroughly. The mixture should be uniformly colored and slightly sticky. Over-mixing makes tough cakes, so once everything is combined, stop. Think of it like making meatballs: gentle but thorough. Cover and let it rest while you check on your cheese.
- After 20 minutes, your cheese mixture should be firm but not frozen solid. Using a small cookie scoop or two spoons, portion out 8-10 balls of cheese mixture, about 1 inch in diameter. Place these on a parchment-lined plate and return to the freezer for another 10 minutes. This step is crucial — most recipes get this completely wrong by skipping the double-freeze method. The first chill firms up the mixture for easy portioning, while the second ensures they hold their shape when you encase them in beef.
- Now comes the fun part — assembly. Divide your seasoned beef into 8-10 equal portions, about 3 tablespoons each. Flatten each portion into a thin patty, approximately 4 inches across. The patty should be thin enough to wrap around the cheese but not so thin that it tears. Place a frozen cheese ball in the center and gently wrap the beef around it, sealing completely. Roll it between your palms to form a smooth ball, then flatten slightly into a hockey puck shape. This ensures even cooking and prevents cheese leakage.
- Preheat your oven to 375°F (190°C) and position a rack in the middle. Heat an oven-safe skillet over medium-high heat and add your butter. When the butter stops foaming and just starts to brown, carefully place your beef cakes in the pan. That sizzle when it hits the pan? Absolute perfection. Sear for 2-3 minutes per side until you get a beautiful golden-brown crust. Don't walk away from the stove here — this happens fast and you want that caramelization for maximum flavor.
- Once all your cakes are seared, arrange them in a buttered muffin tin if you want individual portions, or nestle them back in your oven-safe skillet. Transfer to the preheated oven and bake for 12-15 minutes. The cakes are done when they feel firm but springy to the touch and the internal temperature hits 160°F (71°C). If you've ever struggled with this, you're not alone — and I've got the fix: use an instant-read thermometer and pull them at exactly 155°F (68°C) because they'll continue cooking from residual heat.
- Remove from the oven and let them rest for exactly 5 minutes. I know, I know — the smell is driving you crazy and you want to dive in immediately. But this rest allows the molten center to settle slightly so it doesn't all come rushing out like a cheesy dam breaking. During this time, the juices redistribute throughout the beef, ensuring every bite is moist and flavorful. Future pacing: Picture yourself pulling these out of the oven, the whole kitchen smelling incredible, and having the patience to wait those crucial five minutes.
- Serve immediately while the centers are still gloriously molten. Place each cake on a small plate and provide your guests with steak knives — they're going to want to cut into these bad boys and watch the cheese flow. Offer BBQ sauce or ketchup on the side for dipping, though honestly, they're perfect as-is. If you've ever struggled with getting that perfect cheese pull for photos, here's my secret: cut a small X in the top with a sharp knife before serving. This creates a controlled break point for maximum drama.
- That's it — you did it. But hold on, I've got a few more tricks that'll take this to another level...
Insider Tricks for Flawless Results
The Temperature Rule Nobody Follows
Room temperature beef mixes more evenly with seasonings and forms better cakes. Take your ground beef out of the fridge 30 minutes before you start — this small step makes a massive difference in how well everything comes together. Cold beef resists mixing, leading to overworking as you try to incorporate seasonings. Overworked beef equals tough, dense cakes that nobody wants to eat. I learned this the hard way after making hockey pucks that could've doubled as paperweights.
Why Your Nose Knows Best
Don't rely on timers alone — your nose is your most reliable kitchen tool. When these are perfectly done, your kitchen will smell like the world's best burger joint had a baby with a French bakery. The aroma of beef, butter, and melting cheese creates an olfactory symphony that signals perfection. If you smell anything burning, you've gone too far. A friend tried skipping this step once — let's just say it didn't end well, and her smoke alarm has trust issues now.
The 5-Minute Rest That Changes Everything
I cannot stress this enough — those five minutes of resting time are not optional. They're what separate amateur results from restaurant-quality perfection. During this time, the molten center thickens slightly, creating that perfect lava consistency instead of a runny mess. The beef relaxes and becomes more tender, while the exterior firms up just enough to hold everything together when you cut into it. Use this time to set the table, pour drinks, or just bask in the glory of what you're about to serve.
The Seal Test
Before baking, gently press around the edges of each cake to ensure there are no cracks or thin spots where cheese might escape. Think of it like patching a tire — you want to find potential leaks before they become problems. A properly sealed cake should feel uniformly firm with no visible seams. If you find a thin spot, patch it with a small piece of beef from another portion. This extra 30 seconds of attention prevents 90% of cheese leakage issues.
The Make-Ahead Method
These are brilliant for entertaining because you can do all the assembly up to 24 hours ahead. After forming the cakes, place them on a parchment-lined tray, cover tightly with plastic wrap, and refrigerate. When ready to serve, let them sit at room temperature for 15 minutes while your oven preheats, then proceed with searing and baking as directed. They'll taste exactly like you just made them, but you'll be relaxed and ready to enjoy your party instead of frantically cooking in the kitchen.
Creative Twists and Variations
This recipe is a playground. Here are some of my favorite ways to switch things up:
The Bacon Bomb
Add 2 tablespoons of crumbled cooked bacon to your cheese mixture along with a teaspoon of bacon grease. The smoky pork flavor infuses the molten center, creating a bacon cheeseburger experience that's somehow better than the sum of its parts. Top each cake with a small piece of candied bacon before serving for extra crunch and visual appeal. This version is what happens when a bacon cheeseburger and a molten cake have a beautiful, smoky baby.
Spicy Southwest
Replace the paprika with chipotle powder and add 2 tablespoons of diced pickled jalapeños to your cheese mixture. The smoky heat from the chipotle combines with the tangy jalapeños to create a flavor explosion that'll make spice lovers weep with joy. Serve with a cooling ranch dip to balance the heat. Warning: start with half the chipotle powder if you're sensitive to spice — this version brings serious fire.
Mushroom Swiss
Swap the cheddar for Swiss cheese and add 2 tablespoons of finely diced sautéed mushrooms to your beef mixture. The earthy mushrooms and nutty Swiss create an elevated flavor profile that tastes like it came from a fancy steakhouse. Sauté the mushrooms until they're dry before adding them, or they'll introduce too much moisture. This is the sophisticated cousin of the original recipe.
Pizza Party
Replace half the cheddar with shredded provolone, add Italian seasoning to the beef, and include a small cube of pepperoni in the center of each cheese ball. Serve with warm marinara for dipping. It's like a pizza and a cheeseburger had a molten love child that somehow works perfectly. Kids go absolutely wild for this version, and honestly, so do most adults.
Breakfast Blitz
Add everything bagel seasoning to your beef mixture and include a cube of cream cheese mixed with chives in the center. Serve with a side of hash browns and you've got the most indulgent breakfast imaginable. The everything seasoning adds onion, garlic, and sesame flavors that complement the beef beautifully. This is weekend brunch goals achieved.
French Onion
Caramelize onions until they're deep golden and mix them into your cheese filling along with a splash of Worcestershire sauce. The sweet, jammy onions create an incredible contrast with the savory beef. Top each cake with a small mound of crispy fried onions before serving for textural contrast. It's like French onion soup and a cheeseburger had a molten rendezvous.
Storing and Bringing It Back to Life
Fridge Storage
Cooked lava cakes will keep in an airtight container in the refrigerator for up to 3 days, though they're best within the first 24 hours. Store them in a single layer if possible, or separate layers with parchment paper to prevent sticking. The centers will solidify when cold, but don't panic — they reheat beautifully. Let them come to room temperature for 15 minutes before reheating for best results. If you've ever struggled with dried-out leftovers, I've got the fix.
Freezer Friendly
These freeze brilliantly either before or after cooking. For unbaked cakes, flash freeze them on a tray until solid, then transfer to a freezer bag for up to 3 months. Bake straight from frozen, adding 5-7 extra minutes to the cooking time. For cooked cakes, wrap each one individually in plastic wrap, then foil, and freeze for up to 2 months. Thaw overnight in the refrigerator before reheating. The key is preventing freezer burn, which would ruin the delicate texture.
Best Reheating Method
Skip the microwave — it makes the beef rubbery and the cheese greasy. Instead, place refrigerated cakes in a 300°F oven for 8-10 minutes until heated through. Add a tiny splash of water to the pan before covering with foil — it steams them back to perfection. For frozen cakes, thaw overnight, then reheat as above. The centers won't be quite as molten as fresh, but they'll still be deliciously creamy and warm. If you're in a hurry, you can reheat them in a covered skillet with a tablespoon of water over low heat, turning once.