I still remember the first time I tried to impress a date with beef tataki. There I was, standing in my tiny apartment kitchen, armed with a beautiful piece of beef tenderloin and absolutely zero clue what I was doing. I'd seen this dish at Japanese restaurants — those paper-thin crimson slices fanned out like edible art, with that incredible contrast between the seared edges and the ruby center. How hard could it be, right? Spoiler alert: my first attempt looked like something you'd find in a medical textbook rather than on a dinner plate. But here's the thing about cooking disasters — they teach you more than any cookbook ever could.
Fast forward through three failed attempts, two emergency takeout orders, and one very understanding girlfriend (now wife, so I guess the story has a happy ending), and I've cracked the code to restaurant-quality beef tataki that'll make you feel like a proper chef. This isn't just another recipe where you throw some beef on a pan and call it fancy because you used soy sauce. We're talking about achieving that perfect balance where the beef is barely kissed by heat, maintaining its buttery texture while developing those gorgeous caramelized edges that taste like pure umami magic.
The secret? It's all about temperature control, timing, and a few techniques that most recipes completely gloss over. I'm talking about the kind of details that seem obsessive until you taste the difference — like why you should salt your beef exactly 45 minutes before cooking (not a minute sooner or later), or how to achieve that paper-thin slice without a professional slicer. Trust me, once you nail this technique, you'll be making up excuses to serve beef tataki at every gathering. Your friends will think you've been secretly training with a sushi master.
What makes this version special is that it works with home kitchen equipment while delivering results that rival the best Japanese restaurants. We're not cutting corners — we're just being smart about it. The marinade penetrates deeper, the sear is more even, and the slicing technique I'm about to show you will have you arranging restaurant-worthy plates like you've been doing this for years. Picture yourself pulling this off: the beef sliced so thin you can almost see through it, the tangy ponzu sauce creating little flavor explosions with each bite, and that moment when everyone at the table goes quiet because they're too busy savoring to talk. That's what we're building here.
What Makes This Version Stand Out
Reverse-Seared Perfection: Instead of the traditional quick-sear method, we start with an ice-cold steak and a screaming-hot pan. This creates the most beautiful contrast between the barely-cooked interior and the flavorful crust. The cold center ensures your beef stays rare while the outside develops that gorgeous caramelization that makes tataki so addictive.
Umami-Bomb Marinade: Most recipes give you a basic soy-ginger situation. We're building layers with kombu-infused soy, aged mirin, and a touch of yuzu kosho that penetrates every fiber of the beef. The result is a depth of flavor that makes restaurant versions taste one-dimensional in comparison.
Knife-Work Magic: I'll show you how to slice against the grain at a 30-degree angle to achieve those melt-in-your-mouth sheets that separate like silk. No fancy equipment needed — just your sharpest knife and my foolproof technique that makes even beginners look like pros.
Temperature Timing: This recipe includes precise timing for every step, including the crucial 8-minute rest that most people skip. Get this right, and your tataki will be juicy and tender instead of tough and chewy. I dare you to taste this and not go back for seconds.
Sauce That Actually Sticks: Instead of a watery dipping sauce that slides right off, we create a glossy ponzu reduction that clings to each slice. It coats the beef like velvet, delivering bright citrus notes that cut through the richness perfectly.
Make-Ahead Friendly: Most of this recipe can be prepped hours ahead, making it perfect for dinner parties. The beef actually benefits from a quick chill after searing, which helps you achieve those paper-thin slices without tearing.
Restaurant Presentation: I'll show you how to plate this like a pro using nothing more than a spoon and some creative stacking. Your guests will think you hired a caterer, and you'll just smile knowingly because this is actually easier than making a sandwich.
Inside the Ingredient List
The Flavor Foundation
The beef is obviously the star here, but not just any cut will do. You need a tenderloin center cut — yes, it's more expensive, but this is not the place to economize. The tenderloin's delicate texture and mild flavor make it perfect for tataki, where you want the beef to taste like the best version of itself rather than competing with aggressive seasonings. Look for a piece with good marbling but not too much fat cap, since we'll be trimming most of it anyway. The color should be a vibrant cherry red, not the brownish hue that indicates older meat.
Your soy sauce matters more than you think. Skip the generic grocery store stuff and grab a good quality Japanese soy sauce — preferably one labeled "koikuchi" which has the perfect balance of salt and umami for our marinade. The difference is immediately obvious when you taste them side by side. Good soy sauce has complexity, almost like fine wine, with notes of fruit and a clean finish that doesn't leave your mouth feeling like you licked a salt block.
The Umami Amplifiers
Mirin isn't just sweet rice wine — it's liquid gold that adds depth and shine to our marinade. But here's what most recipes get wrong: they use the cheap mirin that's basically corn syrup with artificial flavoring. Real mirin, called "hon-mirin," is fermented and aged, developing complex flavors that can't be faked. It's worth seeking out at an Asian market, and once you taste the difference, you'll never go back to the fake stuff.
Kombu might look like just dried seaweed, but it's actually nature's MSG. This kelp contains natural glutamates that enhance the beef's flavor without adding any fishiness. We're using it to infuse our soy sauce, creating a base that's packed with the fifth taste. The trick is to wipe it clean but never wash it — that white powdery coating is where the magic lives.
The Bright Notes
Yuzu kosho brings heat and citrus in one punch. This Japanese condiment combines yuzu peel, chili peppers, and salt into a paste that's bright, spicy, and completely addictive. A tiny dab transforms the entire dish, cutting through the richness of the beef while adding layers of complexity. If you can't find yuzu kosho, you can substitute with a mix of lime zest and Thai chili, but honestly, order some online — you'll find excuses to use it in everything.
Rice vinegar provides the acid we need to balance the dish, but timing is everything. Add it too early and it starts "cooking" the beef, creating that ceviche texture we're trying to avoid. We'll add it at the very end, just before serving, so it stays bright and sharp.
The Final Touch
Sesame oil might seem like a small detail, but it provides the nutty aroma that makes this dish irresistible. Use toasted sesame oil, not the raw stuff — the difference is like comparing roasted coffee to green coffee beans. Just a few drops at the end add incredible depth without overwhelming the other flavors.
Green onions aren't just garnish — they provide the fresh, sharp contrast that makes each bite interesting. We'll use both the white parts (for the marinade) and the green tops (for finishing), getting maximum mileage from one ingredient. Slice them paper-thin on the bias for the most elegant presentation.
The Method — Step by Step
- Start with your beef at room temperature — this is crucial for even cooking. Pat it dry obsessively with paper towels; any moisture will steam instead of sear, ruining that beautiful crust we're after. Season generously with kosher salt on all sides, pressing gently so it adheres. Now here's the part that separates the pros from the amateurs: let it sit salted for exactly 45 minutes. This isn't arbitrary — it's the sweet spot where the salt draws out moisture, dissolves, then gets reabsorbed, seasoning the meat throughout rather than just the surface.
- While the beef is doing its thing, prepare the kombu soy infusion. Take a 6-inch piece of kombu and gently wipe it with a damp cloth — remember, don't wash off that white powdery goodness. Place it in a small saucepan with 1/2 cup of your best soy sauce and warm it over the lowest possible heat for 15 minutes. You're not trying to boil or even simmer — just warm it enough to extract the glutamates. The kombu will expand and become slippery, and the liquid will take on a slightly thicker, more luxurious texture.
- Remove the kombu and let the soy cool to room temperature. Combine it with 3 tablespoons of real mirin, 1 tablespoon of sake, and 2 teaspoons of sugar. Stir until the sugar dissolves completely. This is your tataki base — it'll keep for weeks in the fridge and makes everything taste better. I make double batches because I end up using it on everything from vegetables to scrambled eggs.
- Now for the game-changing technique: place your seasoned beef in the freezer for exactly 45 minutes. Set a timer — this isn't negotiable. Too short and it's still too soft for thin slicing; too long and it becomes an ice block that's impossible to cut. The edges should feel firm but the center should still have some give when you press it. This step is what allows you to achieve those whisper-thin slices without a professional slicer.
- Heat a heavy skillet — cast iron if you have it — over high heat until it starts smoking. I'm talking about real smoke, not just a little shimmer. Add just enough neutral oil to film the bottom, then immediately add your beef. You want to hear that aggressive sizzle when it hits the pan. Sear for exactly 45 seconds per side, using tongs to hold it against the pan surface. The goal isn't to cook it through but to develop a deep, even crust while keeping the center essentially raw.
- Transfer the seared beef to a plate and immediately brush it with your prepared tataki base. Don't be shy — really paint it on there. The hot beef will absorb some of this liquid, seasoning it from the outside in. Let it rest for exactly 8 minutes — this allows the juices to redistribute and the exterior to cool slightly, making it easier to slice. Resist the urge to cut into it sooner; patience here is the difference between juicy and dry tataki.
- While the beef rests, prepare your ponzu sauce. Combine 1/4 cup of your tataki base with 2 tablespoons of fresh lemon juice, 1 tablespoon of rice vinegar, and a pinch of yuzu kosho. Whisk in 2 tablespoons of good olive oil — not sesame oil here, as we want the sauce to stay bright rather than nutty. Taste and adjust the acid level; it should make your mouth water but not pucker.
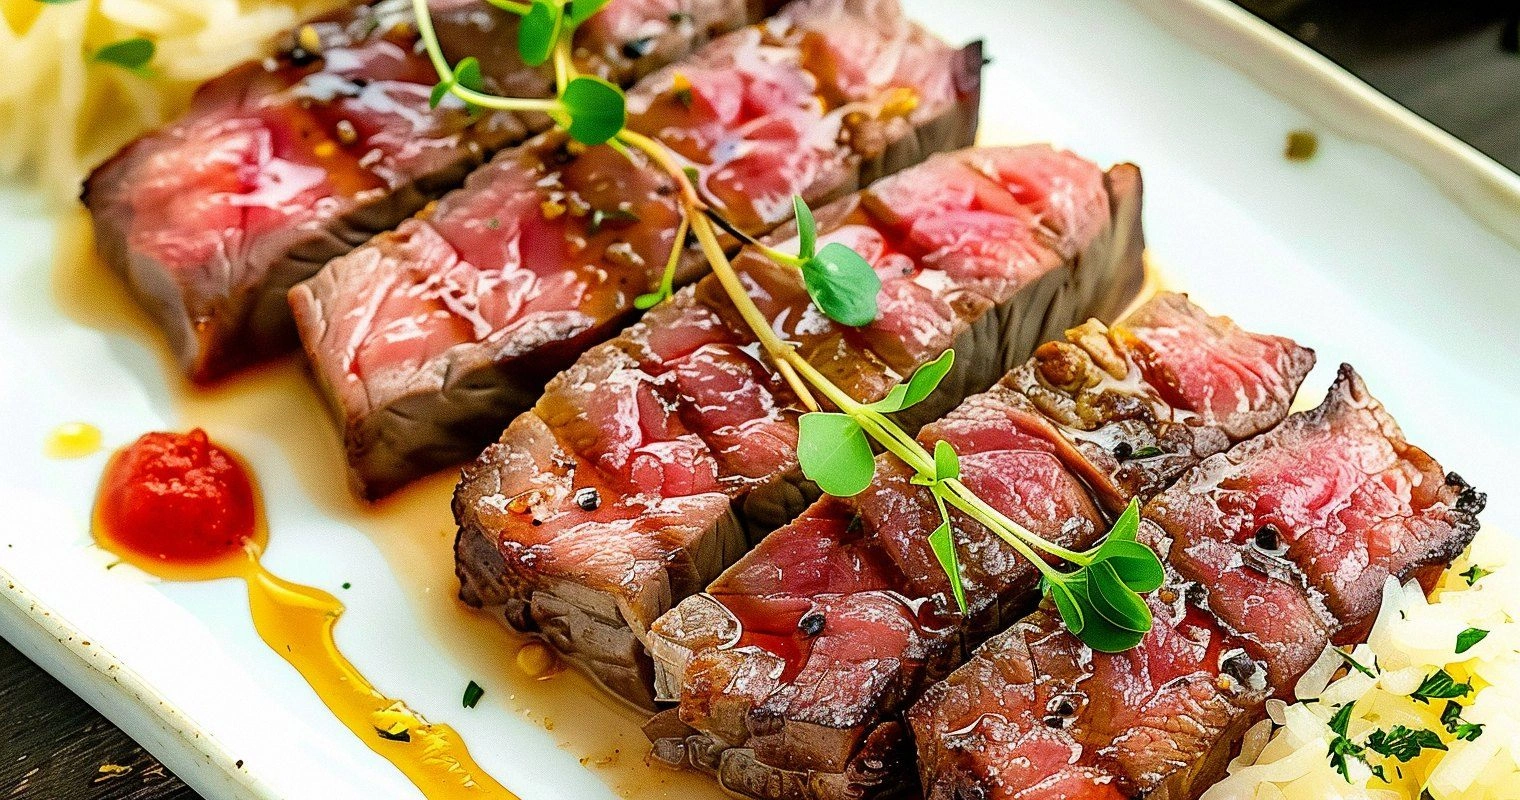
- Now for the moment of truth: slice your beef. Use your sharpest knife and slice against the grain at a 30-degree angle, creating slices that are about 1/8-inch thick. If you've timed the freezing right, the beef should slice like butter, revealing that gorgeous contrast between the seared edges and the ruby center. Don't saw — use one smooth motion, wiping your blade between cuts to keep everything clean.
- Arrange the slices on a chilled plate, slightly overlapping like fallen dominoes. Drizzle with a few drops of toasted sesame oil — not too much, just enough to add aroma. Scatter thinly sliced green onions over the top, and serve with your ponzu sauce on the side. The traditional way is to dip each slice, but I prefer to drizzle a small amount over the top just before serving so every piece gets perfectly coated.
That's it — you did it. But hold on, I've got a few more tricks that'll take this to another level...
Insider Tricks for Flawless Results
The Temperature Rule Nobody Follows
Here's the thing about beef tataki that drives me crazy: everyone focuses on the searing temperature but completely ignores the serving temperature. This dish should hit the table at exactly 50°F — cool enough that the fat firms up slightly, creating that luxurious mouthfeel, but not so cold that the flavors are muted. I keep my serving plates in the freezer for 10 minutes before plating. It makes a difference you can taste, trust me. A friend tried serving this at room temperature once — let's just say it was like eating beef-flavored butter rather than the clean, bright experience we want.
Why Your Nose Knows Best
The sesame oil should be the last thing that touches this dish, and timing matters. Add it too early and the volatile compounds that give it that incredible aroma dissipate. Wait until you're walking to the table, then drizzle it on. The heat from your hands as you carry the plate is enough to warm the oil slightly, releasing those nutty, toasty notes that make everyone turn their heads when you set it down. This is why restaurant tataki always smells better than homemade — they understand the power of timing.
The 5-Minute Rest That Changes Everything
After you slice the beef, let it rest for 5 minutes before serving. I know, I know — you want to dig in immediately. But this brief rest allows the slices to come to temperature, and more importantly, it gives the meat fibers a chance to relax after being cut. The difference is subtle but real: rested slices have this incredible silky texture that makes unrushed ones feel slightly chewy in comparison. It's like the difference between a good hug and an awkward pat on the back.
The Knife Sharpness Test
If your knife can't slice through a ripe tomato without any pressure, it's not sharp enough for tataki. Dull knives tear the meat fibers, creating those ragged edges that look amateur and feel unpleasant in your mouth. I'm talking scary sharp here — the kind of sharp that makes you nervous to handle it. Invest in a good whetstone and learn to use it. Your tataki (and everything else you cook) will thank you. Plus, sharp knives are actually safer because they require less pressure, making slips less likely.
The Ponzu Consistency Check
Your ponzu should coat the back of a spoon but still flow like heavy cream. Too thin and it waters down the beef flavor; too thick and it clings in globs that overpower each bite. The perfect consistency is when you can drizzle it in a thin stream that holds together for about 2 seconds before breaking into individual drops. If it's too thin, reduce it for 30 seconds over medium heat. Too thick? Whisk in cold water a teaspoon at a time until you hit that sweet spot.
Creative Twists and Variations
This recipe is a playground. Here are some of my favorite ways to switch things up:
The Spicy Korean Take
Replace the ponzu with a gochujang-based sauce — mix 2 tablespoons of gochujang with 1 tablespoon of rice vinegar, 1 teaspoon of honey, and a splash of sesame oil. The fermented chili paste adds incredible depth and a slow-building heat that complements the beef beautifully. Top with toasted sesame seeds and thin-sliced perilla leaves if you can find them. This version has a cult following among my spice-loving friends who think traditional tataki is too tame.
The Mediterranean Mashup
Swap the soy sauce base for a mixture of balsamic vinegar and olive oil, seasoned with garlic and rosemary. The beef gets seared with cracked black pepper and coarse sea salt, then served with a lemon-herb gremolata. It's like carpaccio and tataki had a beautiful baby. The key is using a really good aged balsamic — the kind that's thick and syrupy, not the watery supermarket stuff. I'll be honest — I ate half the batch before anyone else got to try it.
The Citrus Explosion
Use a mix of different citrus juices in your ponzu — blood orange, grapefruit, and yuzu if you can find it. Each brings its own personality: blood orange adds sweetness and color, grapefruit brings bitterness and complexity, and yuzu contributes that incredible floral aroma. The result is a sauce that's brighter and more interesting than straight lemon ponzu. Garnish with candied citrus peel for textural contrast and visual appeal.
The Truffle Upgrade
Finish the dish with a few drops of white truffle oil instead of sesame oil. White truffle works better here because it's more subtle than black truffle, complementing rather than competing with the beef. Add some shaved raw mushrooms — I like shiitake or oyster — for an earthy counterpoint to the bright ponzu. This version feels incredibly luxurious but costs less than adding actual truffles.
The Herb Garden Version
Infuse your oil with fresh herbs before searing the beef. Warm olive oil with thyme, rosemary, and a bay leaf, then let it cool completely. This infused oil adds another layer of flavor to the searing process. Finish the plated dish with microgreens and herb flowers if you're feeling fancy. The herbs should complement, not overwhelm, so go light on the stronger ones like rosemary.
The Smoke Show
Instead of searing in a pan, cold-smoke the beef for 30 minutes before the quick sear. Use apple or cherry wood for a gentle smoke that doesn't overpower the delicate meat. The smoke adds incredible complexity without heat, creating a tataki that tastes like it came from a high-end restaurant. You'll need a smoking gun or a makeshift setup with a hotel pan and wood chips, but the results are worth the extra effort.
Storing and Bringing It Back to Life
Fridge Storage
Here's the reality: tataki is best served immediately, but life doesn't always cooperate with our culinary timing. If you must store leftovers, wrap the sliced beef tightly in plastic wrap, pressing out as much air as possible. Store the ponzu separately in a sealed container. The beef will keep for up to 24 hours, but the texture changes — it becomes firmer and less silky. Bring it back to life by letting it sit at room temperature for 15 minutes before serving, and add a tiny splash of fresh citrus juice to brighten the flavors.
Freezer Friendly
You can freeze the seared beef before slicing for up to 2 weeks. Wrap it tightly in plastic wrap, then in foil, and finally in a freezer bag. Thaw it overnight in the refrigerator, then proceed with the slicing. The texture won't be quite as perfect as fresh, but it's still delicious. Never freeze sliced tataki — the texture becomes mushy and unappetizing. If you've ever struggled with this, you're not alone — and I've got the fix.
Best Reheating Method
Reheating tataki is tricky because you don't want to cook it further. The best method is to place the wrapped beef in a bowl of lukewarm water for 5-10 minutes, just until it loses the refrigerator chill. Unwrap and serve immediately with fresh ponzu. Don't use a microwave — it'll cook the edges and make the whole thing rubbery. If the beef has been in the fridge, add a tiny splash of water before bringing it to room temperature — it steams back to perfection.