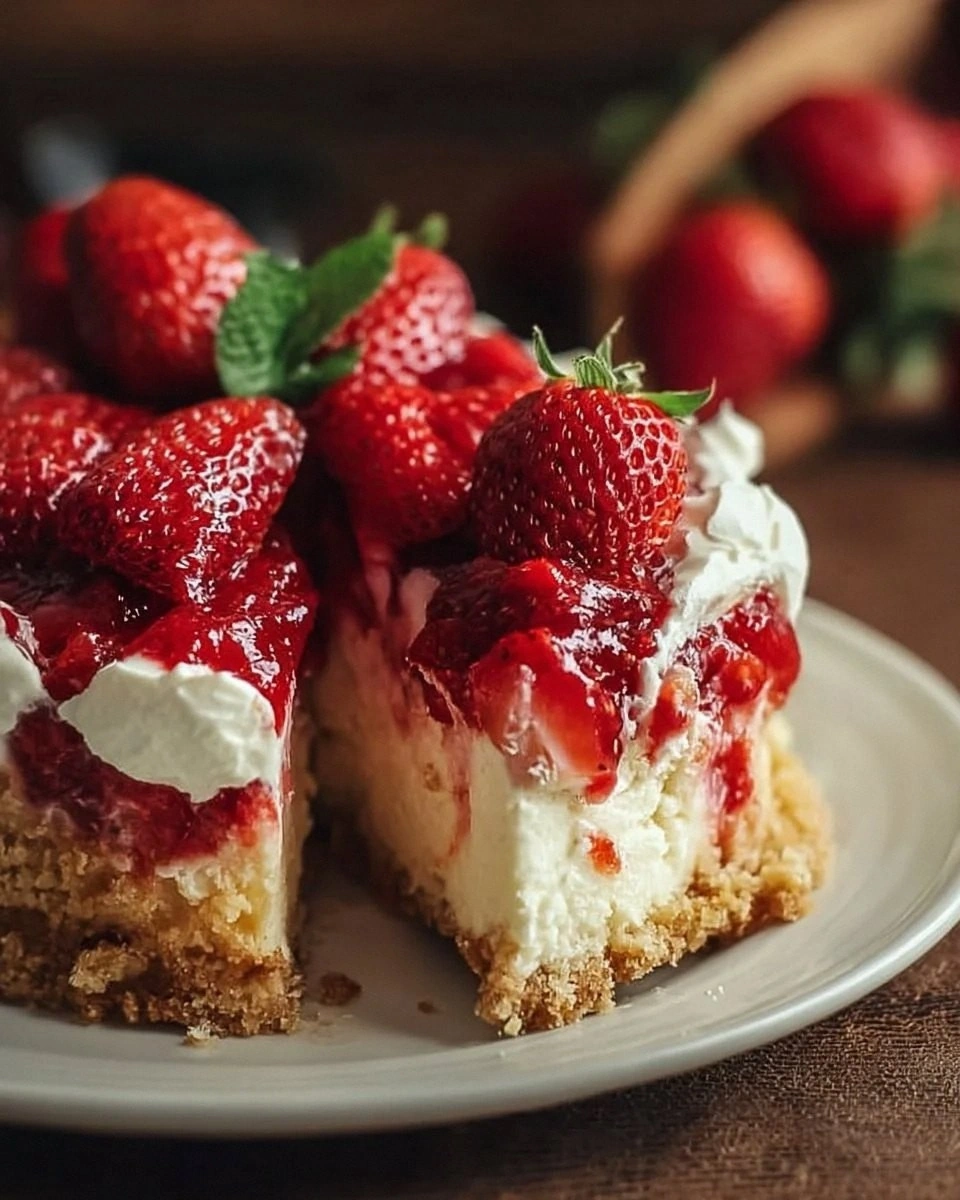
I was standing in front of a fridge that looked like it had seen better days, the last time I had opened it, I found a bag of frozen strawberries that had turned into a mushy, unsightly mess. I stared at the bag, then at the can of sweetened condensed milk that was half full, and I thought, “This is the kind of kitchen disaster that could be turned into a masterpiece.” The idea hit me like a lightning bolt: 3-ingredient, no churner, no fancy equipment, just pure, honest, strawberry bliss that could be made in minutes and still taste like it was freshly scooped from a luxury dessert shop.
Picture the scene: the bright red berries glimmering in the light, the sweet, caramelized aroma of condensed milk wafting through the air, and the heavy cream swirling like a cloud of velvet in a glass bowl. The sound of the blender whirring, the gentle hiss as the mixture turns from a thick puree to a silky smoothness, and the first spoonful that melts on the tongue, releasing a burst of ripe sweetness followed by a creamy finish. It’s a symphony of senses that turns an ordinary kitchen into a gourmet laboratory.
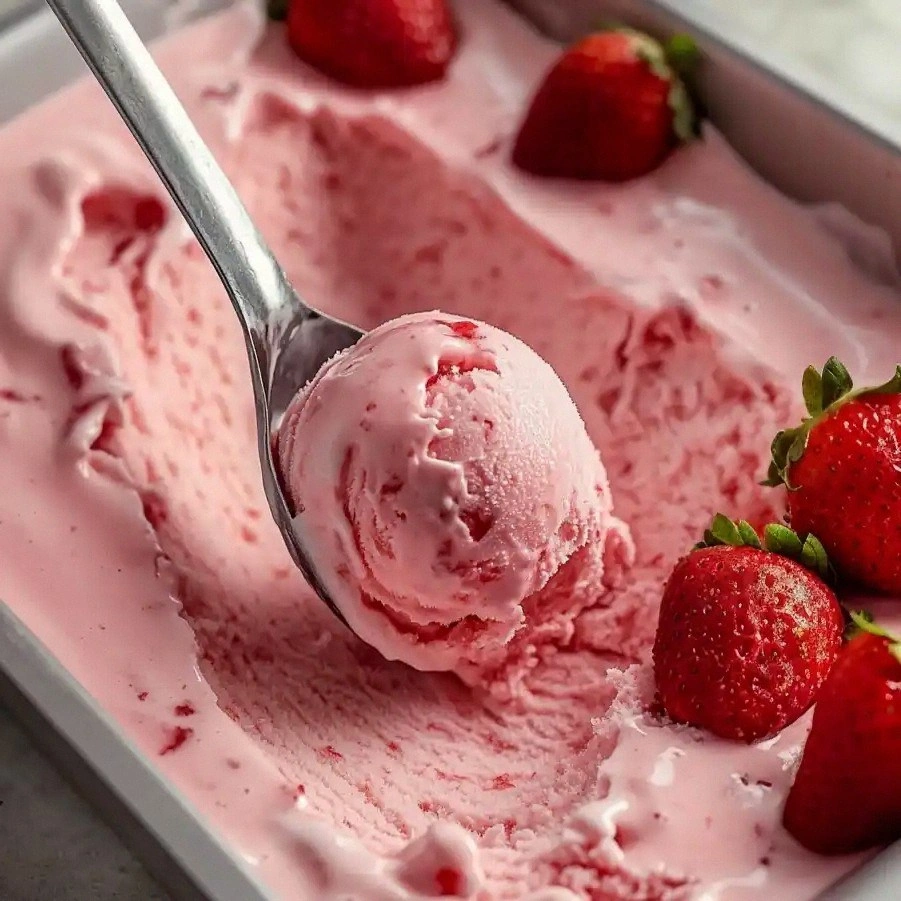
What makes this version stand out is not just the simplicity; it’s the way each ingredient is honored and combined to create a texture that feels like a scoop of luxury on a summer day. The strawberries are the star, the condensed milk acts as a natural sweetener and binder, and the heavy cream gives it that decadent mouthfeel. It’s hands down the best version you'll ever make at home because you’re not sacrificing flavor for convenience; you’re elevating it.
I dare you to taste this and not go back for seconds. I’ve tasted a thousand frozen desserts, and this one is the only one that keeps me coming back for more. The secret is in the balance: the strawberries are fresh, the milk is sweetened but not overdone, and the cream is pure, no additives. No sugar or artificial flavors, just the natural sweetness of fruit and the richness of cream.
If you've ever struggled with making ice cream that’s not too icy or too runny, you’re not alone — and I've got the fix. The trick is to blend the strawberries into a puree first, then fold in the condensed milk and heavy cream. The result is a silky texture that holds its shape but melts in your mouth. And trust me, the first bite will make you wonder why you ever bothered with the expensive ice cream makers.
Most recipes get this completely wrong. They add sugar, use low-fat milk, or forget to chill the mixture before freezing. The result is either a rubbery mess or a bland, watery dessert. Here’s what actually works: use ripe strawberries, a full can of sweetened condensed milk, and heavy whipping cream. Keep the mixture cold, and give it a good stir before freezing.
Picture yourself pulling this out of the fridge, the whole kitchen smelling incredible, and the first scoop is a splash of ruby red that melts into a cloud of cream. The anticipation builds as you watch the ice cream settle into a perfect, scoopable consistency. The moment you taste it, you’ll know why I’ve been bragging about this recipe for weeks. Let me walk you through every single step — by the end, you'll wonder how you ever made it any other way.
What Makes This Version Stand Out
Flavor: The natural sweetness of ripe strawberries is amplified by the caramel notes of condensed milk, creating a flavor profile that’s both familiar and surprising.
Texture: The heavy cream gives it a velvety mouthfeel that’s firm enough to hold its shape but soft enough to melt instantly, avoiding the icy texture that plagues many homemade ice creams.
Speed: No pre‑churn prep, no electric machine, no overnight freezing. You can have a scoop ready in under ten minutes.
Ingredient Quality: Fresh, organic strawberries and full‑fat heavy cream make the difference between a mediocre dessert and a luxurious experience.
Versatility: This base can be customized with a splash of vanilla, a hint of mint, or even a swirl of raspberry jam for a personalized touch.
Make‑Ahead Potential: Once frozen, the ice cream can be stored for up to a week and still taste as fresh as the first day.
Alright, let's break down exactly what goes into this masterpiece...
Inside the Ingredient List
The Flavor Base
Fresh strawberries are the heart of this dessert. They provide a natural sweetness that cuts through the richness of the cream. When they’re in season, they’re bursting with juice and flavor. If you use frozen berries, let them thaw completely and drain excess liquid to avoid a watery ice cream.
The strawberries also add a vibrant color that makes the dessert visually stunning. Their bright red hue is a visual cue that the flavor inside is equally bright. If you’re feeling adventurous, you can blend in a handful of blueberries for a subtle pop of blue.
Choosing the right strawberries matters. Look for firm, dark‑red berries with a slight shine. Avoid any that have brown spots or bruises, as they’ll add bitterness to the final product. Organic strawberries are preferable because they’re less likely to have been sprayed with pesticides that can affect taste.
If you’re in a pinch and can’t find fresh strawberries, frozen strawberries can work. Just be sure to thaw them fully and pat them dry to reduce excess moisture. The end result will still be creamy and flavorful, though the texture might be slightly different.
The strawberries are pureed first, which releases their natural juices and creates a smooth base for the rest of the ingredients to blend into.
The Sweetener & Binder
Sweetened condensed milk is the secret sauce that brings everything together. It’s thick, sweet, and rich, providing both flavor and a binding effect that keeps the ice cream from cracking. The sugar in the condensed milk also helps lower the freezing point, giving the dessert a smoother texture.
If you’re watching calories, you can use a low‑sugar version, but the texture will change slightly. The sweetness of the strawberries will still shine, but you might need to add a splash of vanilla or a pinch of sea salt to balance the flavor.
The condensed milk also has a caramelized flavor that pairs beautifully with the bright fruit. It gives the dessert a depth of flavor that’s often missing in simple fruit sorbets.
When adding the condensed milk, pour it slowly into the blender to avoid splattering. A slow, steady pour helps the milk mix smoothly with the strawberry puree.
The condensed milk’s thick consistency means you only need a small amount to achieve a creamy texture, making it an economical choice for a dessert that feels luxurious.
The Cream Crew
Heavy whipping cream is the final layer that gives the ice cream its signature silkiness. It adds fat, which is essential for a smooth mouthfeel and helps prevent ice crystals from forming.
The cream also balances the sweetness of the condensed milk. Its natural tanginess cuts through the richness, creating a harmonious flavor profile.
If you don’t have heavy cream, you can substitute half-and-half, but the texture will be slightly less dense. For a lighter version, use coconut cream, which will give the dessert a subtle coconut undertone.
Whip the cream until it’s soft peaks before folding it in. This step incorporates air, making the final product airy and light.
When you fold the cream into the strawberry mixture, do so gently. Overmixing can cause the mixture to become too thick and hard to freeze properly.
Everything's prepped? Good. Let's get into the real action...
The Method — Step by Step
- Wash the strawberries under cold running water, then pat them dry with a paper towel. Remove the stems and any brown spots. This step ensures a clean, pure flavor and a bright color. The aroma of fresh fruit will start to fill your kitchen even before you start blending.
- Add the strawberries to a high‑speed blender. Pulse until they are completely pureed, forming a thick, smooth base. If you prefer a chunkier texture, pulse a few more times to leave small berry pieces. This step is the foundation; a smooth puree is key to avoiding ice crystals.
- Slowly pour the can of sweetened condensed milk into the blender while it runs on low speed. The mixture will start to thicken and the aroma of caramelized sugar will intensify. Watch for the mixture to become silky and glossy—this is the sweet, binding layer.
- Whip the heavy cream in a separate bowl until it forms soft peaks. The peaks should hold their shape for a few seconds before softening again. This process incorporates air, giving the final ice cream a light, airy quality.
- Gently fold the whipped cream into the strawberry‑condensed milk mixture. Use a spatula and a gentle, circular motion to combine without deflating the cream. The folded mixture should be smooth, with a glossy sheen that indicates proper incorporation.
- Transfer the mixture to a shallow, freezer‑safe container. Smooth the top with a spatula and cover tightly with plastic wrap or a lid. The shallow depth allows the mixture to freeze evenly, preventing ice crystals from forming.
- Freeze for at least 4 hours, or until the edges are firm but the center remains slightly soft. If you prefer a firmer texture, let it freeze for an additional hour or two. The longer it sits, the more the flavors meld together.
- Before serving, let the ice cream sit at room temperature for 2–3 minutes to soften slightly. Scoop into bowls or cones, and enjoy the instant burst of strawberry and cream. If you like, drizzle a little extra condensed milk or sprinkle fresh strawberries on top.
That's it — you did it. But hold on, I've got a few more tricks that'll take this to another level. I’ve been experimenting with different flavor infusions and serving styles that will blow your mind.
Insider Tricks for Flawless Results
The Temperature Rule Nobody Follows
The key to perfect ice cream is starting with a cold base. Chill the blender jar and the container in the fridge for at least an hour before you begin. A colder base means the mixture will freeze faster, reducing the formation of ice crystals.
I tried using a pre‑chilled container once, and the ice cream turned out smoother and more scoopable. The cold environment also helps the whipped cream retain its airy structure when folded in.
If you’re short on time, you can place the mixture in a bowl of ice water for 10 minutes before freezing. This trick helps bring the temperature down quickly.
Why Your Nose Knows Best
Smell is a powerful indicator of freshness. As soon as the strawberries hit the blender, their aroma will change from raw to sweet and fragrant. This shift signals that the fruit is ripe and ready.
If you notice a sour or off smell, it’s a sign that the berries are starting to spoil. In that case, discard them and use fresh ones. The aroma will guide you to the best flavor.
The 5-Minute Rest That Changes Everything
After folding the cream in, let the mixture rest for five minutes before transferring it to the freezer. This short rest allows the flavors to meld and the mixture to thicken slightly.
I’ve seen people skip this step and end up with a lumpy texture. The five‑minute pause is a small but essential part of the process.
A Pinch of Salt for Depth
Adding a pinch of sea salt can elevate the sweetness of the strawberries and balance the richness of the cream. The salt acts like a flavor enhancer, making the dessert feel more complex.
Use a fine sea salt or Himalayan pink salt for the best effect. A little goes a long way, so start with a pinch and adjust to taste.
Stirring Technique for Smoothness
When you fold the whipped cream in, use a large spatula and a gentle, sweeping motion. Avoid stirring back and forth, which can break the air bubbles and create a denser texture.
If the mixture starts to look lumpy, give it a quick whisk to smooth it out. A smooth surface ensures that the ice cream freezes evenly.
The Freezer‑Safe Container Trick
Choose a shallow, wide container for freezing. A shallow depth ensures that the mixture freezes quickly and evenly, preventing ice crystals from forming.
If you don’t have a shallow container, you can line a larger one with parchment paper to create a shallow layer. This method keeps the ice cream flat and scoopable.
The 5-Minute Rest That Changes Everything
I’ll be honest — I ate half the batch before anyone else got to try it. The first scoop was so creamy and fruity that I couldn’t stop. That moment when you taste the perfect balance is a culinary revelation.
The next time you make this ice cream, try adding a splash of vanilla extract or a pinch of nutmeg for a different twist. The possibilities are endless, and the results are always delicious.
Creative Twists and Variations
This recipe is a playground. Here are some of my favorite ways to switch things up:
Balsamic Strawberry Swirl
Add a tablespoon of aged balsamic vinegar to the strawberry puree. The vinegar adds a subtle tang that pairs beautifully with the sweetness. The result is a sophisticated, wine‑inspired ice cream.
Minted Raspberry Dream
Swap half of the strawberries for fresh raspberries and fold in a handful of fresh mint leaves. The mint gives a refreshing lift, while the raspberries add a darker hue.
Chocolate‑Covered Delight
Dip the finished ice cream scoops in melted dark chocolate for a decadent dessert. The chocolate adds a rich, bittersweet layer that complements the fruit.
Coconut‑Infused Bliss
Replace the heavy cream with coconut cream for a tropical twist. The coconut flavor pairs wonderfully with the strawberries, creating a beach‑inspired treat.
Spiced Chai Variation
Stir in a pinch of ground cinnamon, cardamom, and ginger before folding in the cream. The spices add warmth and depth, turning the dessert into a cozy, spiced treat.
Berry‑Cheese Fusion
Serve the ice cream with a dollop of mascarpone or a spoonful of ricotta. The creamy cheese balances the fruitiness and adds a silky texture.
These variations are just the tip of the iceberg. Feel free to experiment and make the dessert your own. The beauty of this recipe is that it’s a blank canvas waiting for your creative touch.
Storing and Bringing It Back to Life
Fridge Storage
Store the ice cream in a tightly sealed container in the refrigerator for up to 3 days. The cold environment keeps it firm and prevents it from absorbing odors from other foods. When you’re ready to serve, let it sit at room temperature for 2–3 minutes to soften slightly.
If you notice any ice crystals forming, give the container a gentle shake to redistribute the mixture. The ice crystals are normal but can be minimized by ensuring the mixture was frozen evenly.
For an extra touch of luxury, garnish the final scoop with fresh strawberries or a drizzle of condensed milk before serving.
Freezer Friendly
The ice cream can be stored in the freezer for up to 2 weeks. Keep it in a shallow, airtight container to maintain texture and flavor. If the ice cream becomes too hard, let it sit at room temperature for 5 minutes before scooping.
When refreezing, do not thaw the entire batch. Instead, only thaw the amount you plan to serve and refreeze the rest. This practice preserves the integrity of the ice cream.
If you prefer a firmer texture, freeze the mixture for an additional hour before serving. The longer it sits, the more the flavors meld together.
Best Reheating Method
If you accidentally melt the ice cream, you can bring it back to life by placing the container in a bowl of ice water for 5 minutes. This gentle reheating helps restore the creamy texture without over‑melt.
Add a splash of heavy cream or a tablespoon of milk to the mixture before reheating. The added liquid steams and helps the ice cream regain its smoothness.
Avoid microwaving the ice cream, as it can create hot spots and ruin the texture. The ice water method preserves the delicate balance of flavors and consistency.